Tracksolid Pro App
 |
The Tracksolid Pro app is available for both iOS and Android. The Tracksolid Pro Website can be used to view Location and Trip History, Live & Recorded Video and Event & Alerts History and Video. |
App Navigation
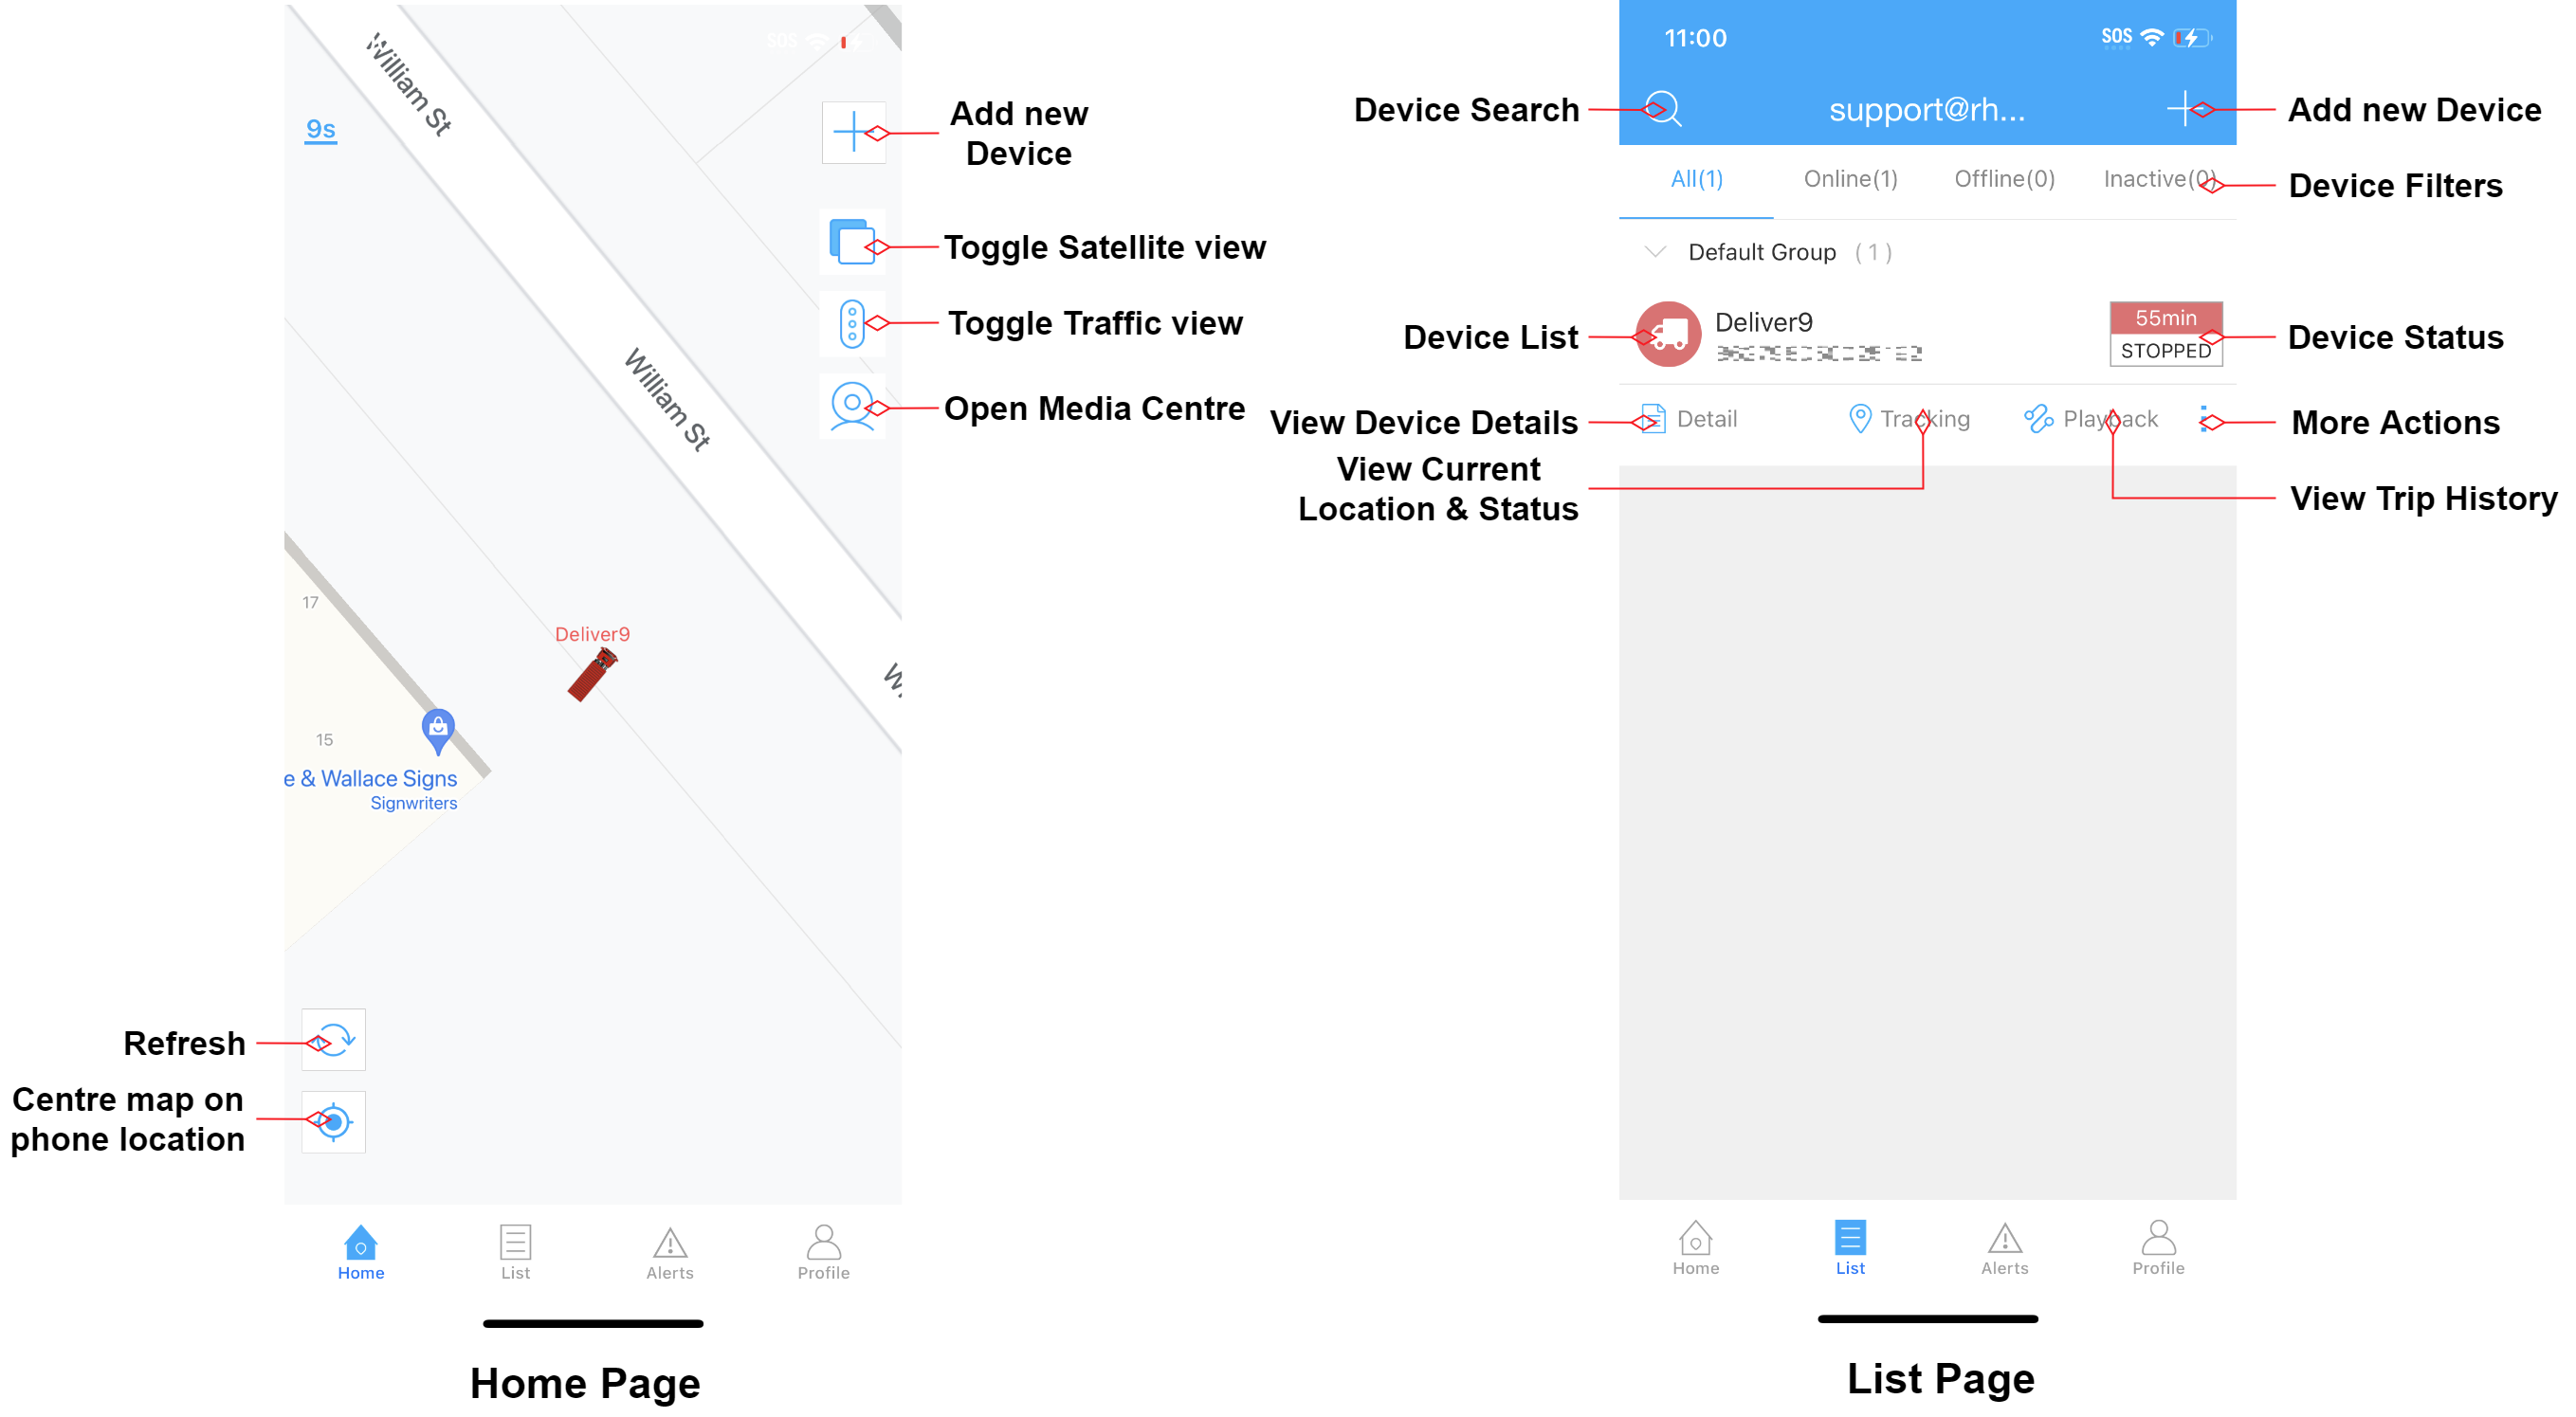
Location & Trip History
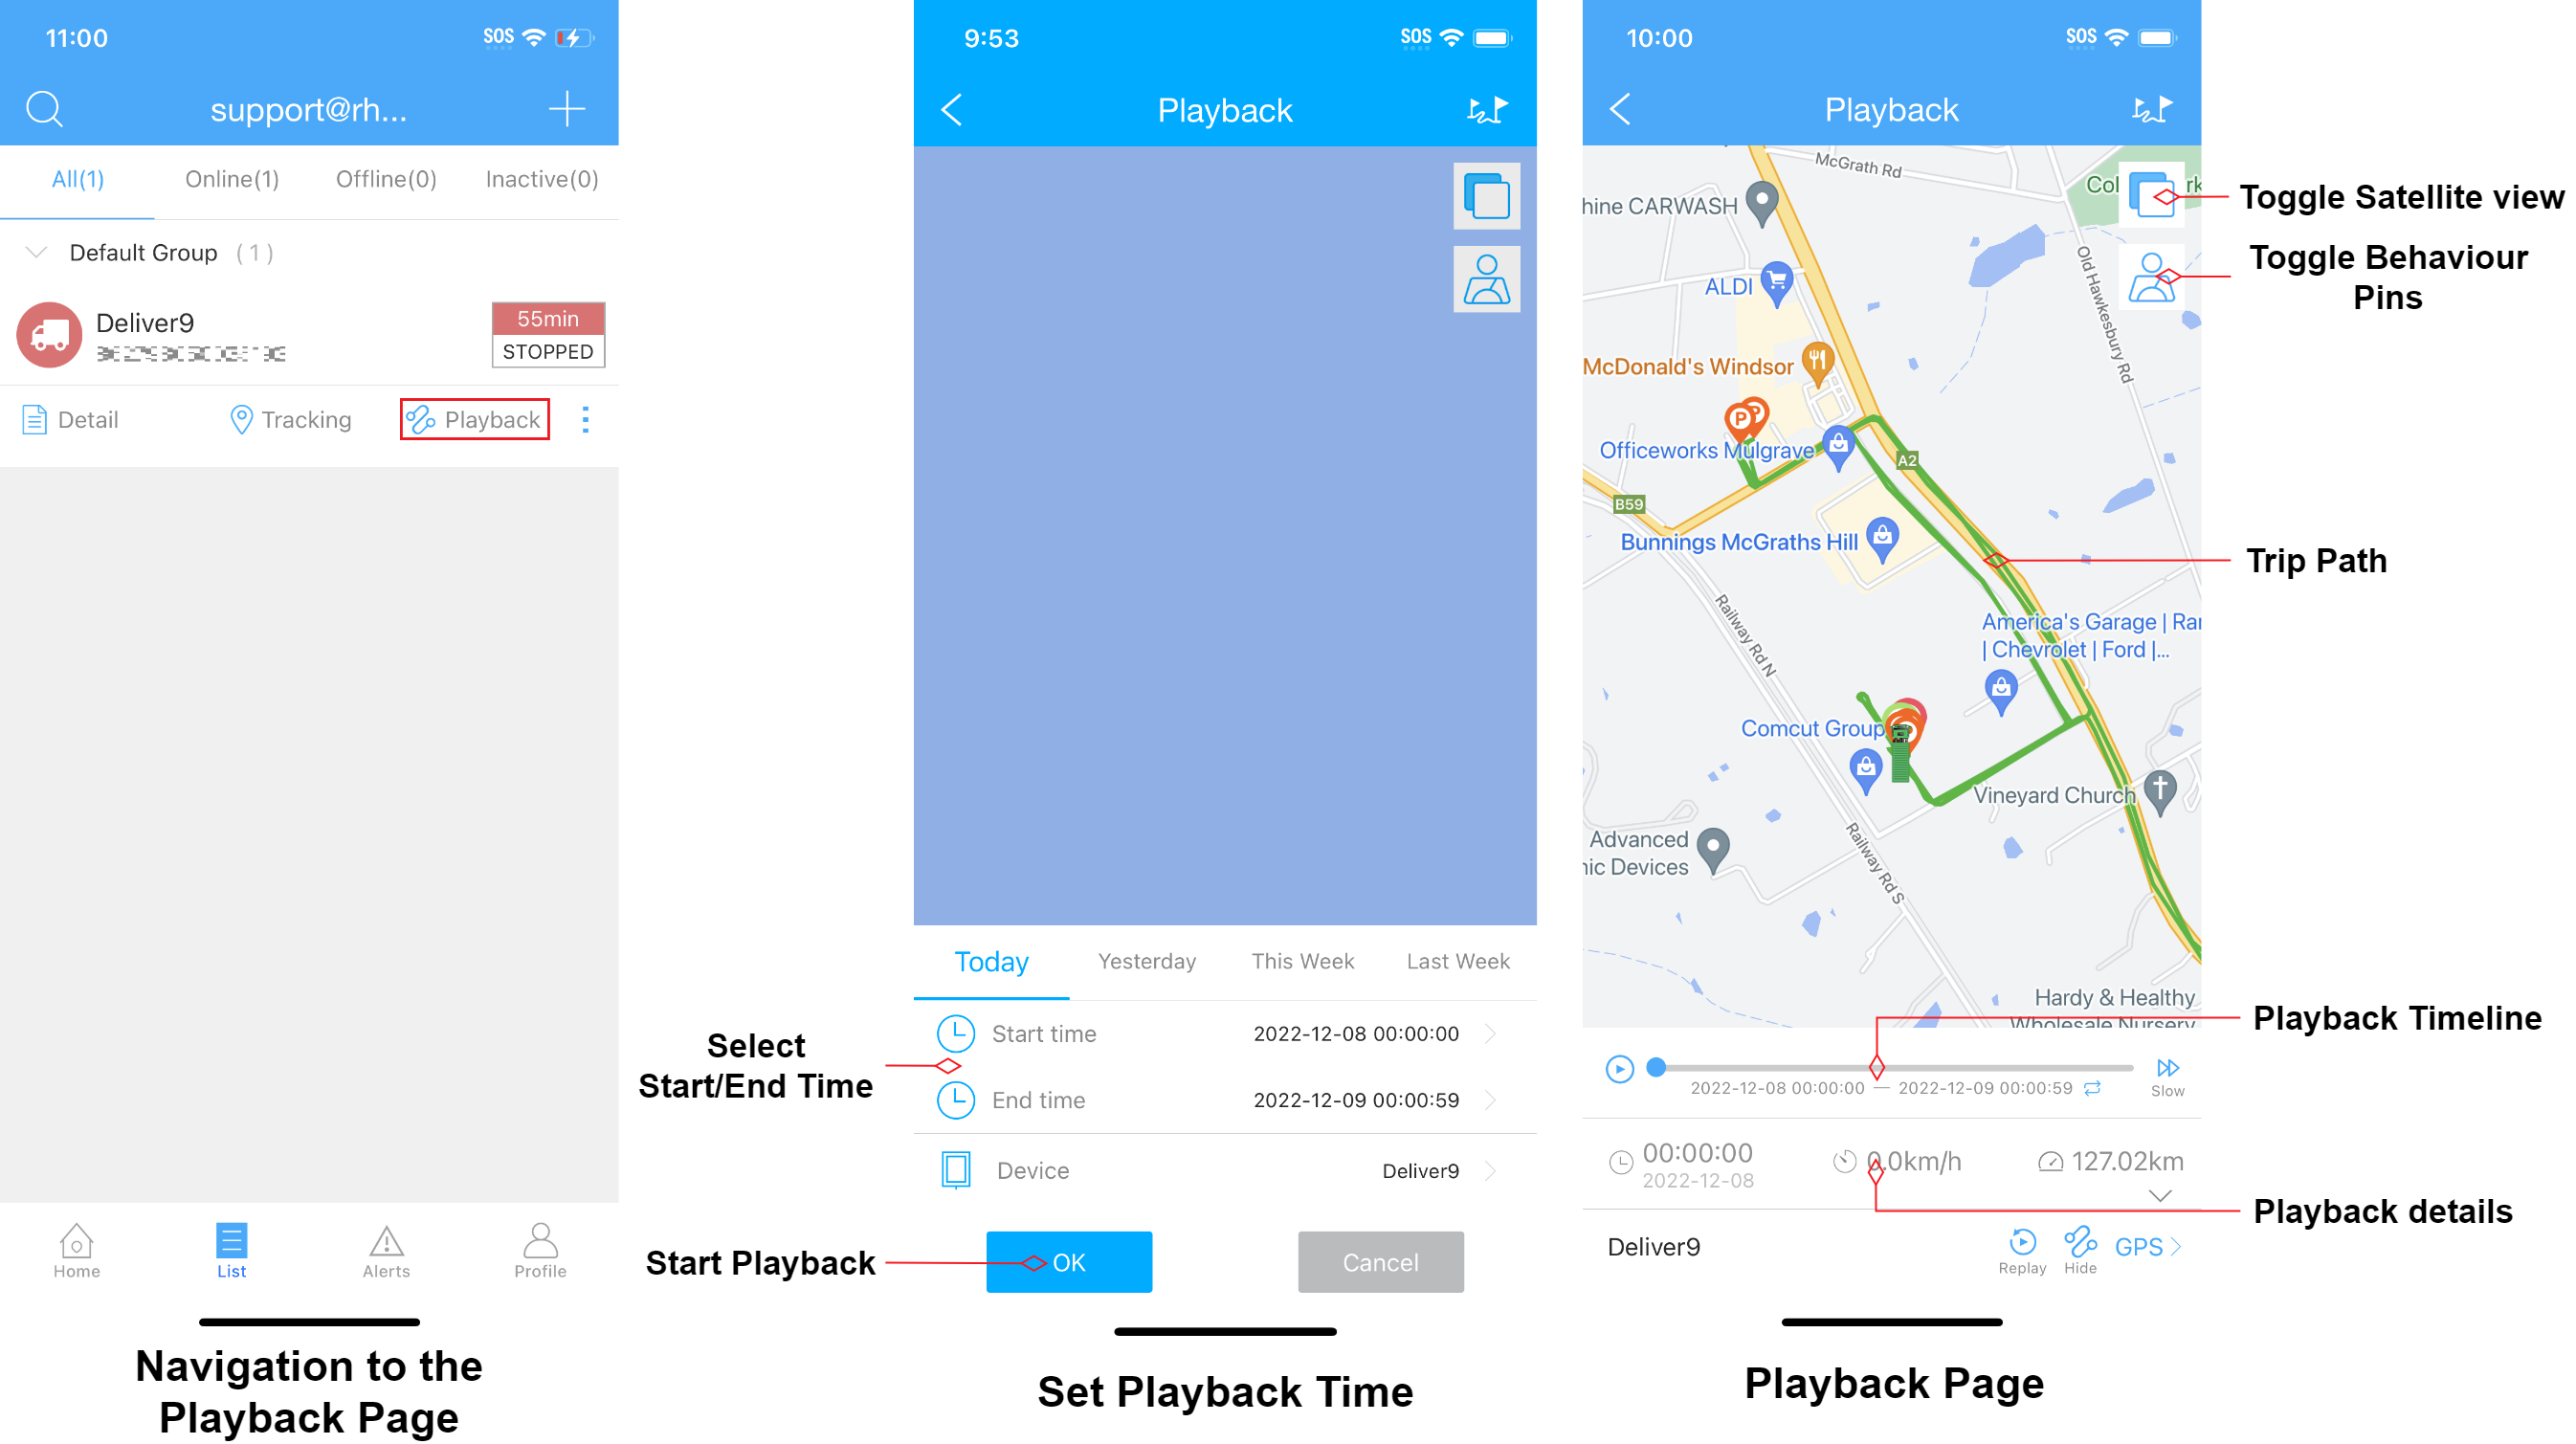
The MDVR-J400 will display the vehicles current GPS location, as well as other details such as current speed. It will also record any driving done as a 'trip' which can be viewed later in the Tracksolid Pro app.
Live & Recorded Video
The MDVR-J400 has an external front facing camera, and an internal driver facing camera.
When the vehicle's ignition is on, the external and internal cameras will record footage to the MicroSD card installed in the MDVR-J400 and the internal flash memory. If an event happens (Crash, vibration, etc) footage will be uploaded to the cloud and can be viewed in the even history if it has been configured.
View Live camera video feed
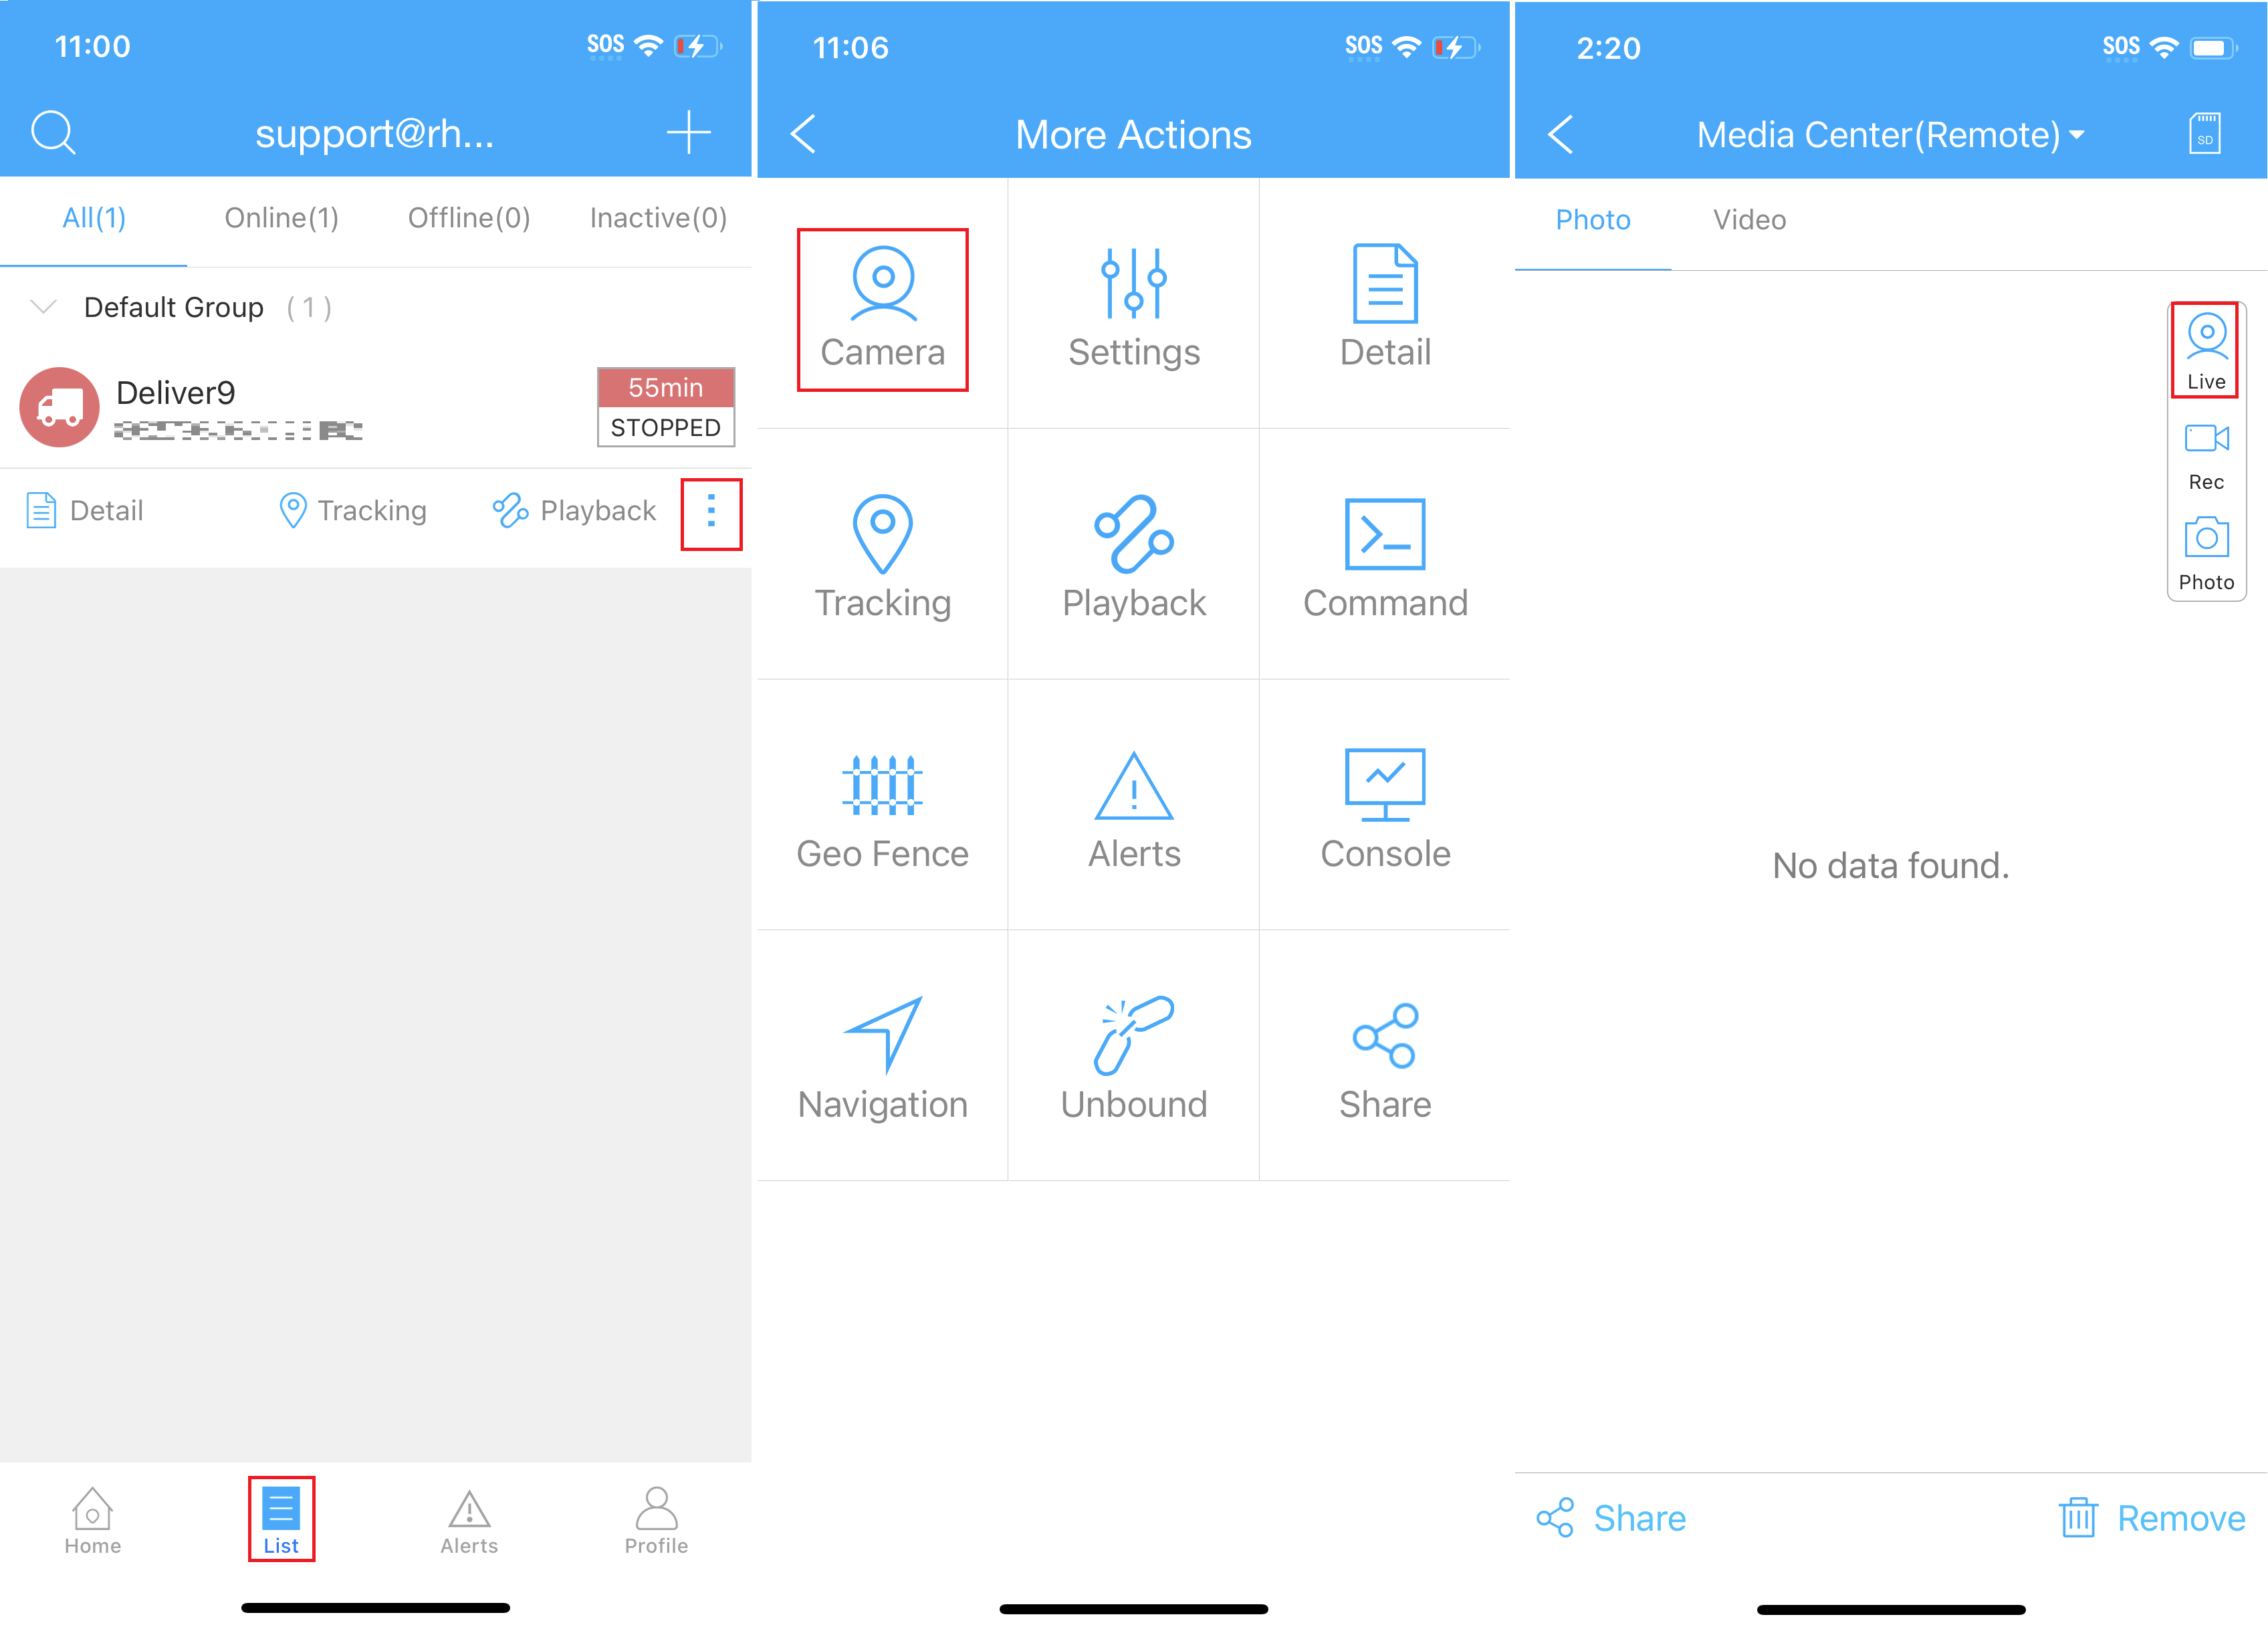
To reach the the camera page, navigate to  >
>  >
>  >
>  .
.
If the vehicle ACC is off, it may take a few minutes to load as the MDVR-J400 will need to wake up first.
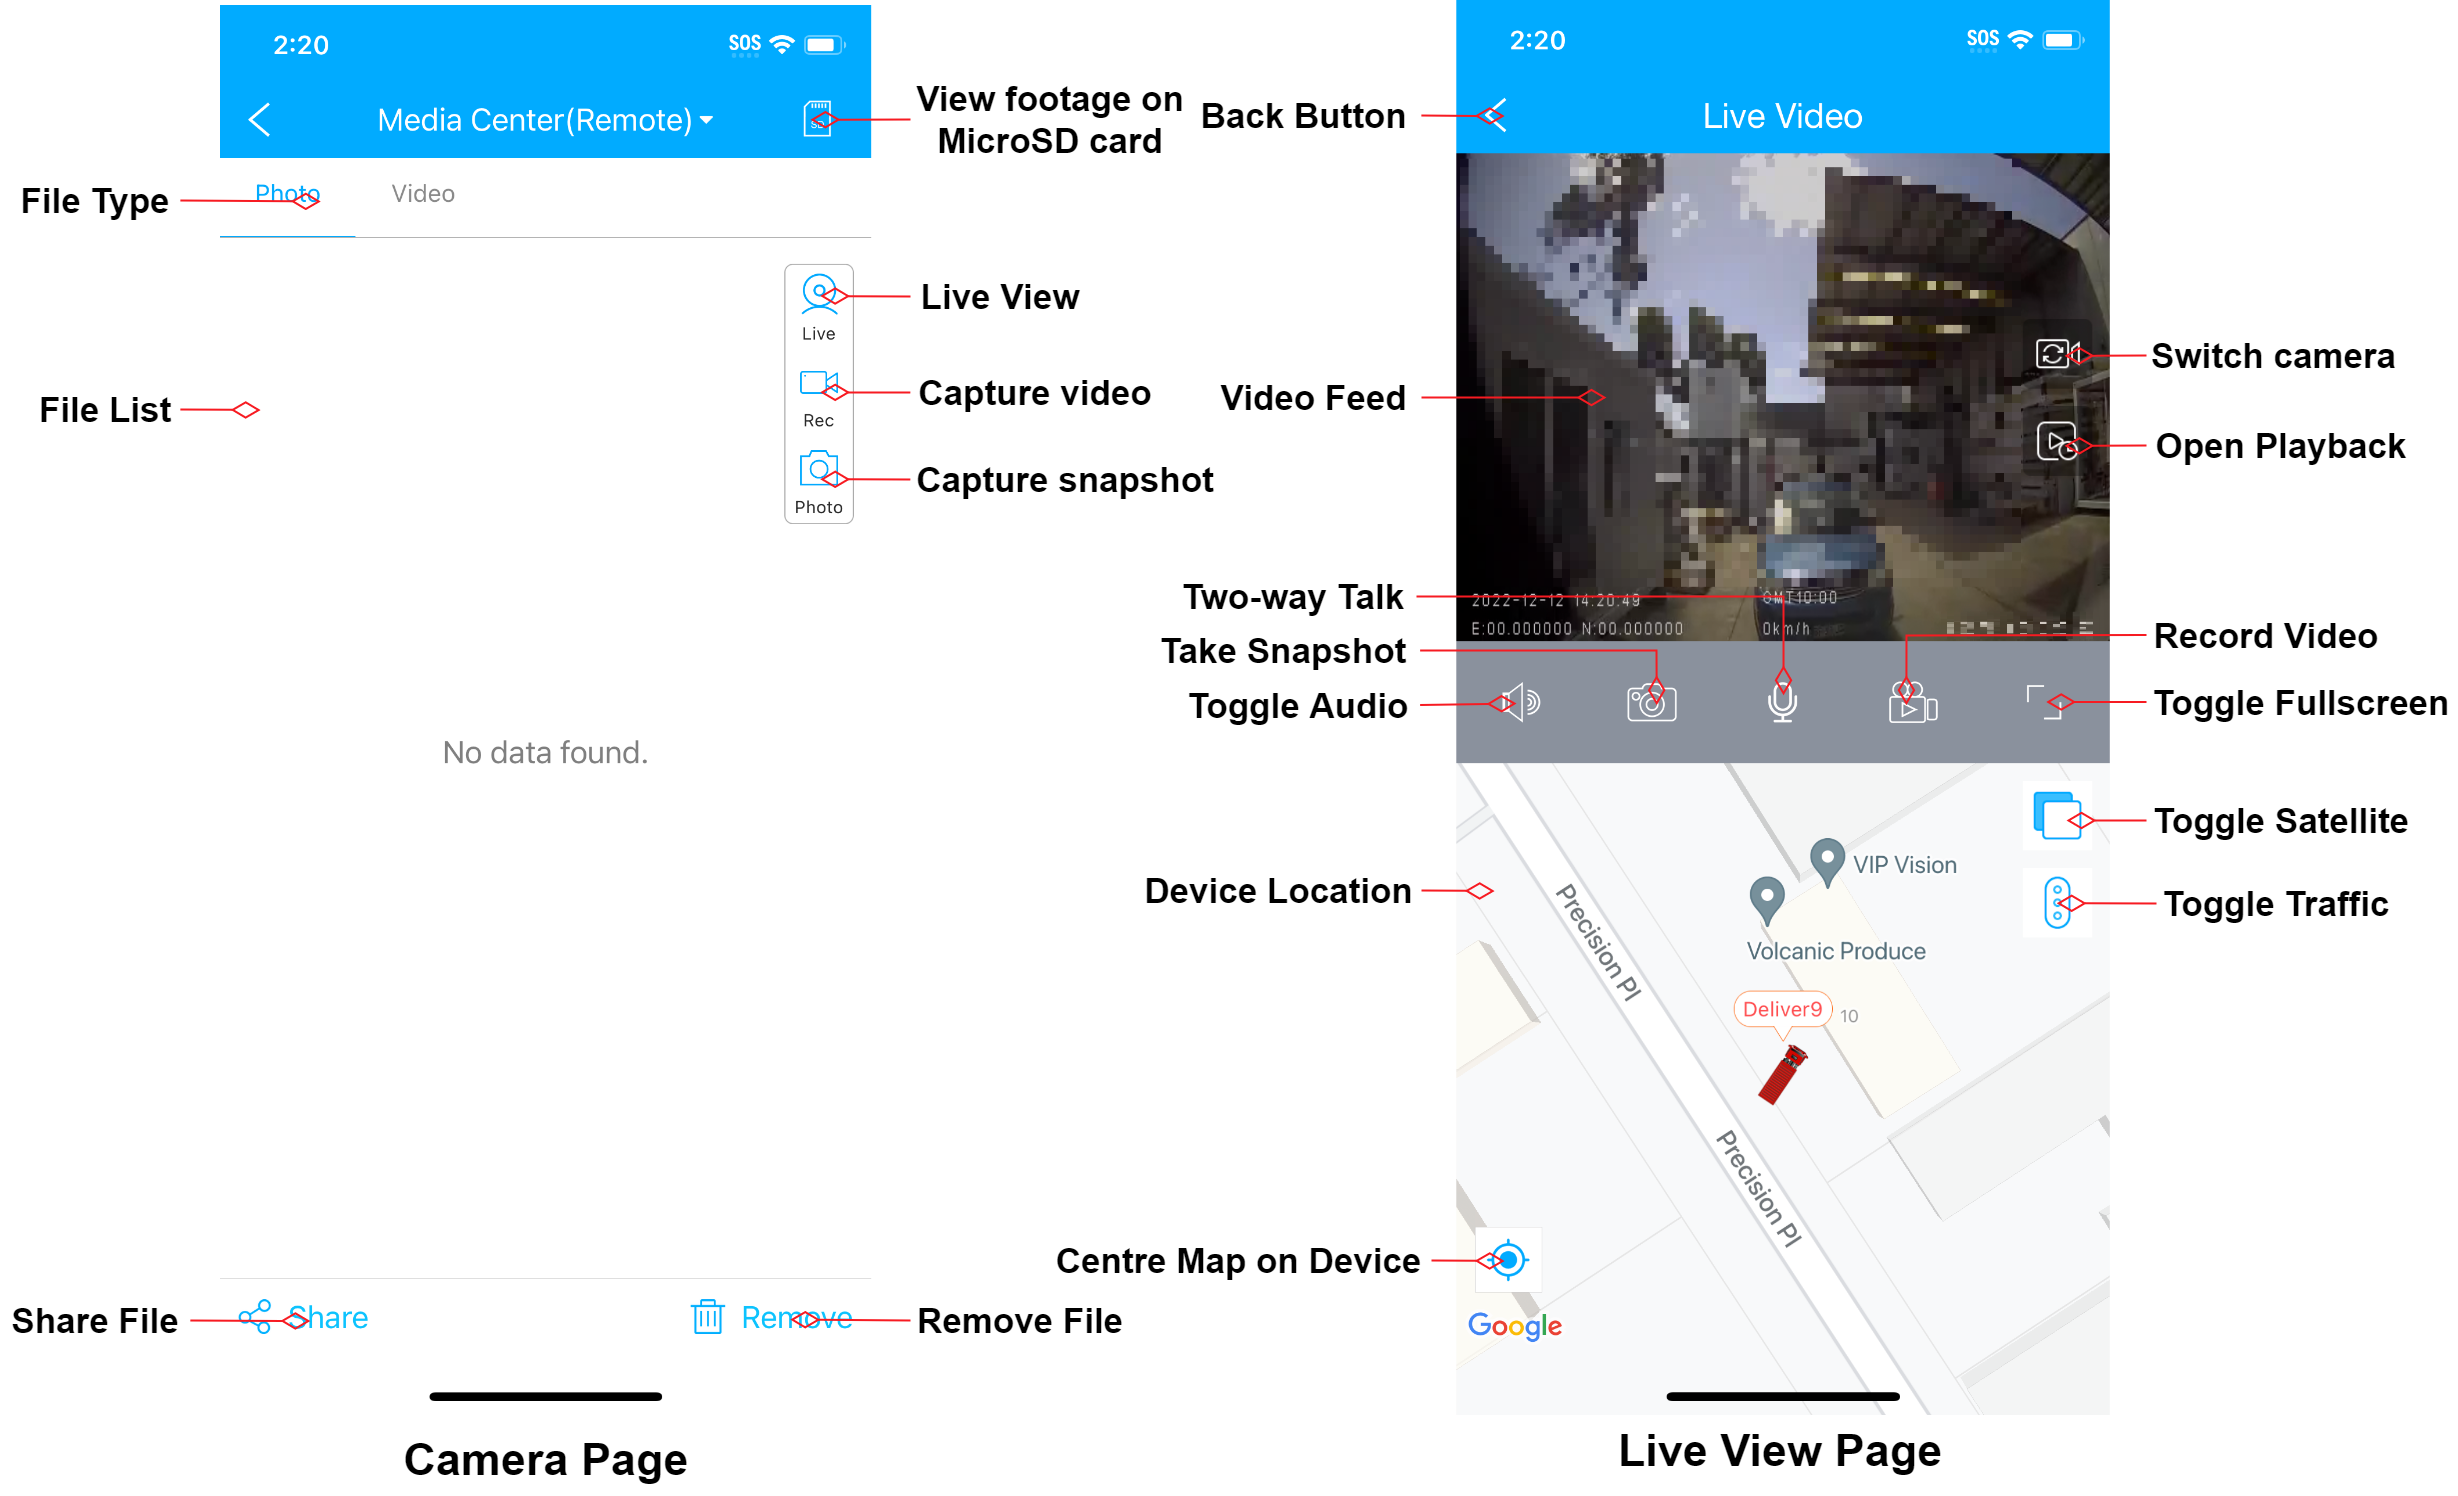
View and export recorded footage
 |
Tap on the MDVR-J400 device you wish to view footage for. |
 |
Tap on the  icon. icon. |
 |
Tap on the  icon icon |
 |
The WiFi of the device will turn on. Take note of the SSID & Password |
 |
Go to your WiFi networks on your phone. Join the WiFi network whose SSID matches the previous step. |
 |
Select FrontCam (Main, street facing camera) or InwardCam (Secondary, driver facing camera). |
 |
Tap on the folder for the Date you wish to view. |
 |
Tap the  icon to play the file. icon to play the file.Tap on the  icon to expand the options for the file. icon to expand the options for the file.Tap the  icon to download the clip. icon to download the clip.Tap on the  icon to view the downloaded clips, or view them in your phone's storage icon to view the downloaded clips, or view them in your phone's storage |
Delete
Alerts & Events
The MDVR-J400 can be configured to create an alert if particular behaviour is observed. The alert details and location can be viewed on the Tracksolid Pro App. You can also choose to upload video from one or more of the cameras to the cloud for an event.
Alert/Event examples:
- SOS Alert (SOS Button is pressed)
- Driving Behaviour Alert (Harsh Acceleration, Break Deceleration, Sharp Turn)
- Vibration Alert
- Crash Alert
- Geofence Alert (Alert when the vehicle enters a Geofence (Pre-defined area on map))
- Fatigue Driving
- Power Off
- Low External Power
View Alert History & Details
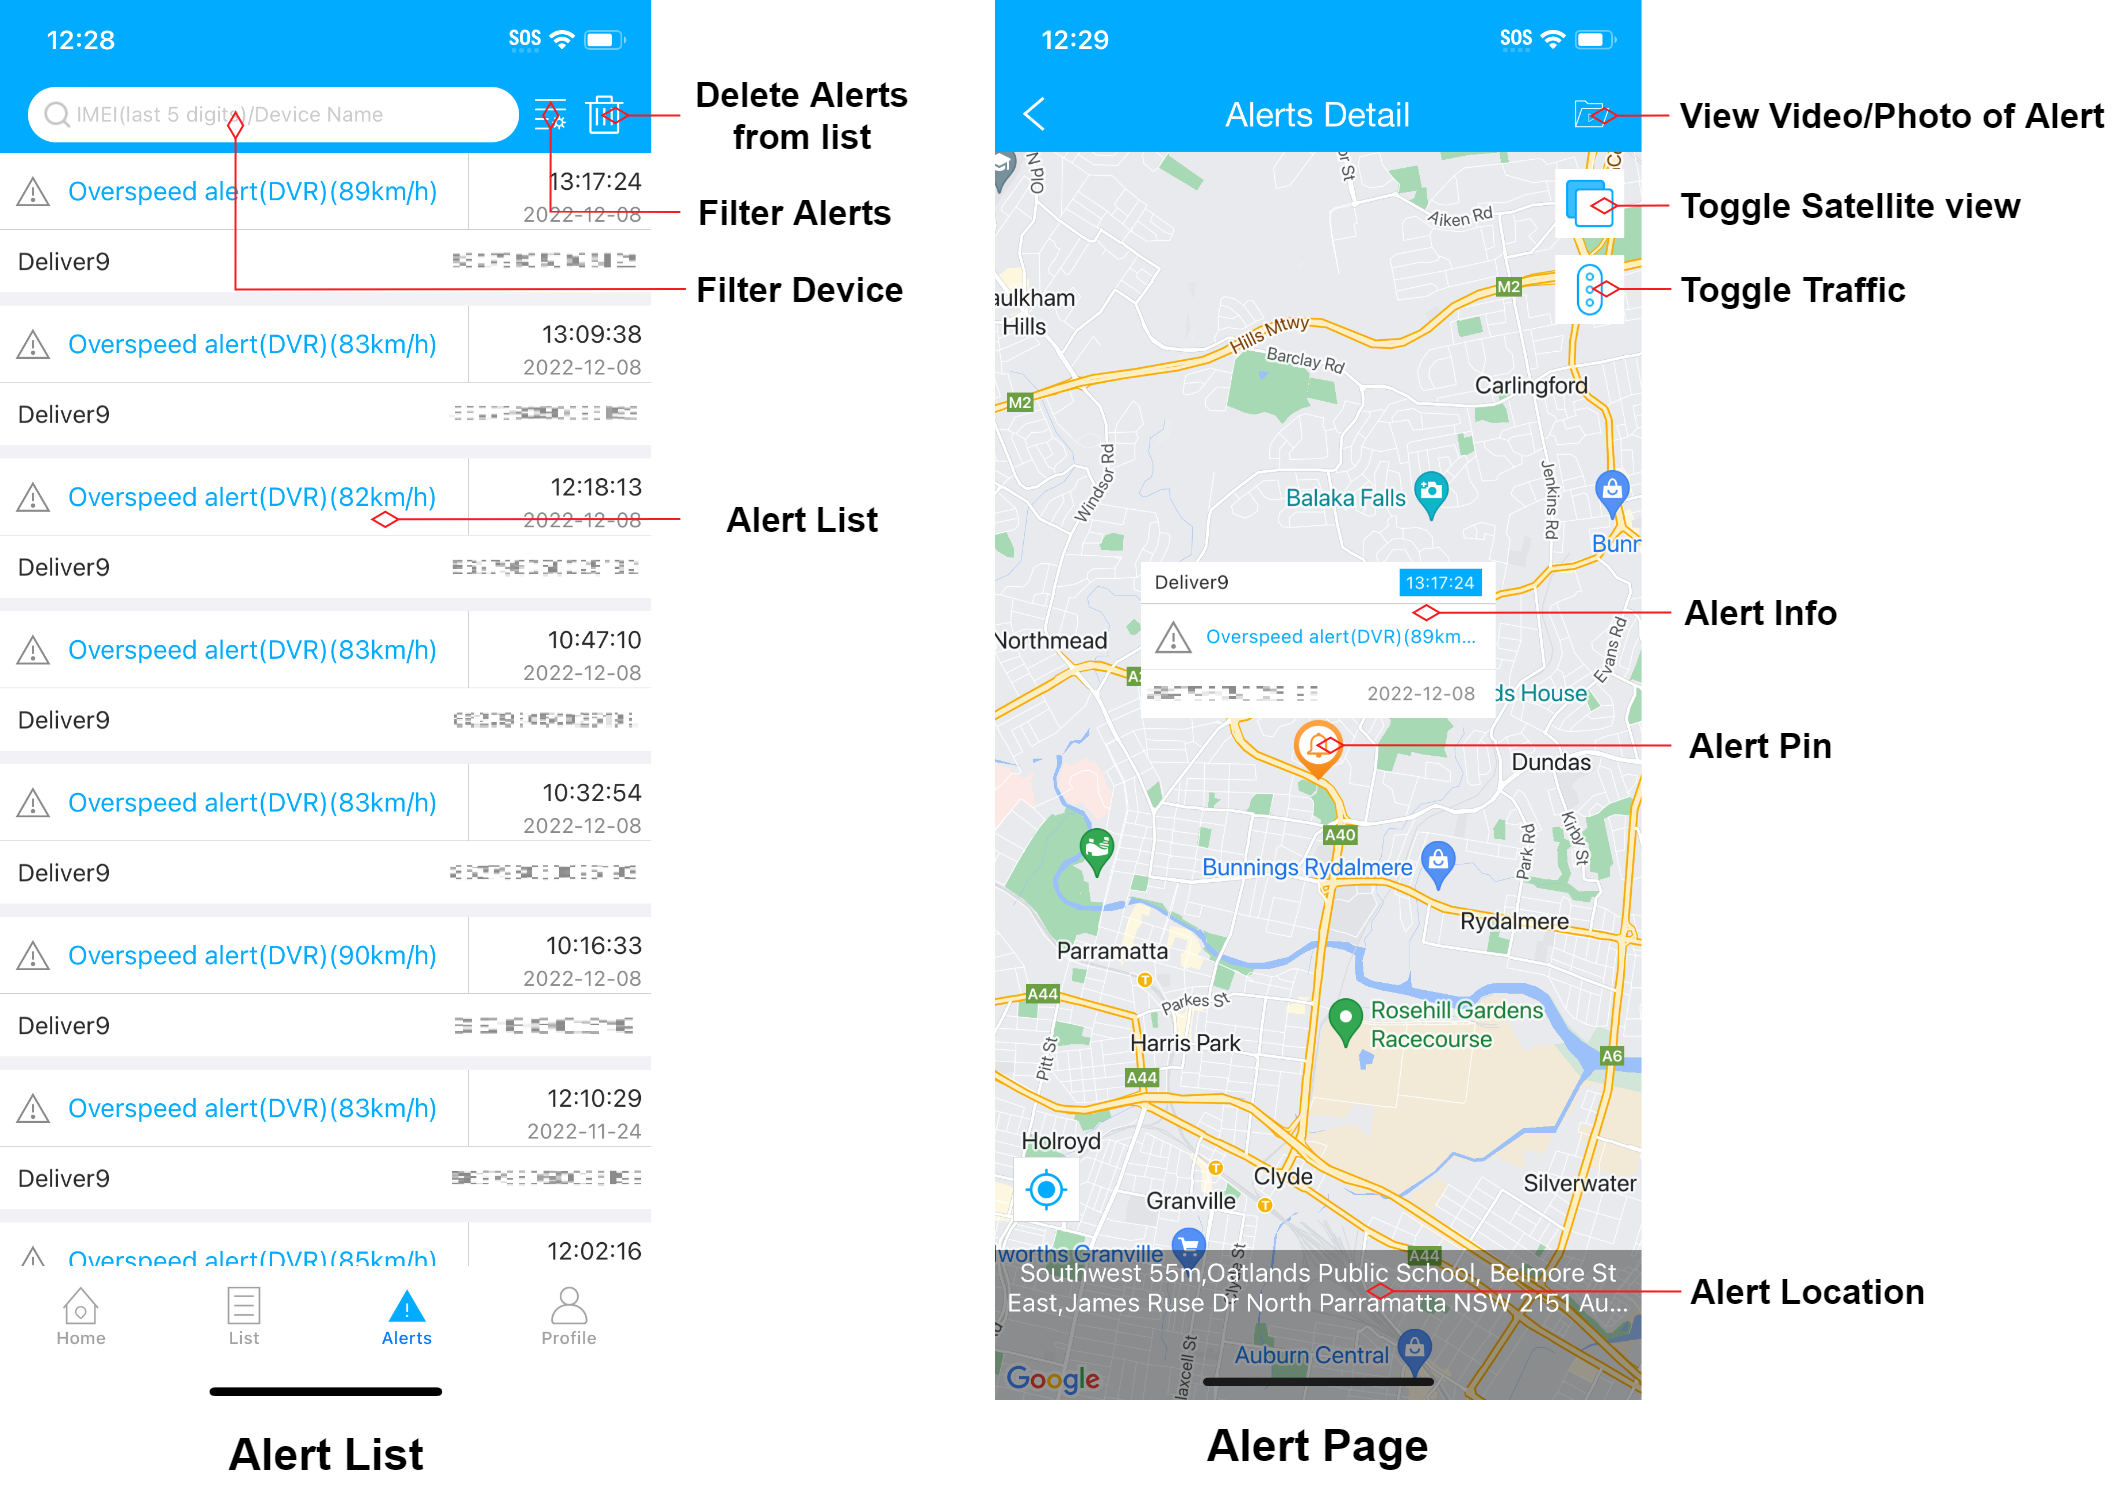
- Tap on
 to open the Alert List.
 - Tap on the Alert you wish to view more information for.
View Uploaded Event Videos
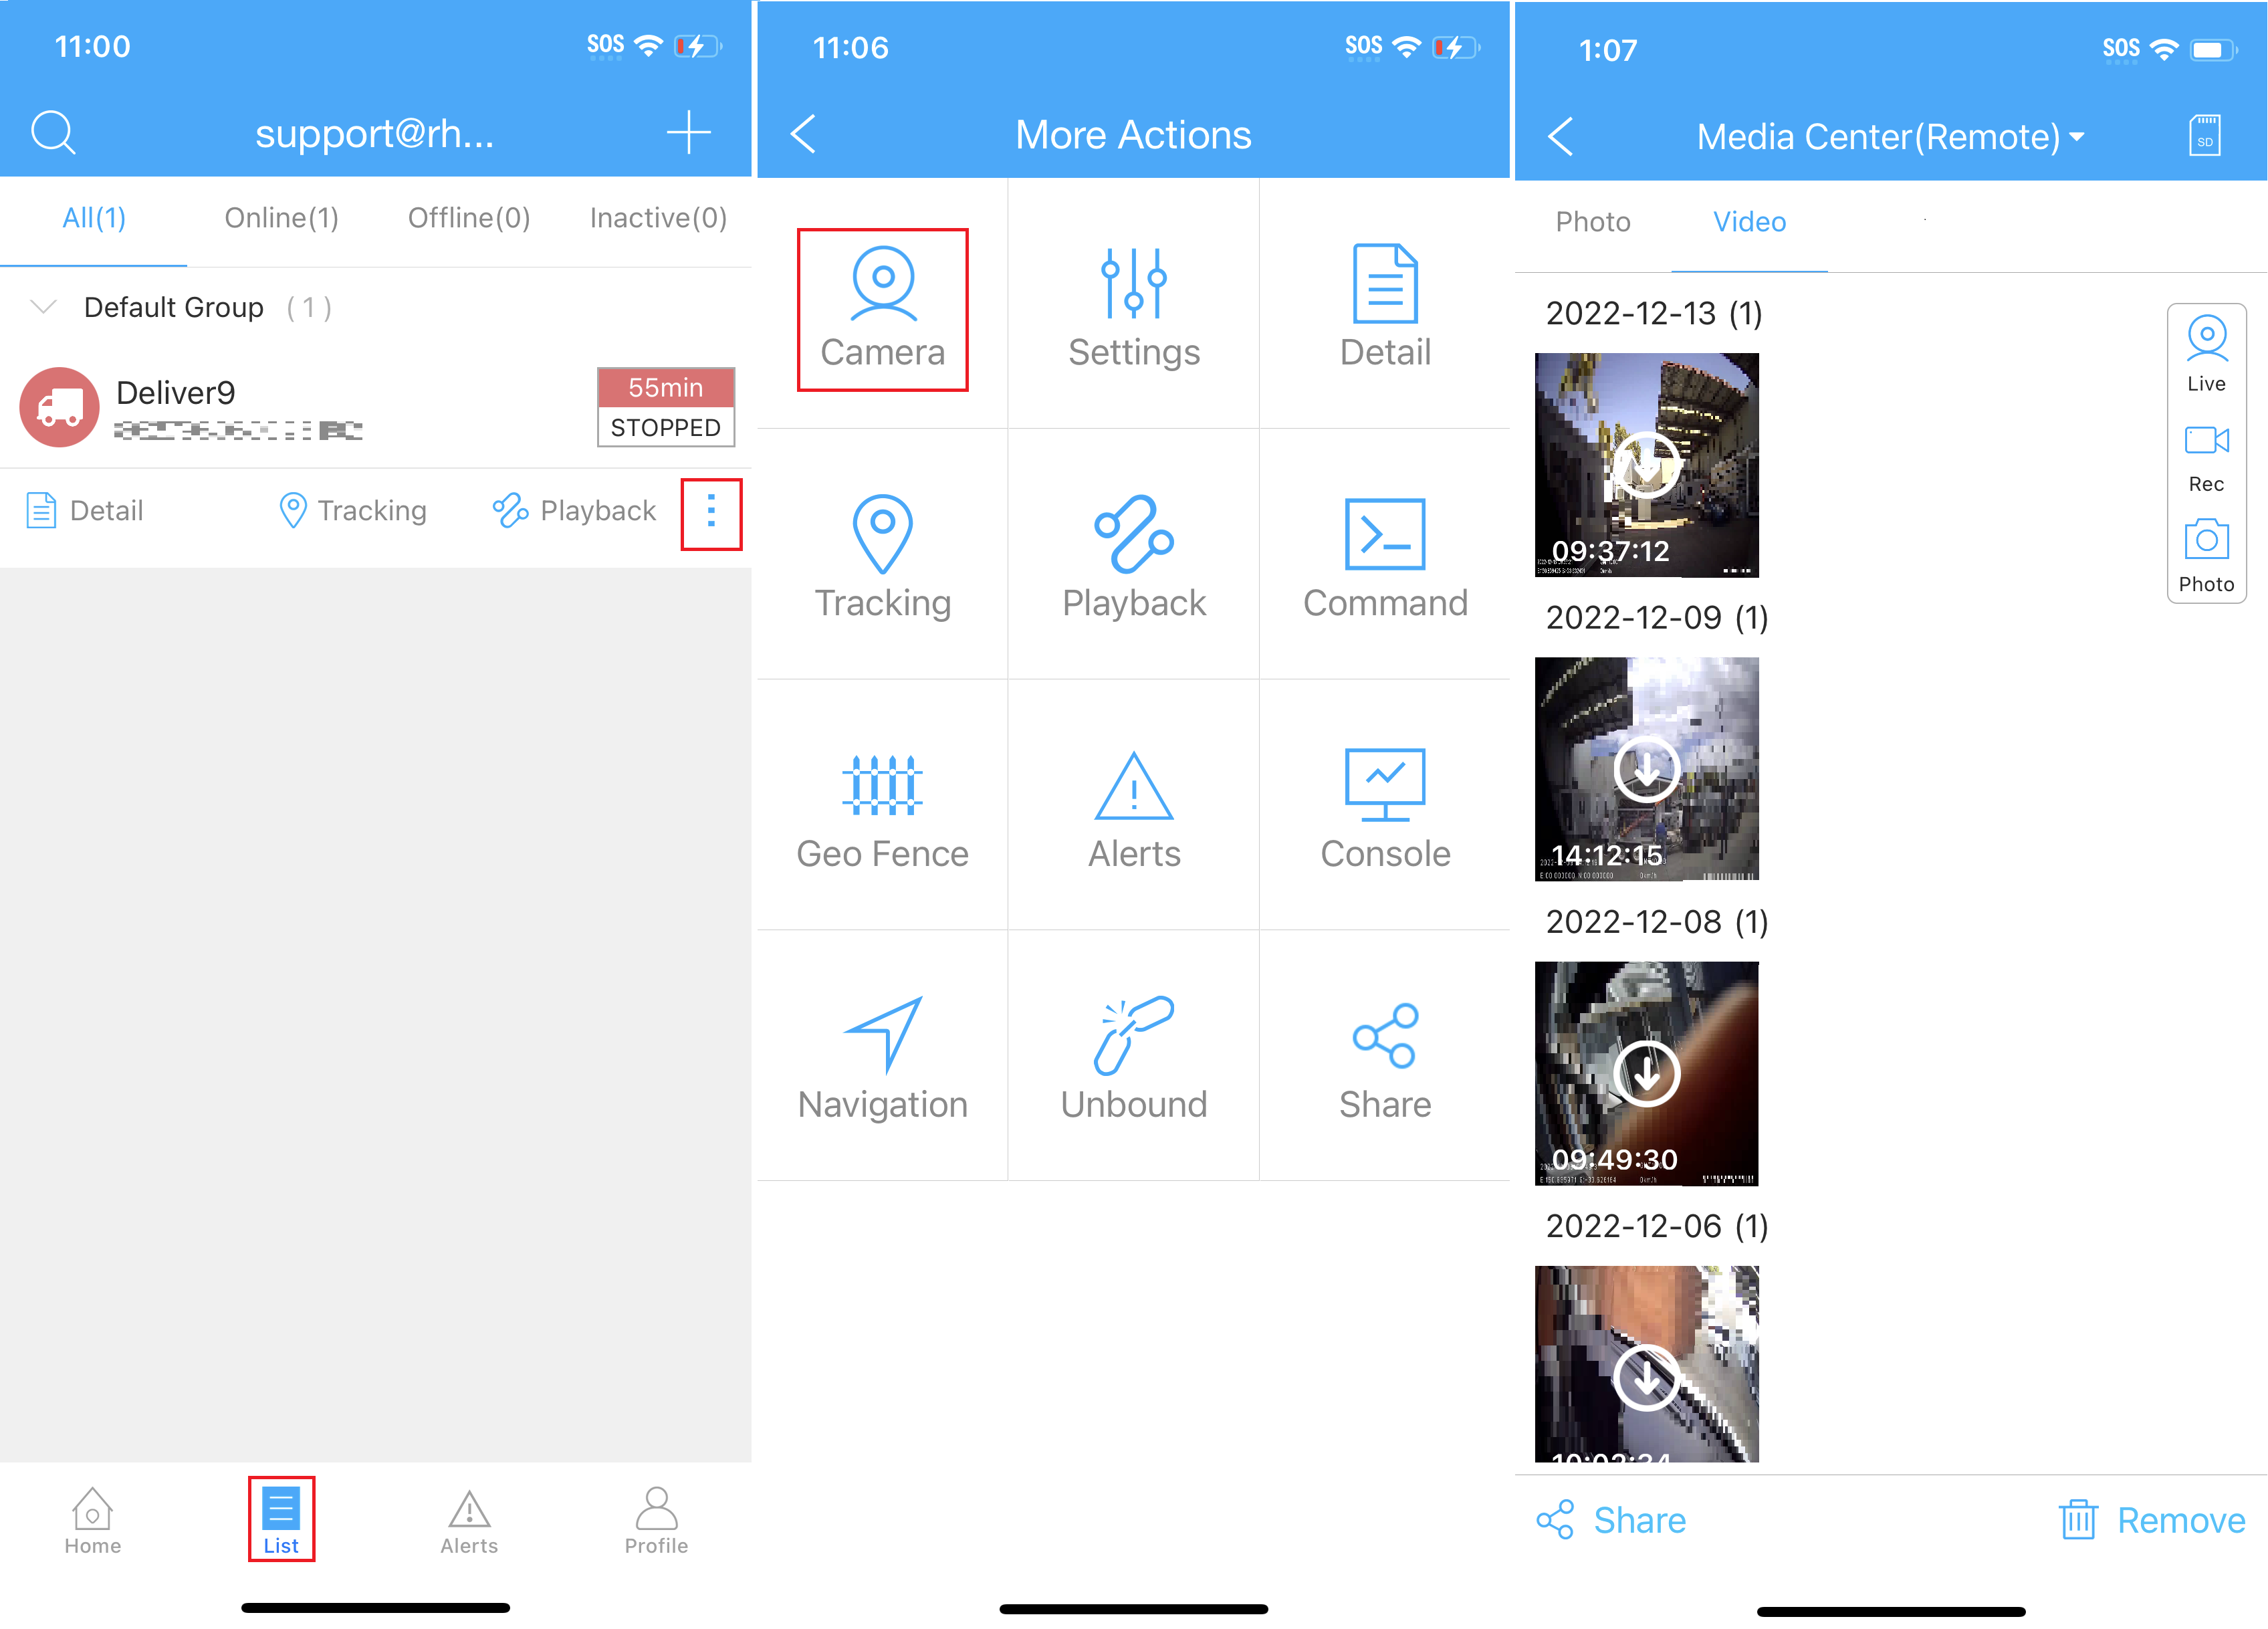
To view the event videos, navigate to  >
>  >
>  then tap on the video tab.
Tap on the file to download it. Once it has been downloaded, tap on it again to play the video.
Configure Alerts and Event Video Uploads
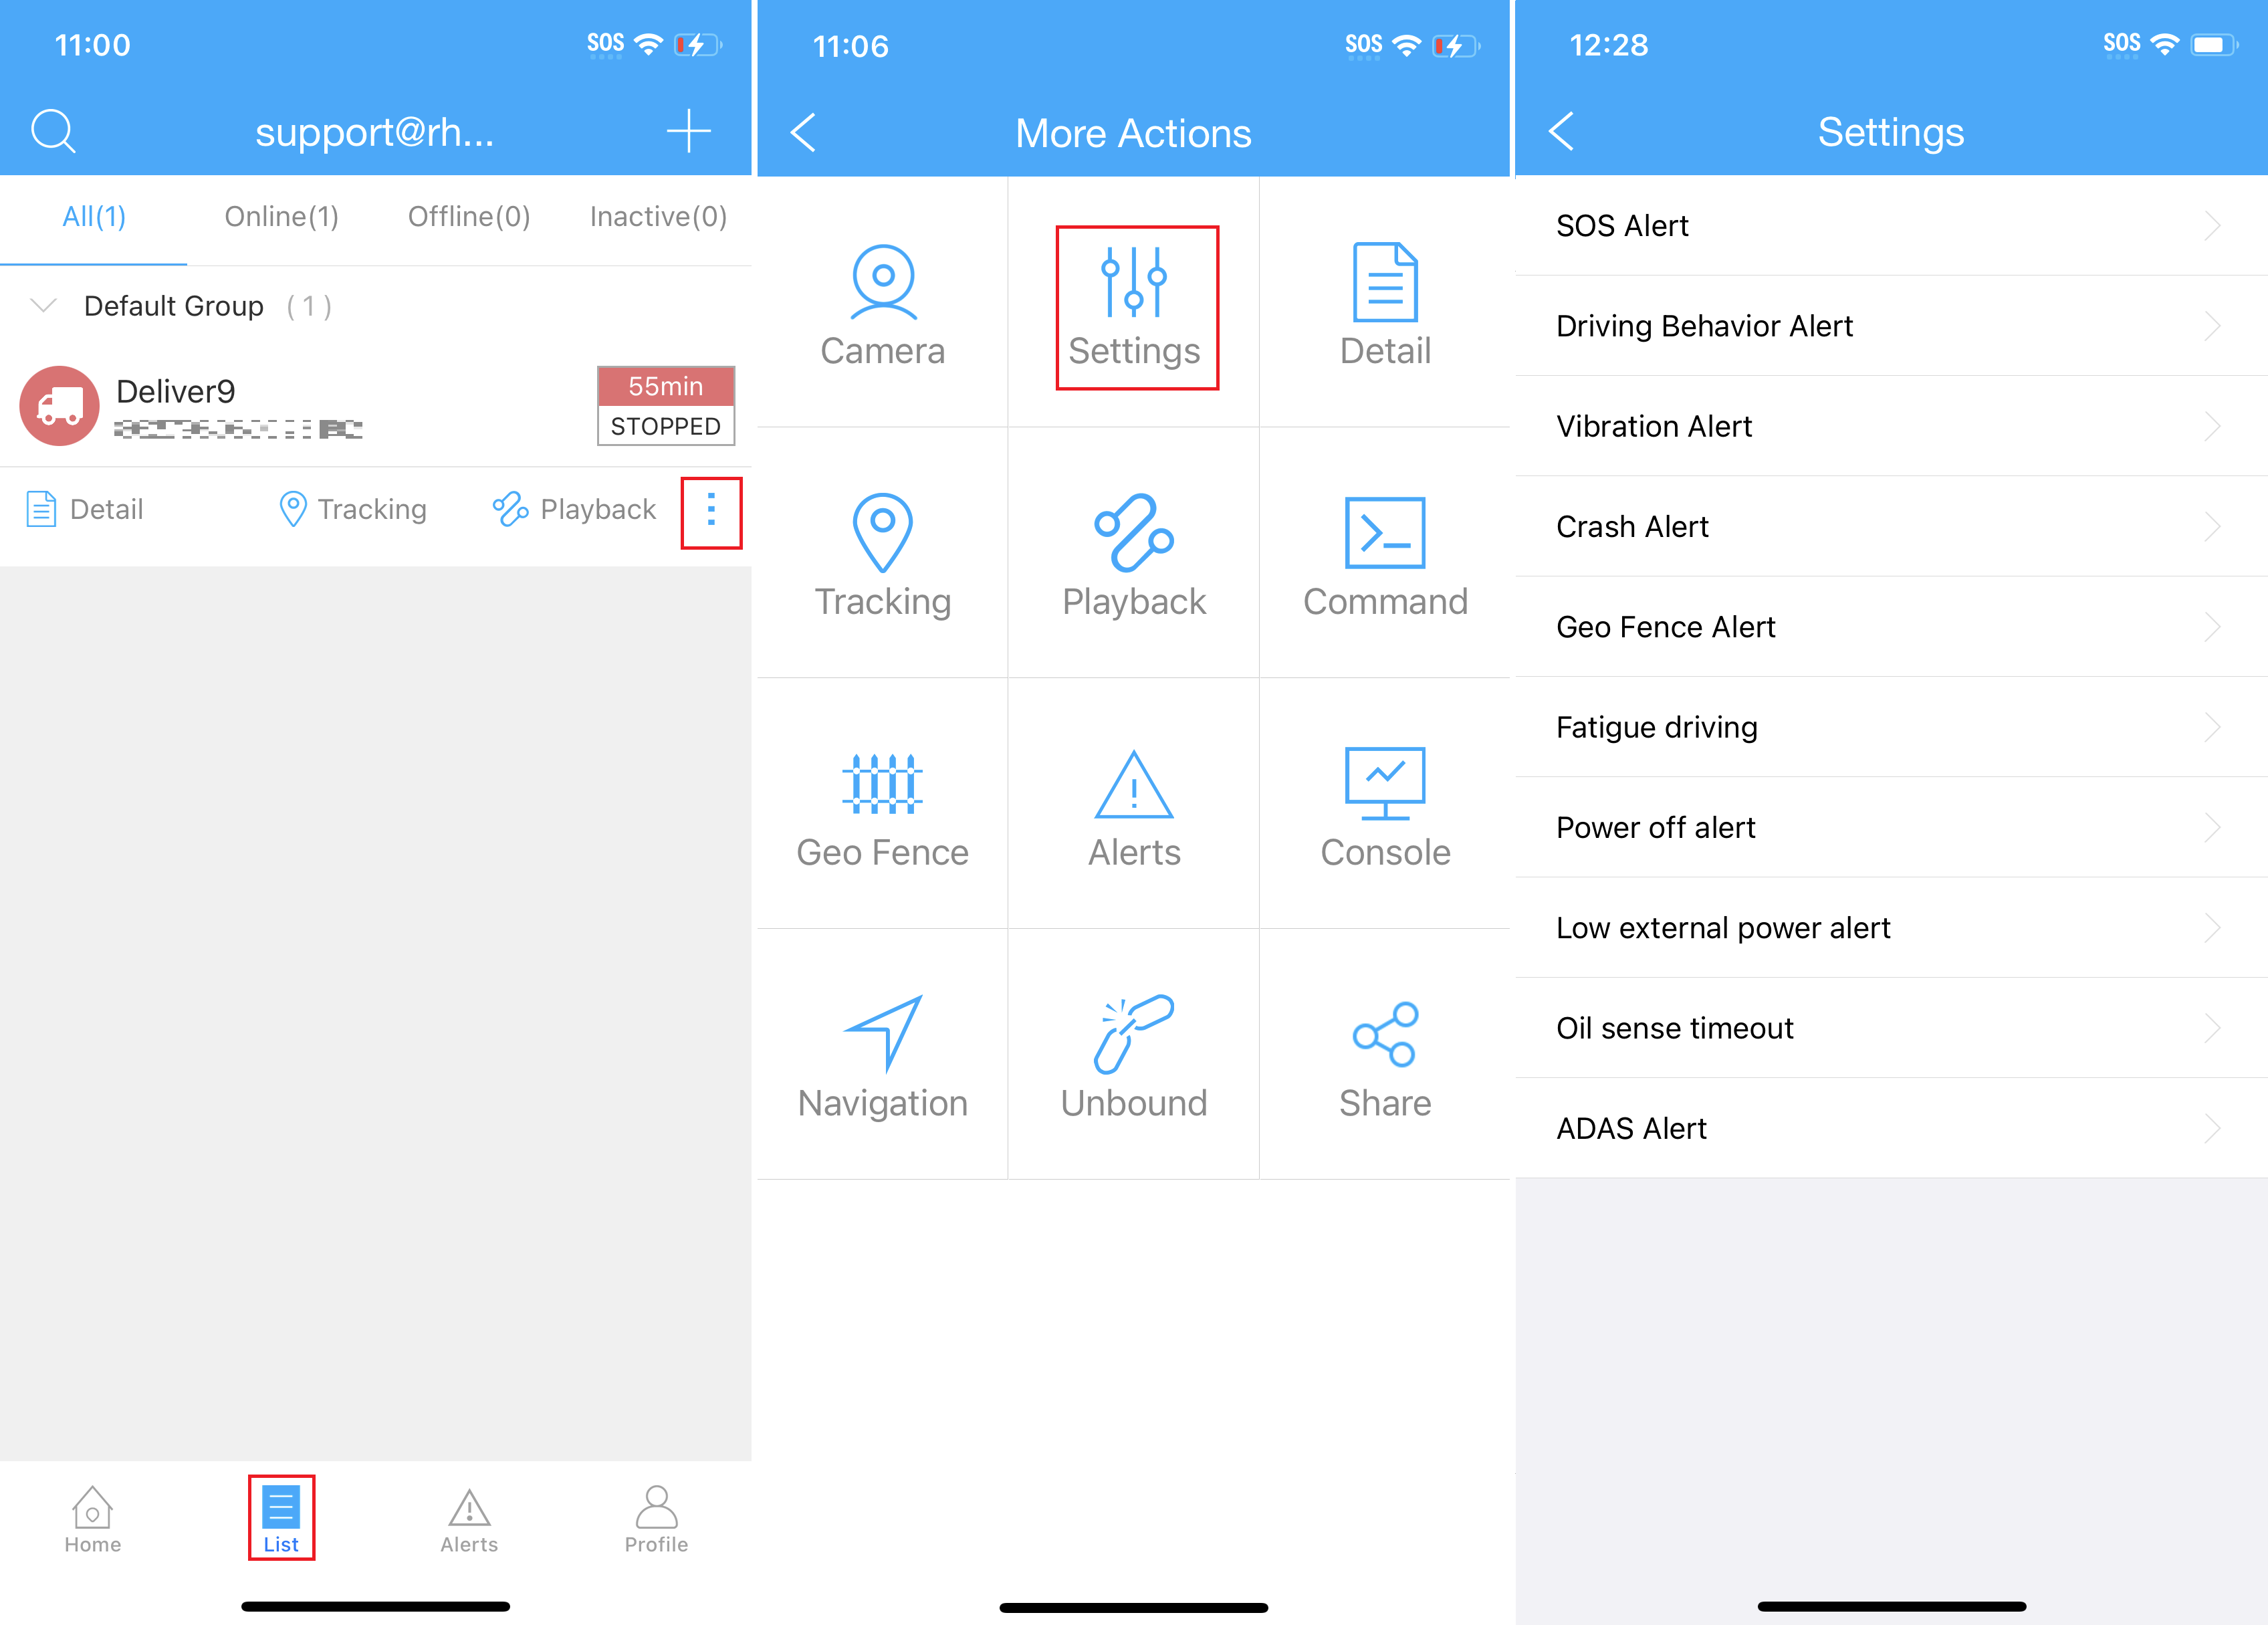
To configure Event video uploads, navigate to  >
>  >
>  .
.
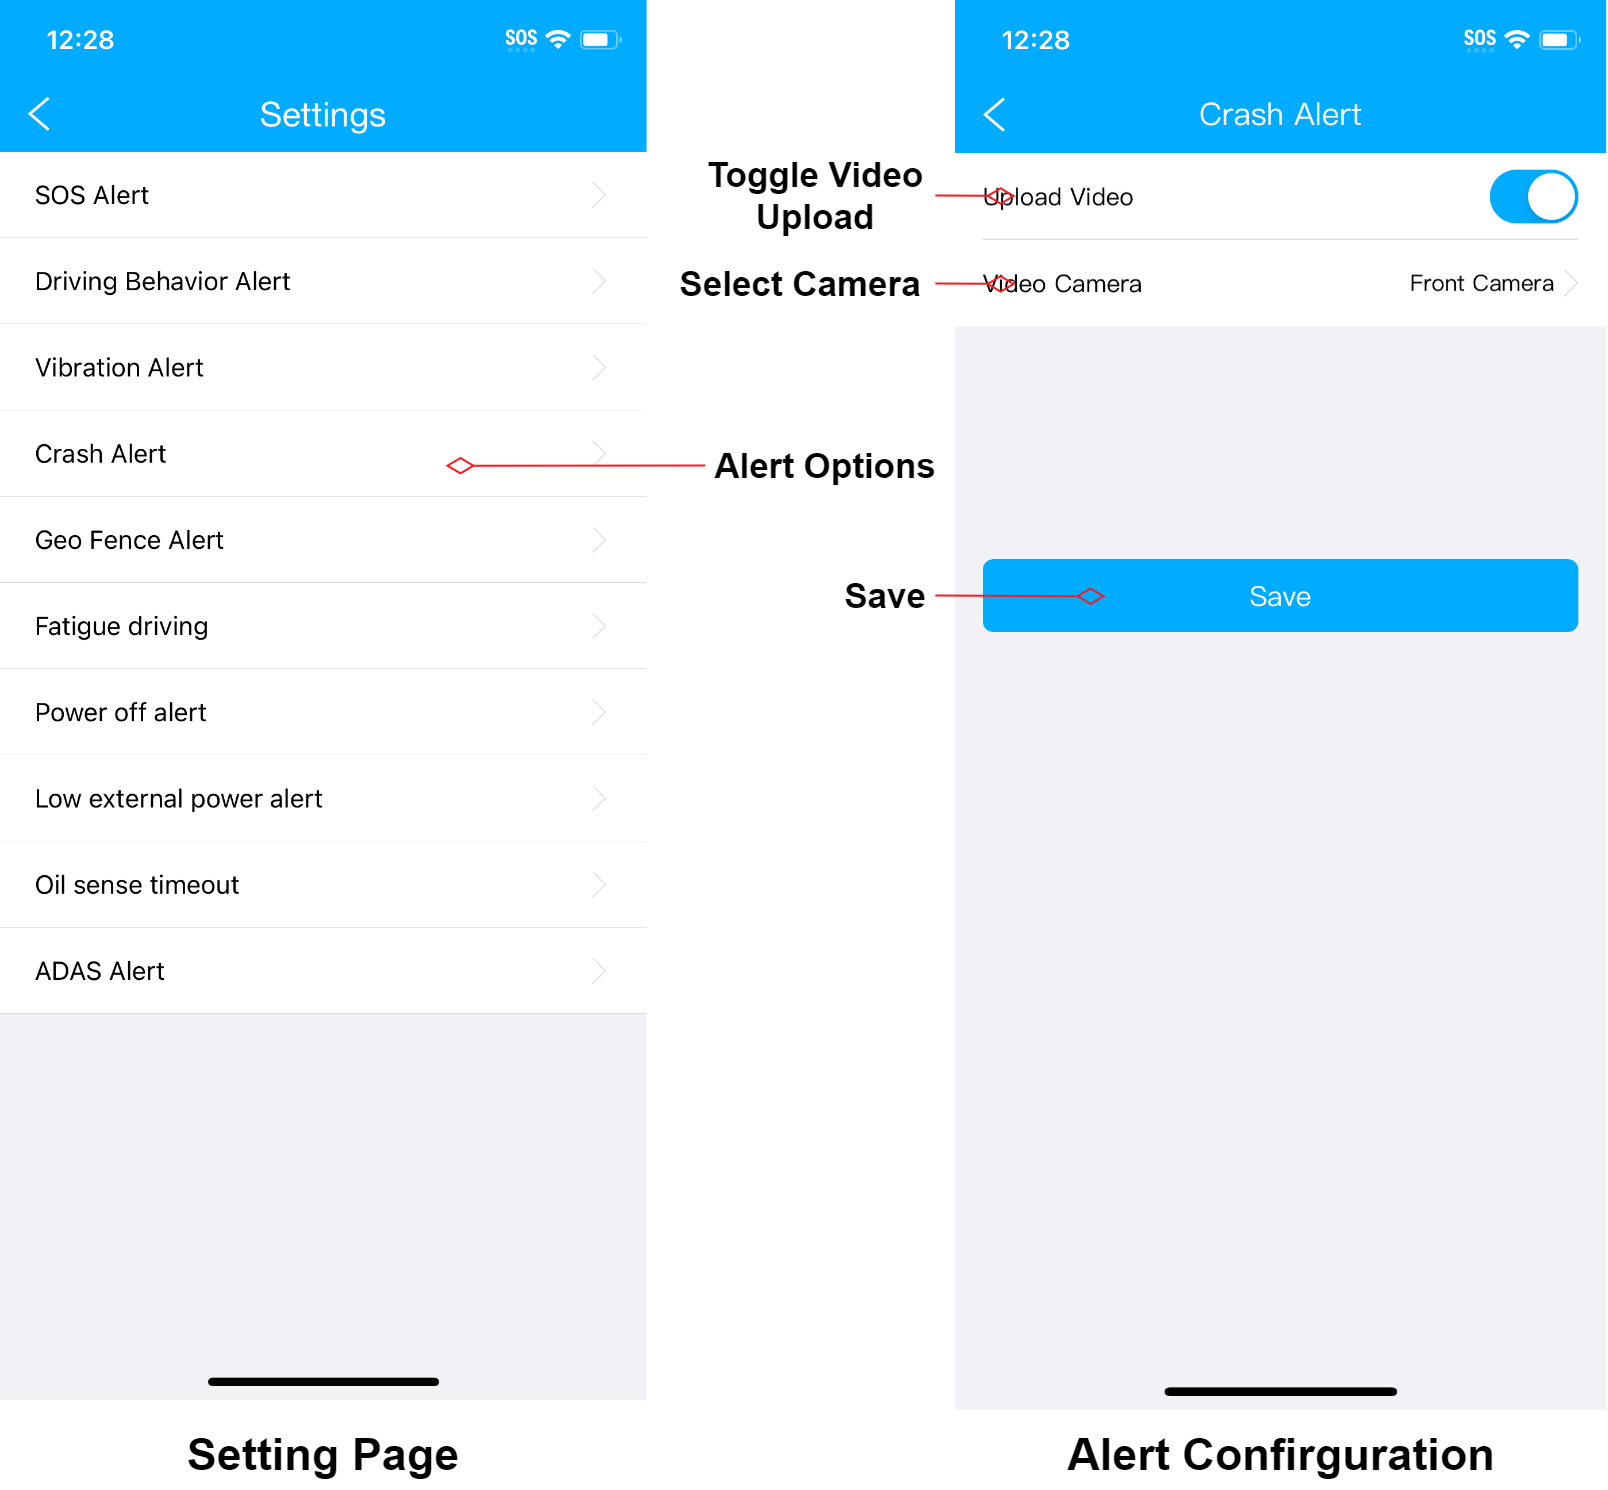
- Tap on the event type you wish to configure (Crash Alert is used in the example above).
- Toggle on the Upload Video option and set Video Camera to the Camera you wish to upload footage from.
- Tap Save when finished.
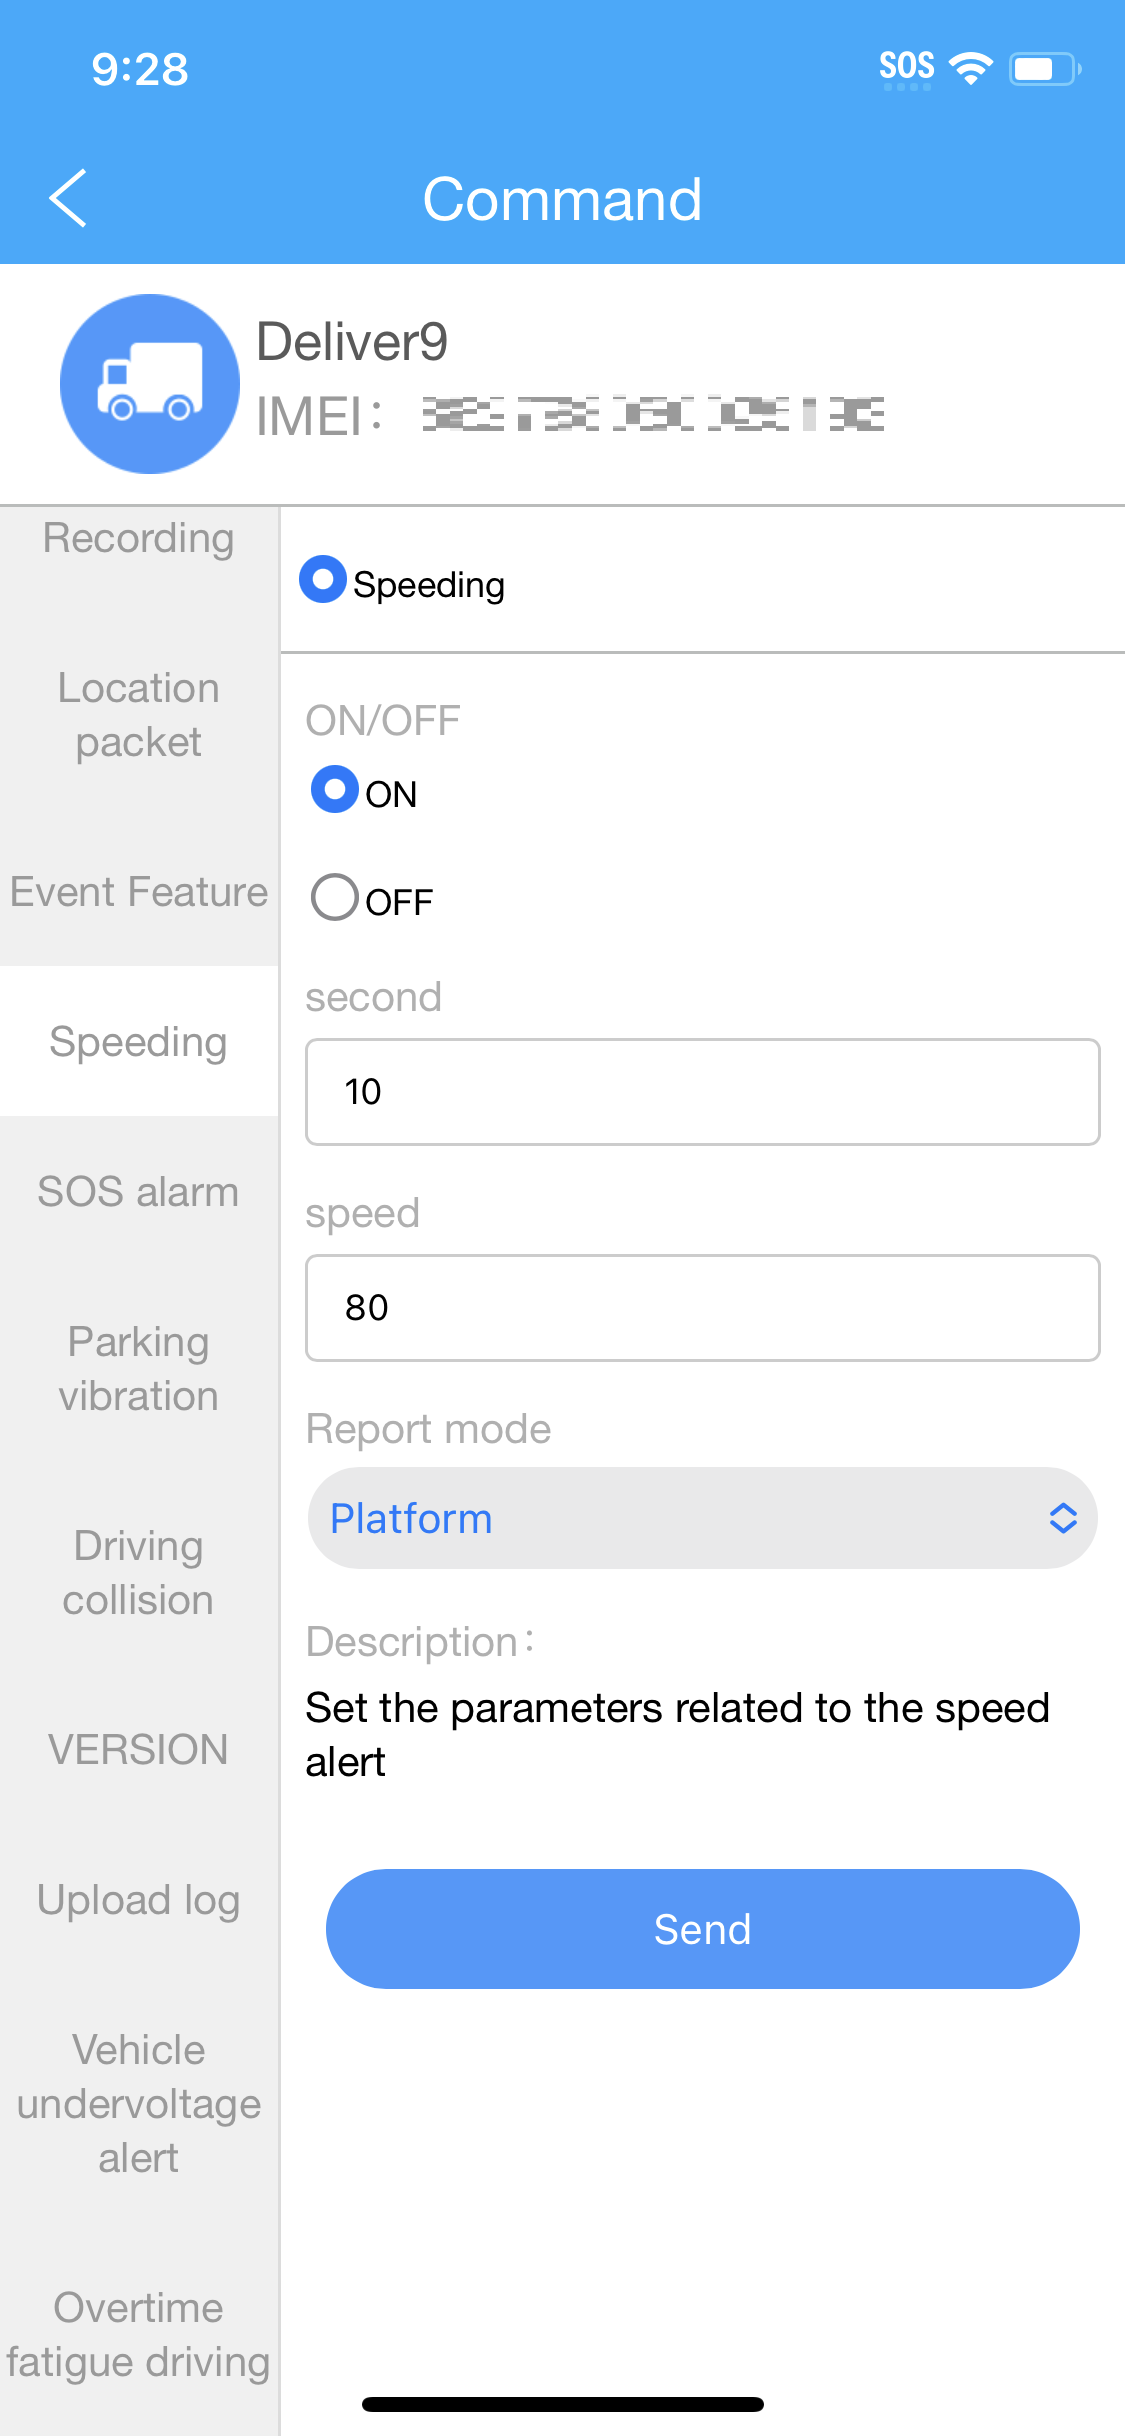
How to Change the 'Overspeed' Alert Threshold
 |
|
Tracksolid Pro Website
The Tracksolid Pro Website is located at https://hk.tracksolidpro.com/mainFrame.
The Tracksolid Pro Website can be used to view Location and Trip History, Live & Recorded Video and Event & Alerts History & Video.
Location & Trip History
The MDVR-J400 will display the vehicles current GPS location, as well as other details such as current speed. It will also record any driving done as a 'trip' which can be viewed later in the Tracksolid Pro website.
View Current Location & Device Details
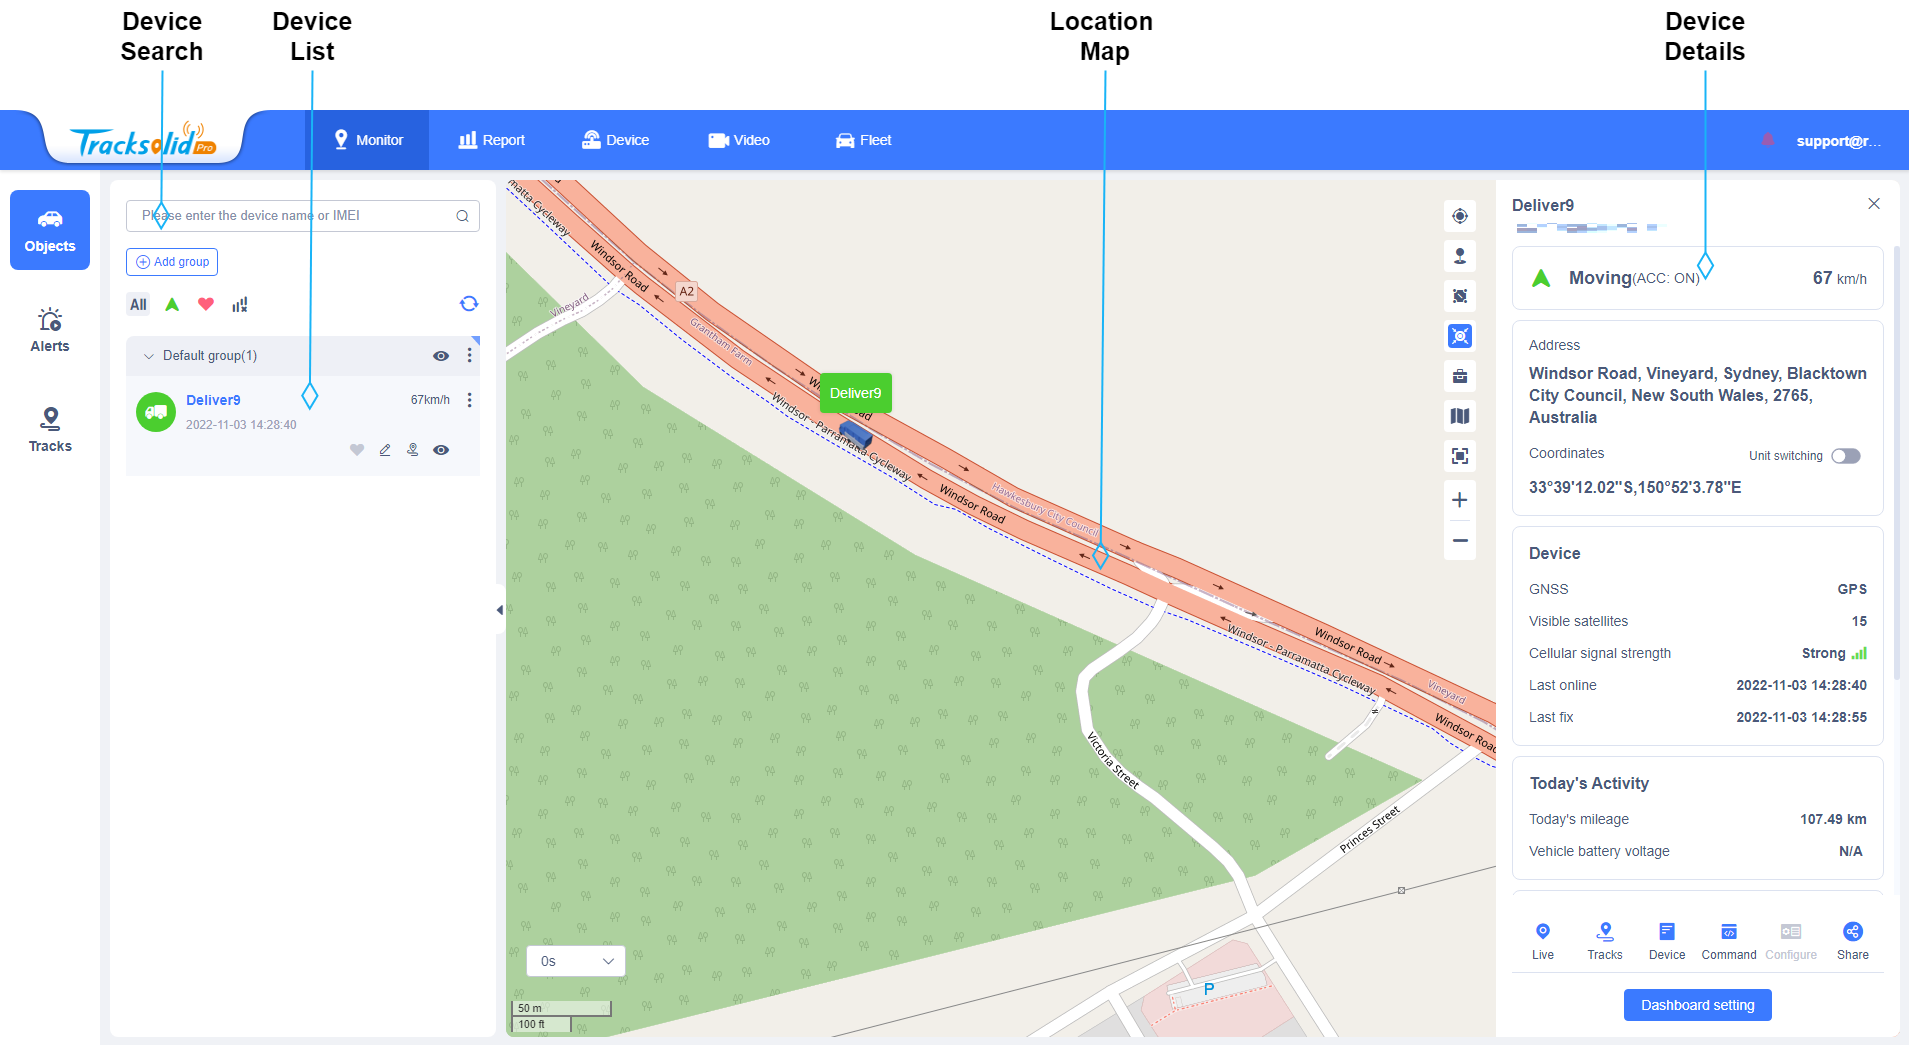
Navigate to Monitor > Objects to view the current location of the MDVR-J400.
- Left-click on the Vehicle in the Device List to display the current location, speed, etc in the Device Details panel.
- You can configure the details shown in Device Details by clicking
 .
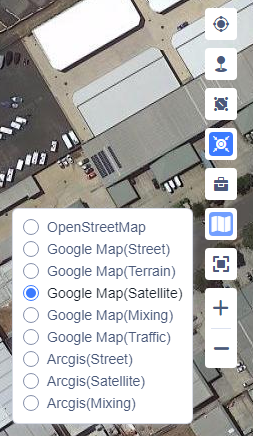
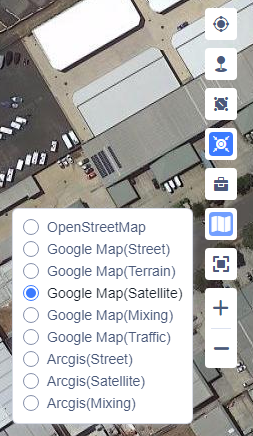
. - To Change the Map type (Street, Satellite, Terrain, etc), click the
 Map button and select the Map type you wish to use.
View and Playback Trip History
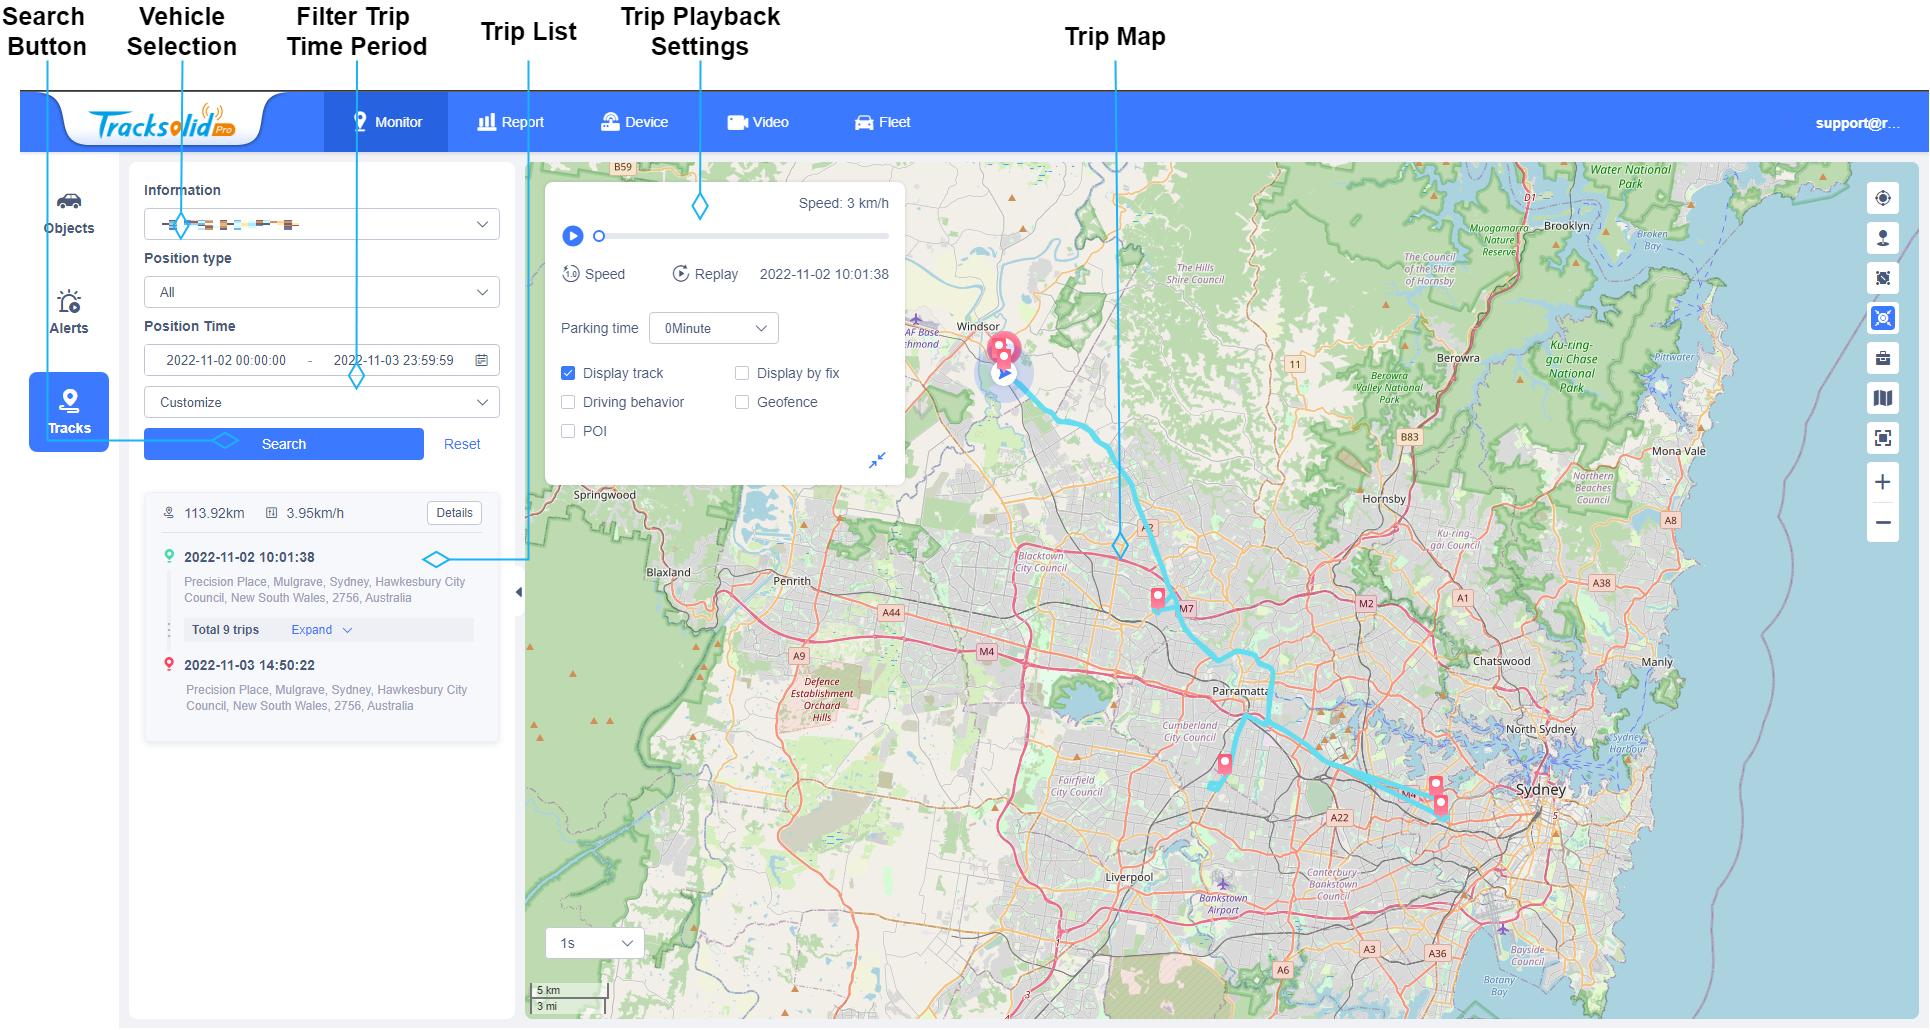
Navigate to Monitor > Tracks to view the Trip History for your the MDVR-J400.
- Select the Vehicle in Vehicle Selection, then use the Filter Trip Time Period section to select the days you wish to view the Trips for.
- Click
 to load the Trips for the Vehicle & Time Period selected.
 - View the Trip List. You can expand the list to see all of the trips. Click on a trip to view it on the Trip Map.
- Select
 in the Trip Playback Settings to start playback of the trip on the Trip Map.
 -
To Change the Map type (Street, Satellite, Terrain, etc), click the
 Map button and select the Map type you wish to use.
Live & Recorded Video
The MDVR-J400 has an external front facing camera, and an internal driver facing camera.
When the vehicle's ignition is on, the external and internal cameras will record footage to the MicroSD card installed in the MDVR-J400 and the internal flash memory. If an event happens (Crash, vibration, etc) footage will be uploaded to the cloud and can be viewed in the even history if it has been configured.
View Live Video Feed
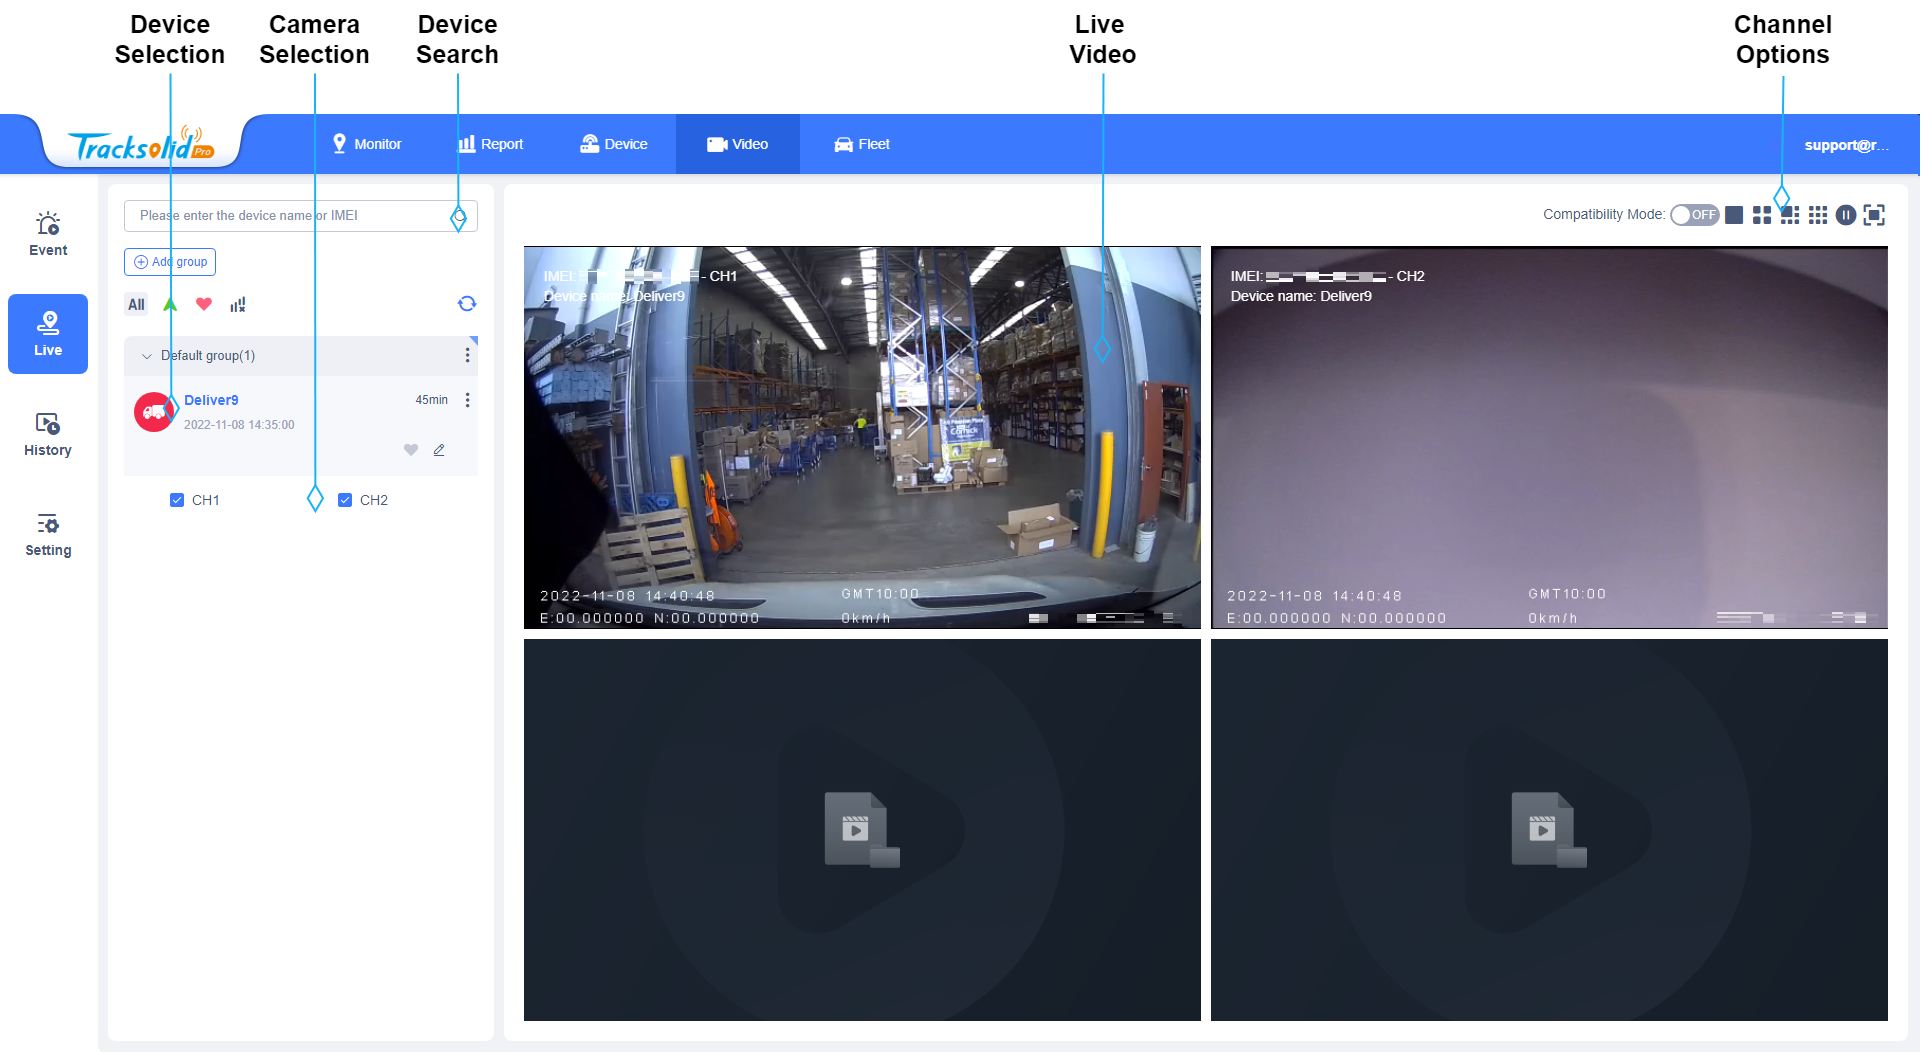
Navigate to Video > Live to view the live video feed of both cameras.
- Select the Vehicle in Device Selection.
- In the Camera Selection section tick the CH1 to view the External camera and CH2 to view the internal camera.
View and Export Recorded Video
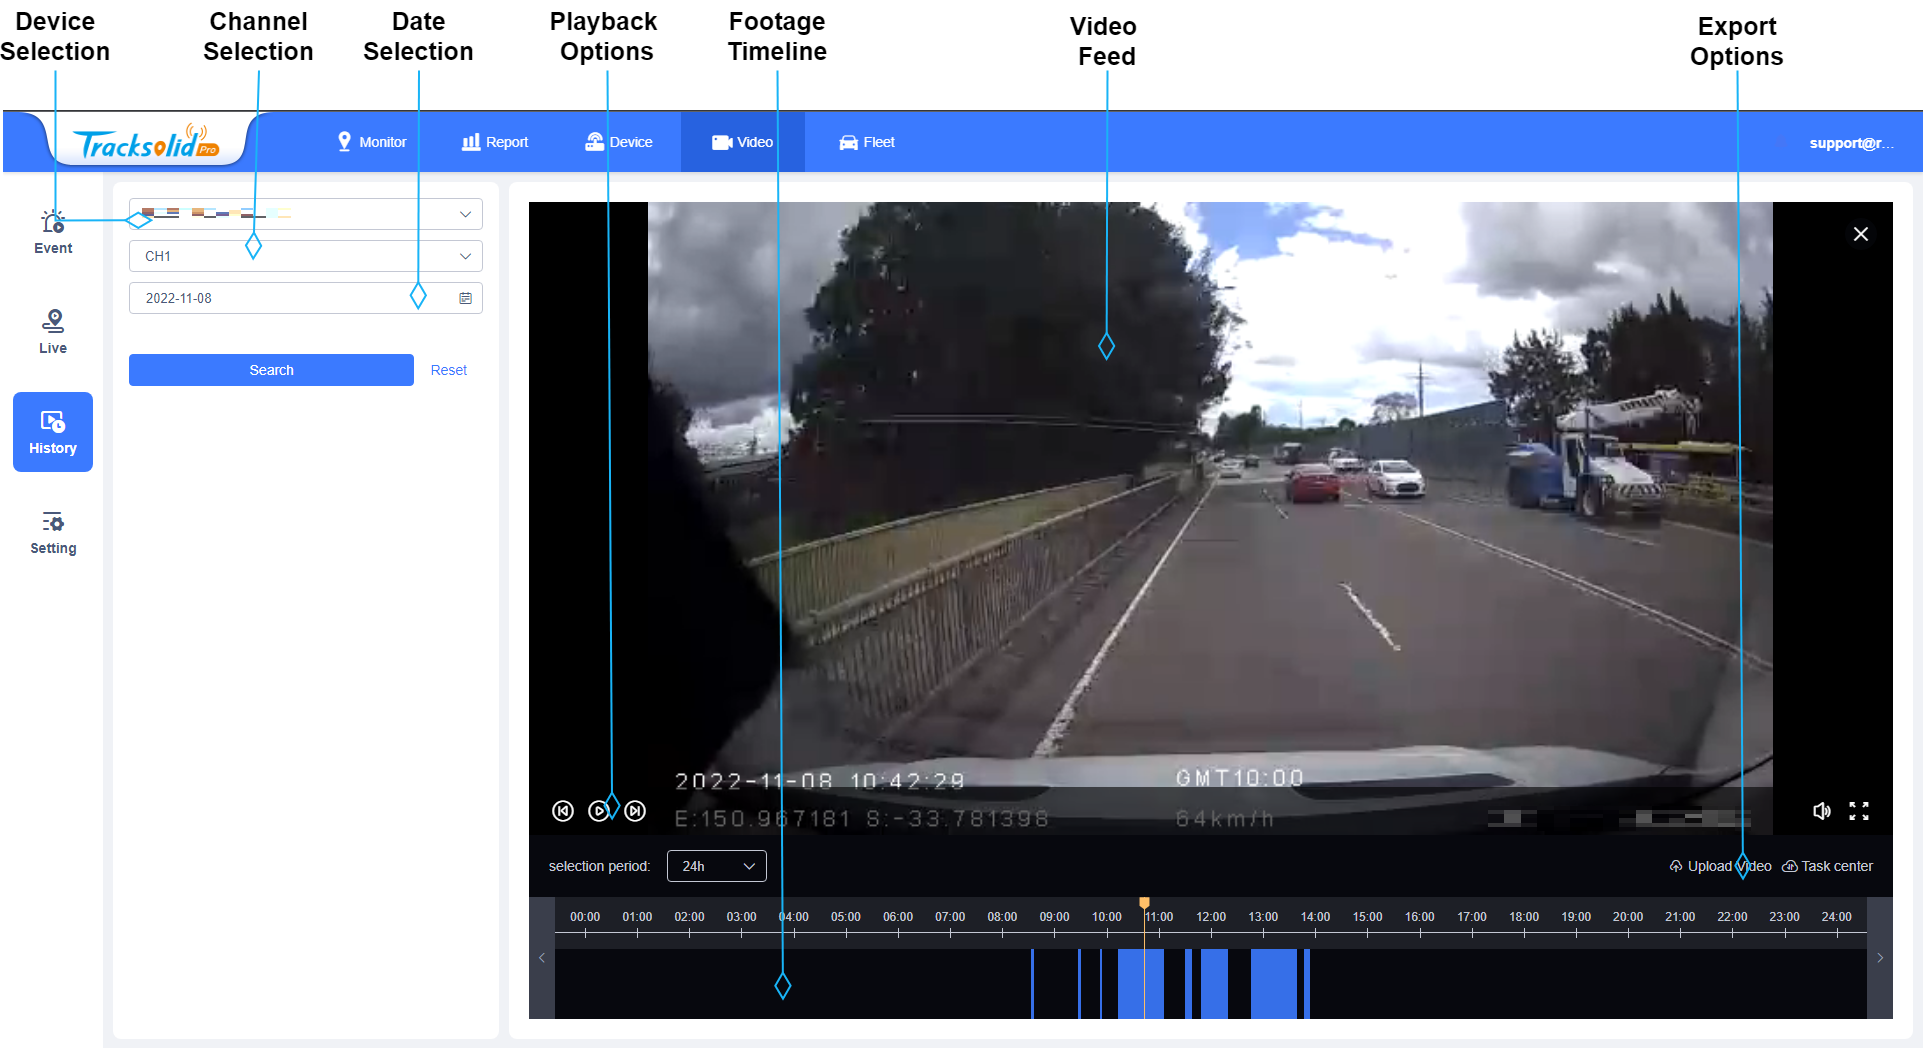
Video Playback Options | |||
 |
Step Forward |  |
Step Backward |
 |
Play/Pause |  |
Mute/Unmute Audio |
 |
Fullscreen Video | ||
Navigate to Video > History to view footage recorded to the MicroSD card installed in the MDVR-J400.
- Select the Vehicle in Device Selection.
- Select the Channel in Channel Selection. CH1 is the External Camera, CH2 is the Internal Camera
- Select the Date you wish to view the footage for in Date Selection.
- Click
 to load footage from the MDVR-J400. If the vehicle is currently off, it will take a while to load as the MDVR-J400 will need to wake up.
 - The Footage Timeline will display the recorded footage in blue. Click anywhere on the timeline to playback footage from that time, or select
 to play from the earliest recorded footage of the day.
 - To download footage, Click
 in the Export Options.
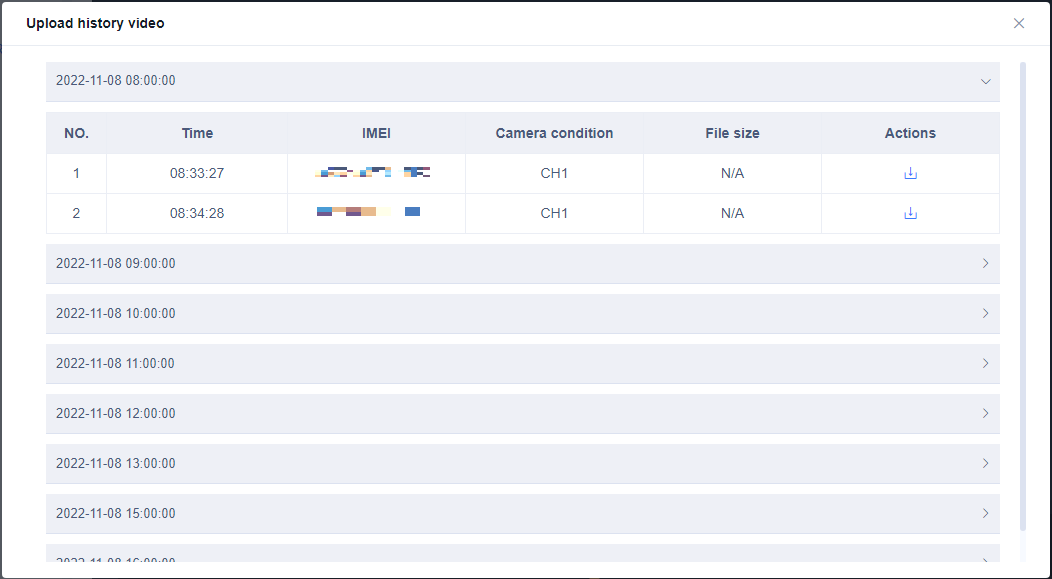
- Select the time period you wish to retrieve footage from to expand it, then select the
 button for the file you wish to download. This will upload the footage to the Tracksolid Pro website for your to download.
 - Select
 in the Export Options.
- Once the Status for the file says Upload Succeeded, Select the
 button to download the file to your computer.
Alerts & Events
The MDVR-J400 can be configured to create an alert if particular behaviour is observed. The alert details and location can be viewed on the Tracksolid Pro Website. You can also choose to upload video from one or more of the cameras to the cloud for an event.
Alert/Event examples:
- SOS Alert (SOS Button is pressed)
- Driving Behaviour Alert (Harsh Acceleration, Break Deceleration, Sharp Turn)
- Vibration Alert
- Crash Alert
- Geofence Alert (Alert when the vehicle enters a Geofence (Pre-defined area on map))
- Fatigue Driving
- Power Off
- Low External Power
View Alert History & Details
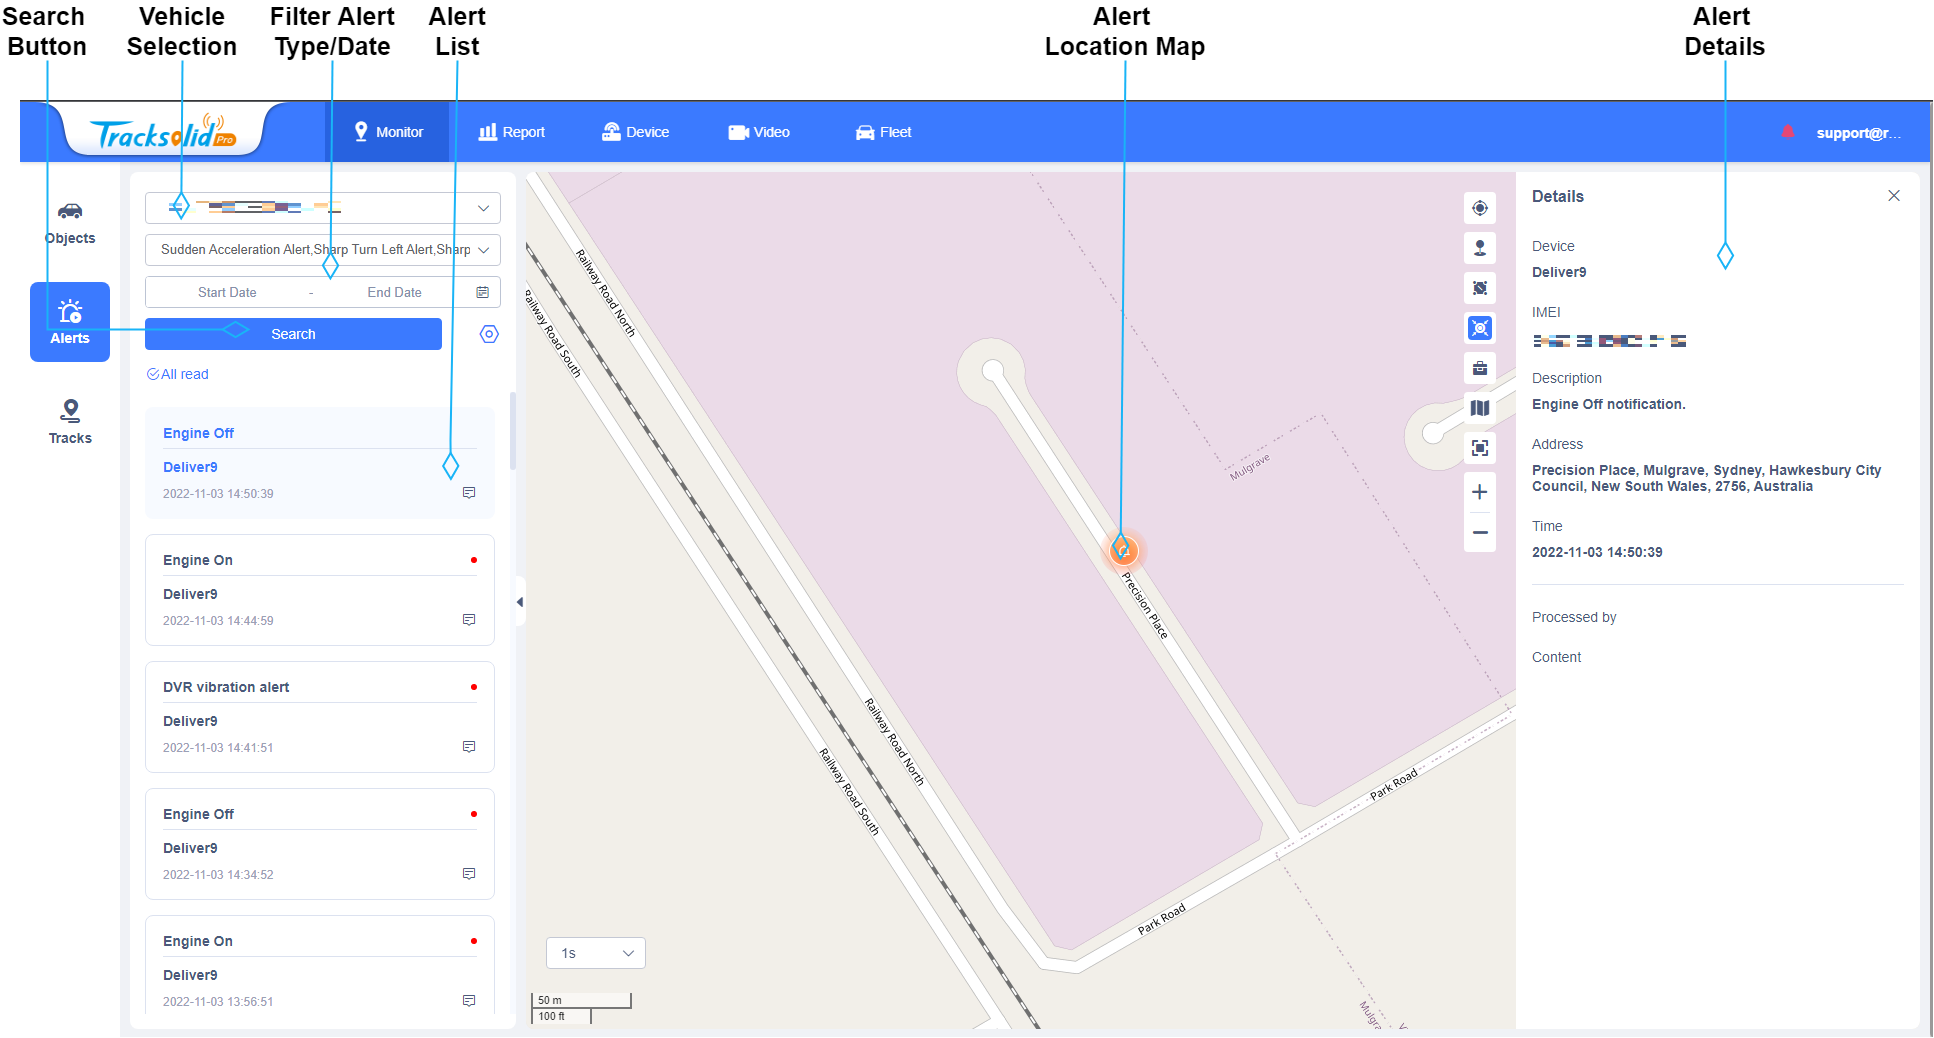
Navigate to Monitor > Alerts to view the Alert History of the MDVR-J400.
- Select the Vehicle in the Vehicle Selection to view the Alert history. You can filter the results by Date and Alert Type.
- Click
 to load the Alerts for the Vehicle & Time Period selected.
 - Click on an Alert to view detailed information (Description, Location of Alert & Time/Date) in the Alert Panel section and the location of the alert in the Alert Location Map.
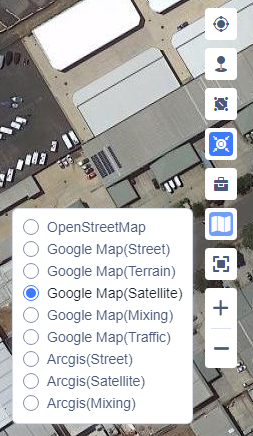
- To Change the Map type (Street, Satellite, Terrain, etc), click the
 Map button and select the Map type you wish to use.
View Uploaded Event Videos
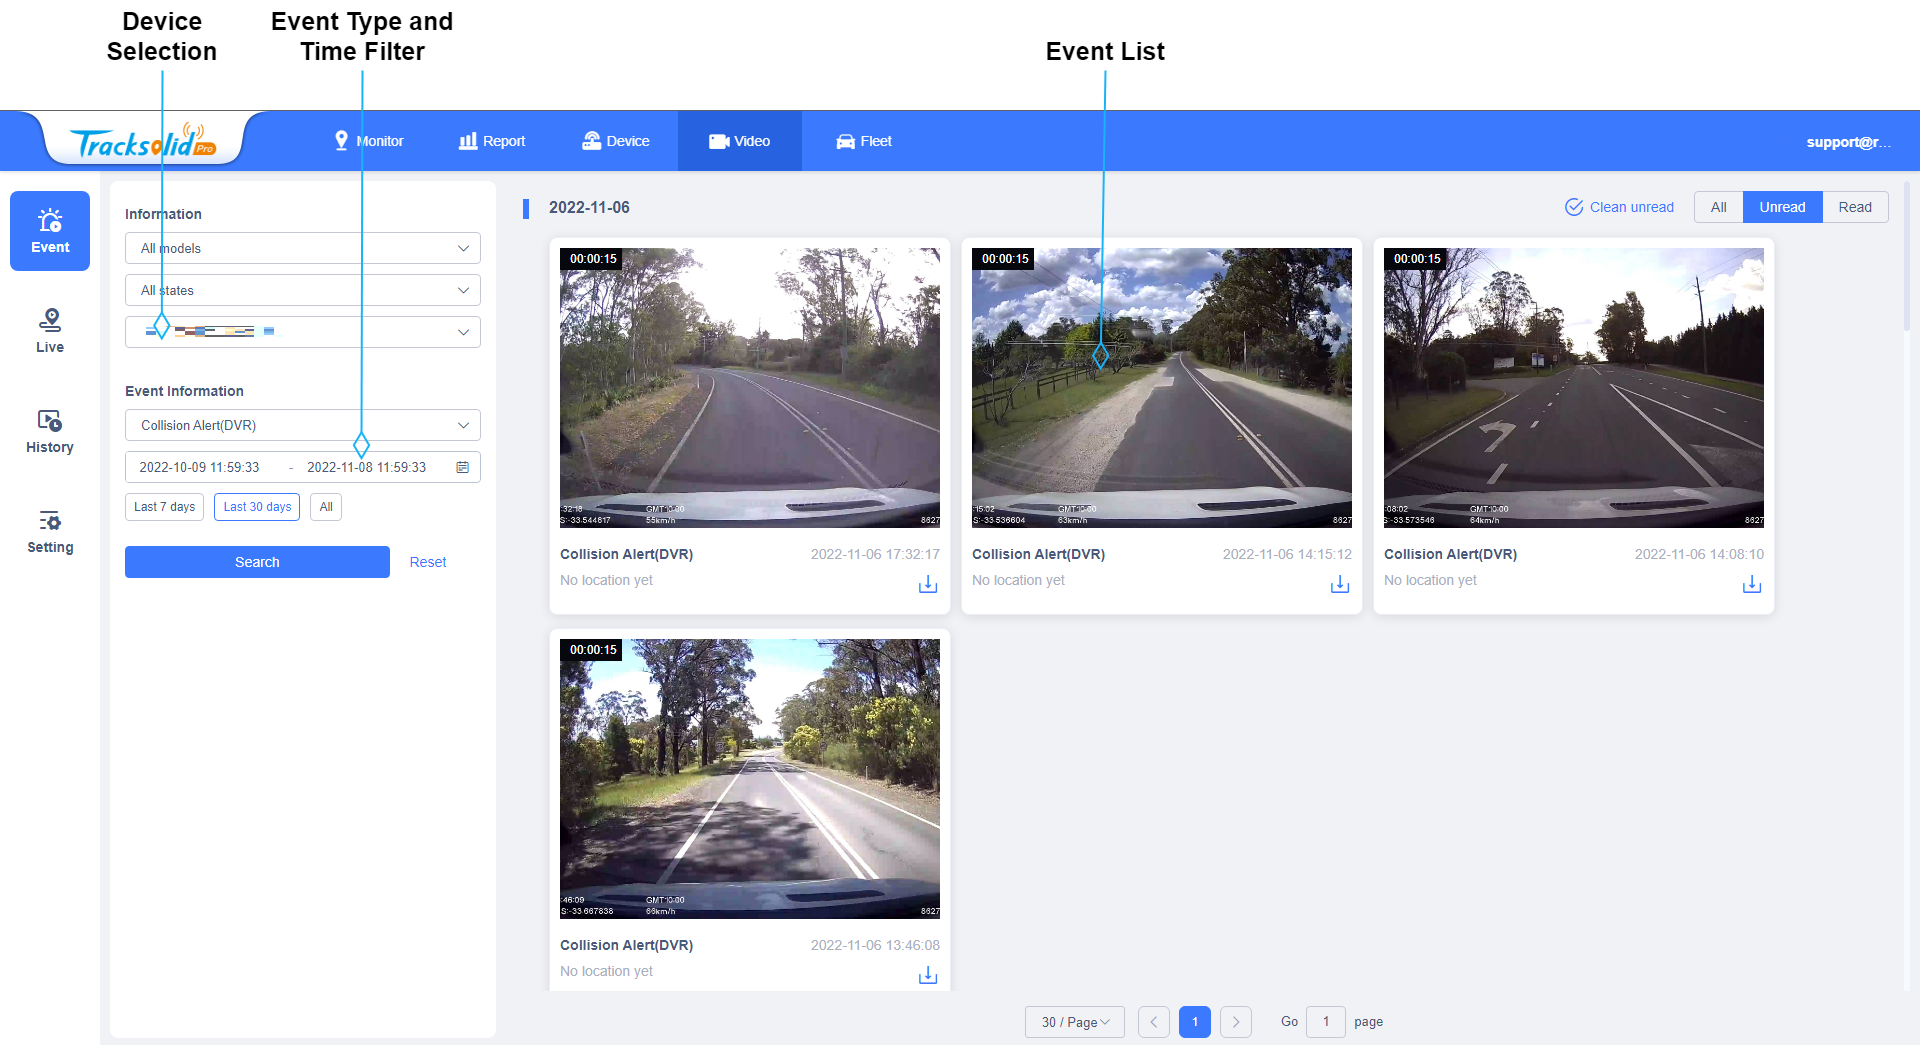
Navigate to Video > Event to view the uploaded Event Videos.
- Select the Vehicle in Device Selection.
- Choose an Event Type and Time Period with the Event Type and Time Filters.
- Click
 to load the Events for the Vehicle & Time Period selected.
 - Click on an Event in the Event Listto view the video.Event Playback Options

Step Forward 
Step Backward 
Play/Pause 
Mute/Unmute Audio 
Switch Camera 
Download Footage 
Fullscreen Video 
Go to Trip Playback
Configure Alerts and Event Video Uploads
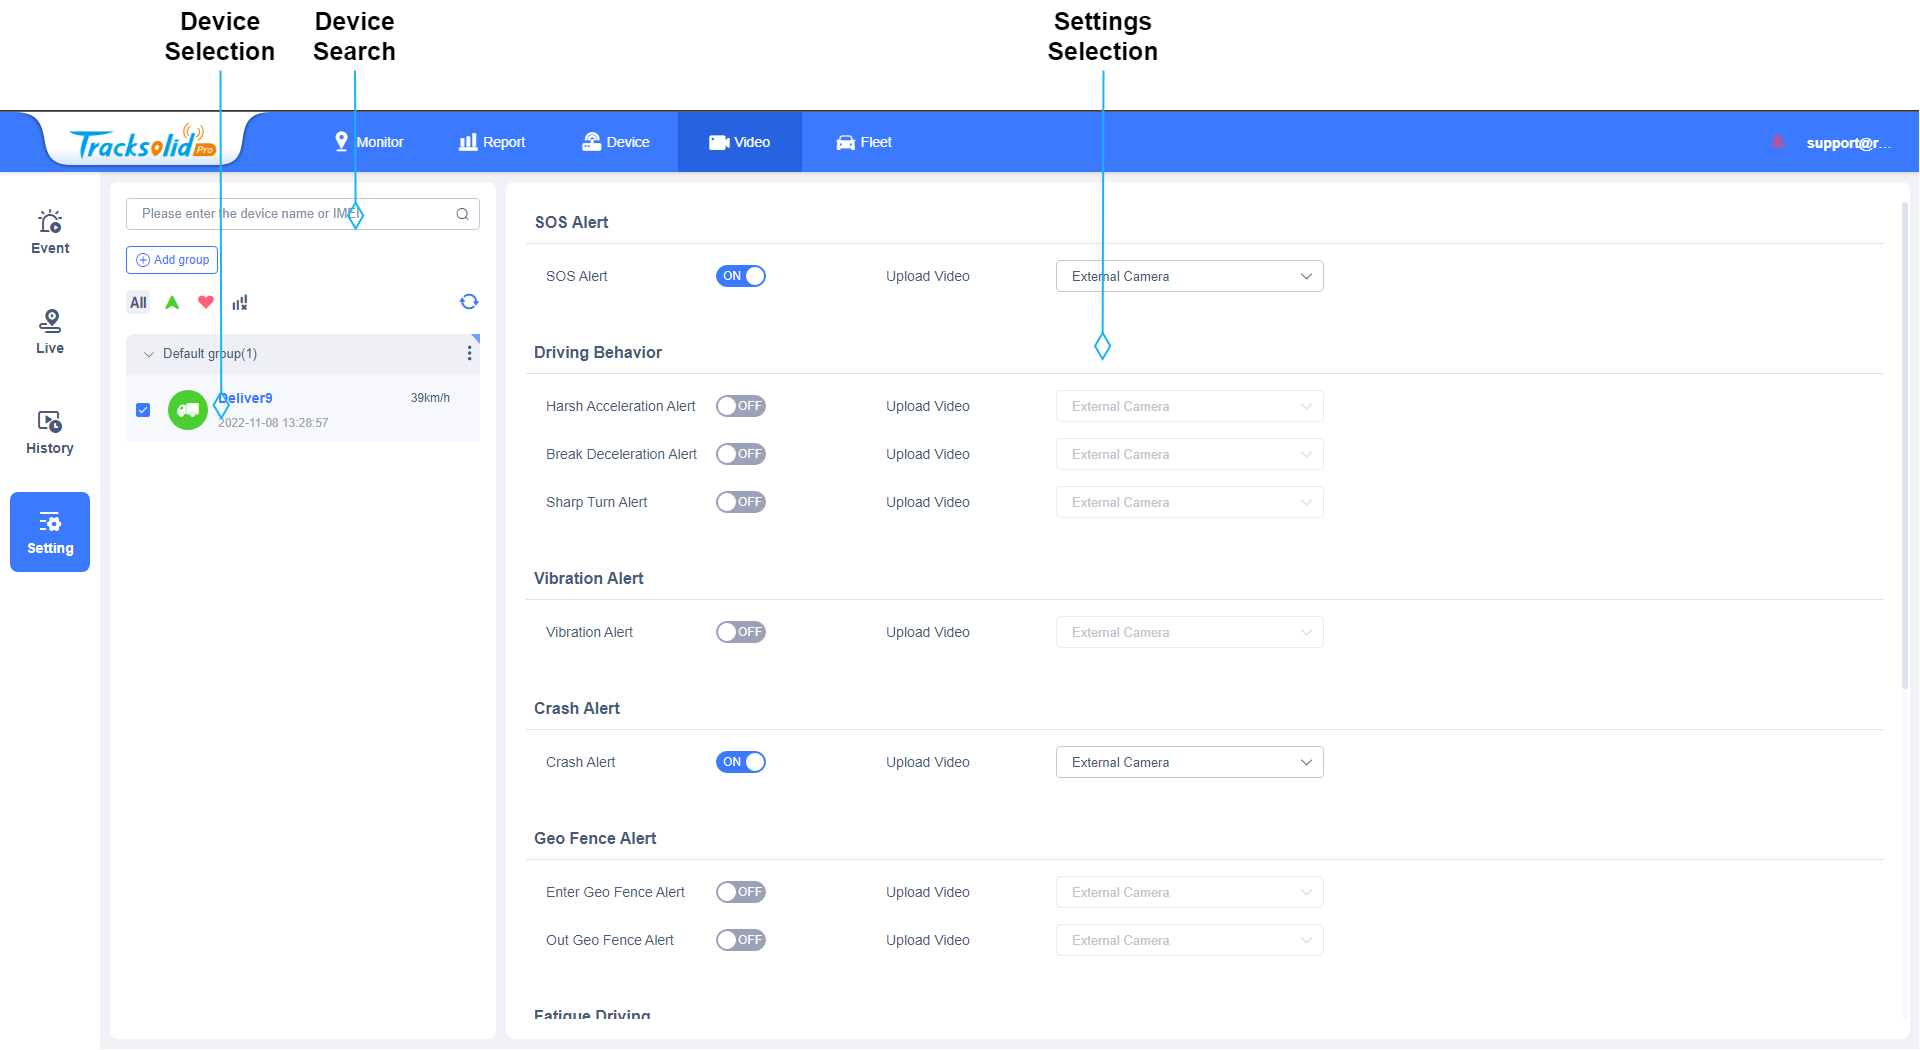
Navigate to Video > Setting to configure Alerts and choose which events will upload Video to the cloud.
- Select the Vehicle in Device Selection to bring up the Event/Alert settings.
- For each Alert type you wish to utilise, set the toggle switch to
 .
. - Select the camera (External, Internal or External + Inward) you wish to upload footage from.
- Click
 to confirm your changes.
 , then

 .
.