Motion Detection
Motion Detection via NVR (Black GUI)
- From the Main Menu, select Alarm.
- Select the Video Detection tab and then the Motion Detect Tab.
- Select the channel you want to Enable motion detection on with the drop down menu.
- After this you can choose to toggle motion detection sensitivity and area by selecting Region Settings.
- You can also configure what actions are taken once the IVS event is triggered.
- Click Apply to confirm settings.
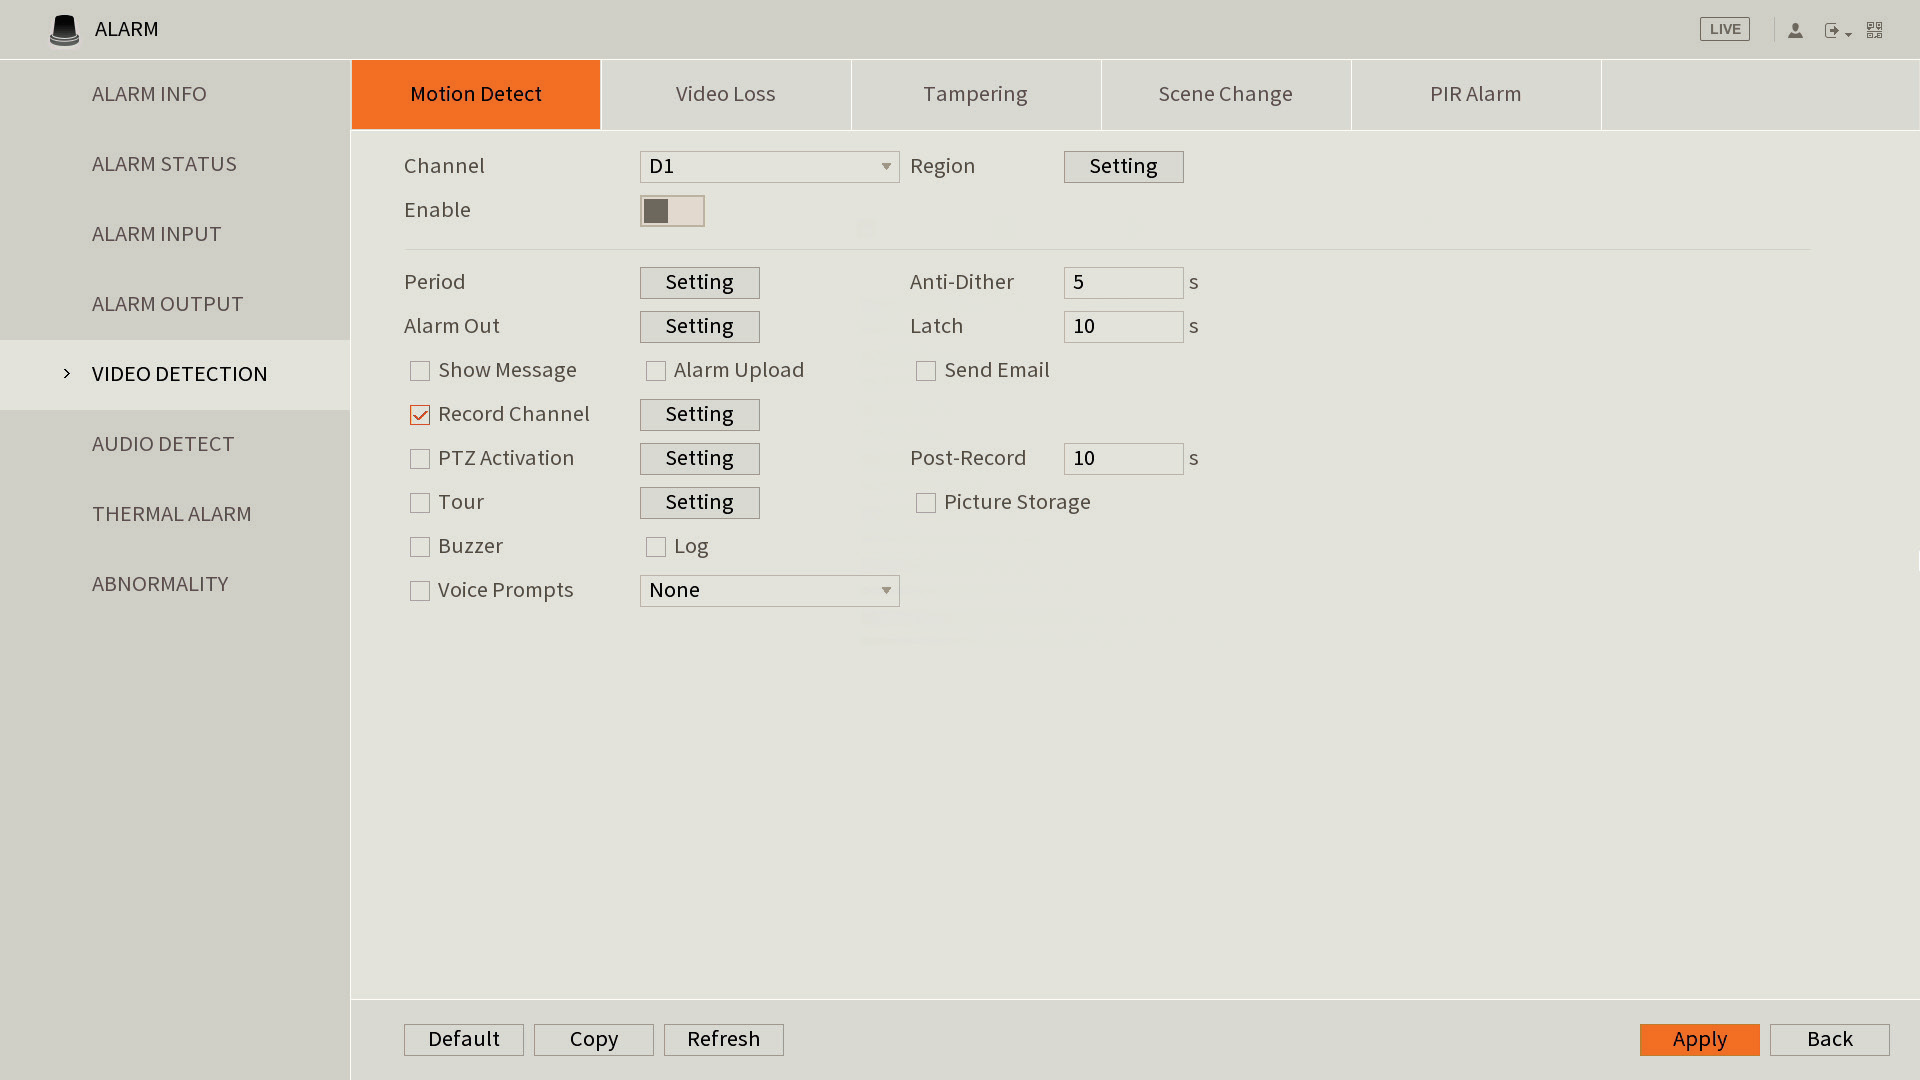
Additional Settings
| Parameter | Description |
| Anti-Dither | Sets the Camera to only record one motion detection event in the set period. |
| Record | Enable this option if you wish for the camera to record when motion is detected. This requires Motion to be scheduled under Storage > Schedule > Record, and Auto to be selected for Record Mode under Storage > Record Control. |
| Record Delay | How long the camera will continue to record as part of the "motion event" after motion has stopped being detected |
| Relay-out | Enabling this will cause the relay of the camera to trigger when Motion is detected. |
| Alarm Delay | How long the relay will stay triggered for after motion is detected. Requires Relay-out to be enabled. |
| Send Email | Send an Email when Motion is detected. Requires configuration under Network > SMTP(Email) |
| PTZ | Set the PTZ to perform a configured Preset/Tour to Pattern when motion is detected. |
| Snapshot | A Snapshot will be taken when motion is detected. Motion Snapshots will need to be set in the Schedule under Storage > Schedule > Snapshot |
Motion Detection via NVR (Blue GUI)
- Go to Main Menu > Event.
- Select the Channel number of the camera you want to enable Motion Detection on.
- Tick Enable, then click OK.

Additional Settings
| Parameter | Description |
| Anti-Dither | Sets the Camera to only record one motion detection event in the set period. |
| Record | Enable this option if you wish for the camera to record when motion is detected. This requires Motion to be scheduled under Storage > Schedule > Record, and Auto to be selected for Record Mode under Storage > Record Control. |
| Record Delay | How long the camera will continue to record as part of the "motion event" after motion has stopped being detected |
| Relay-out | Enabling this will cause the relay of the camera to trigger when Motion is detected. |
| Alarm Delay | How long the relay will stay triggered for after motion is detected. Requires Relay-out to be enabled. |
| Send Email | Send an Email when Motion is detected. Requires configuration under Network > SMTP(Email) |
| PTZ | Set the PTZ to perform a configured Preset/Tour to Pattern when motion is detected. |
| Snapshot | A Snapshot will be taken when motion is detected. Motion Snapshots will need to be set in the Schedule under Storage > Schedule > Snapshot |
Motion Detection via Camera Web Interface (Web 3.0)
- Navigate to Setting > Event > Video Detection > Motion Detection.
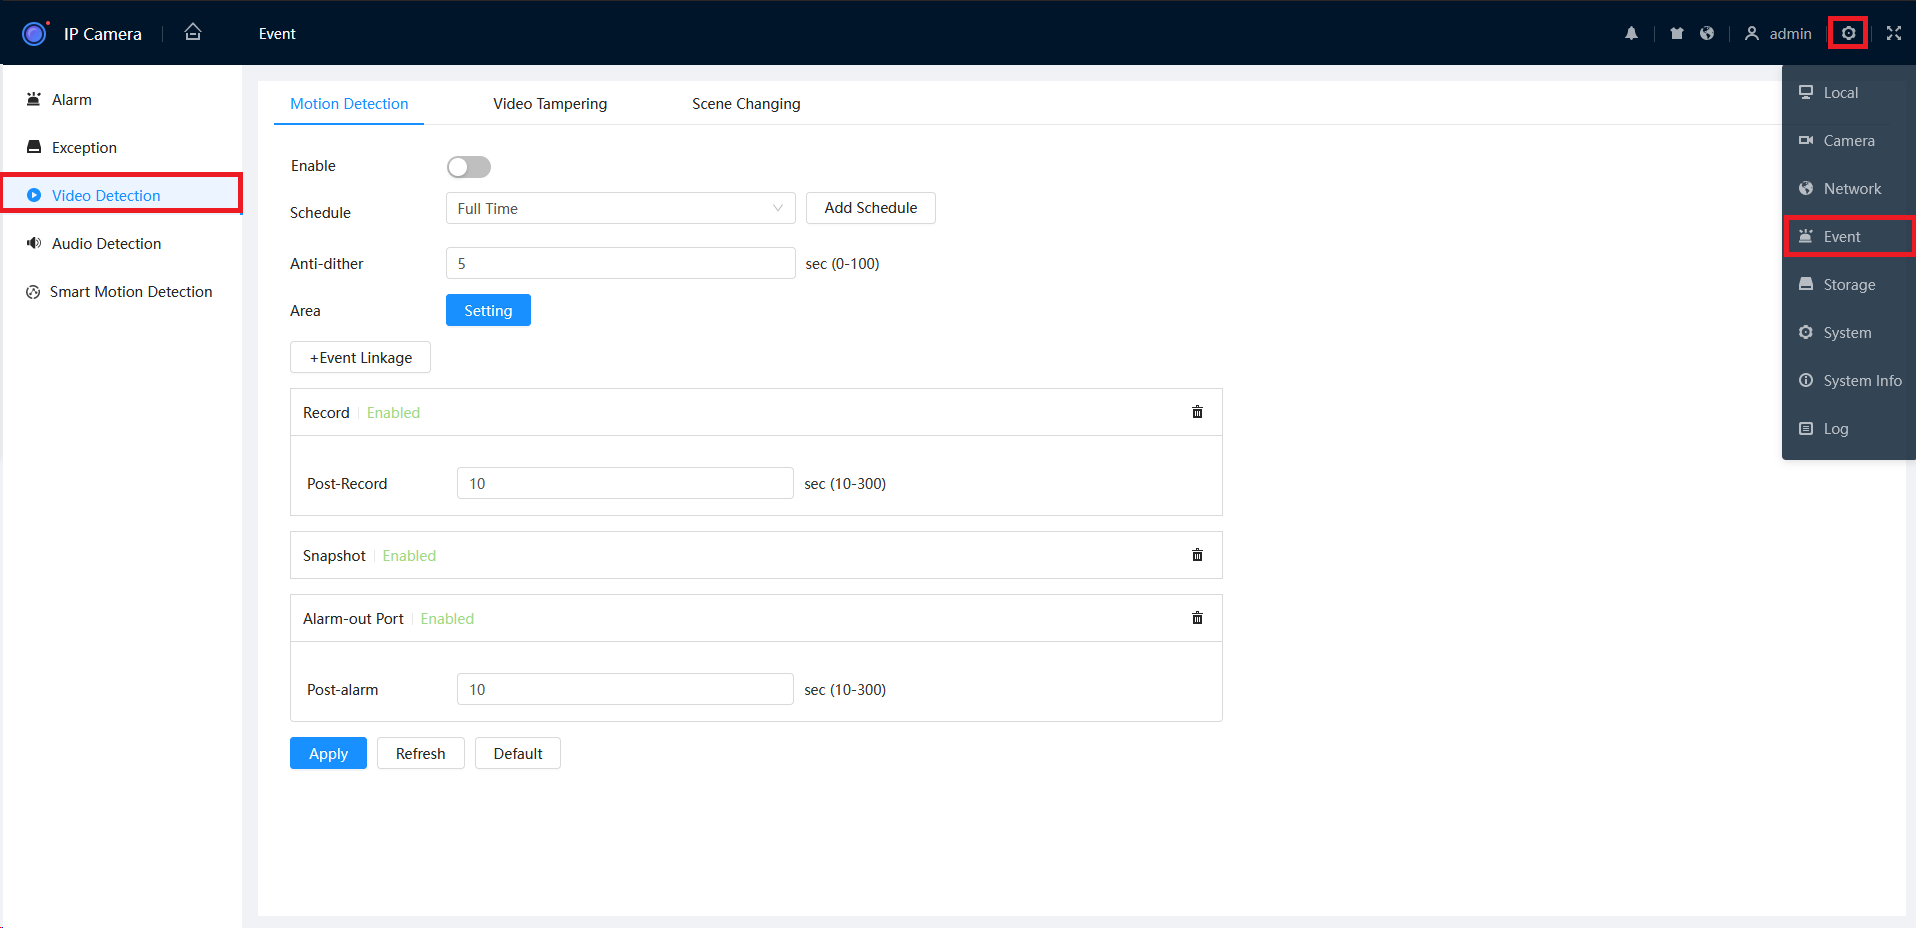
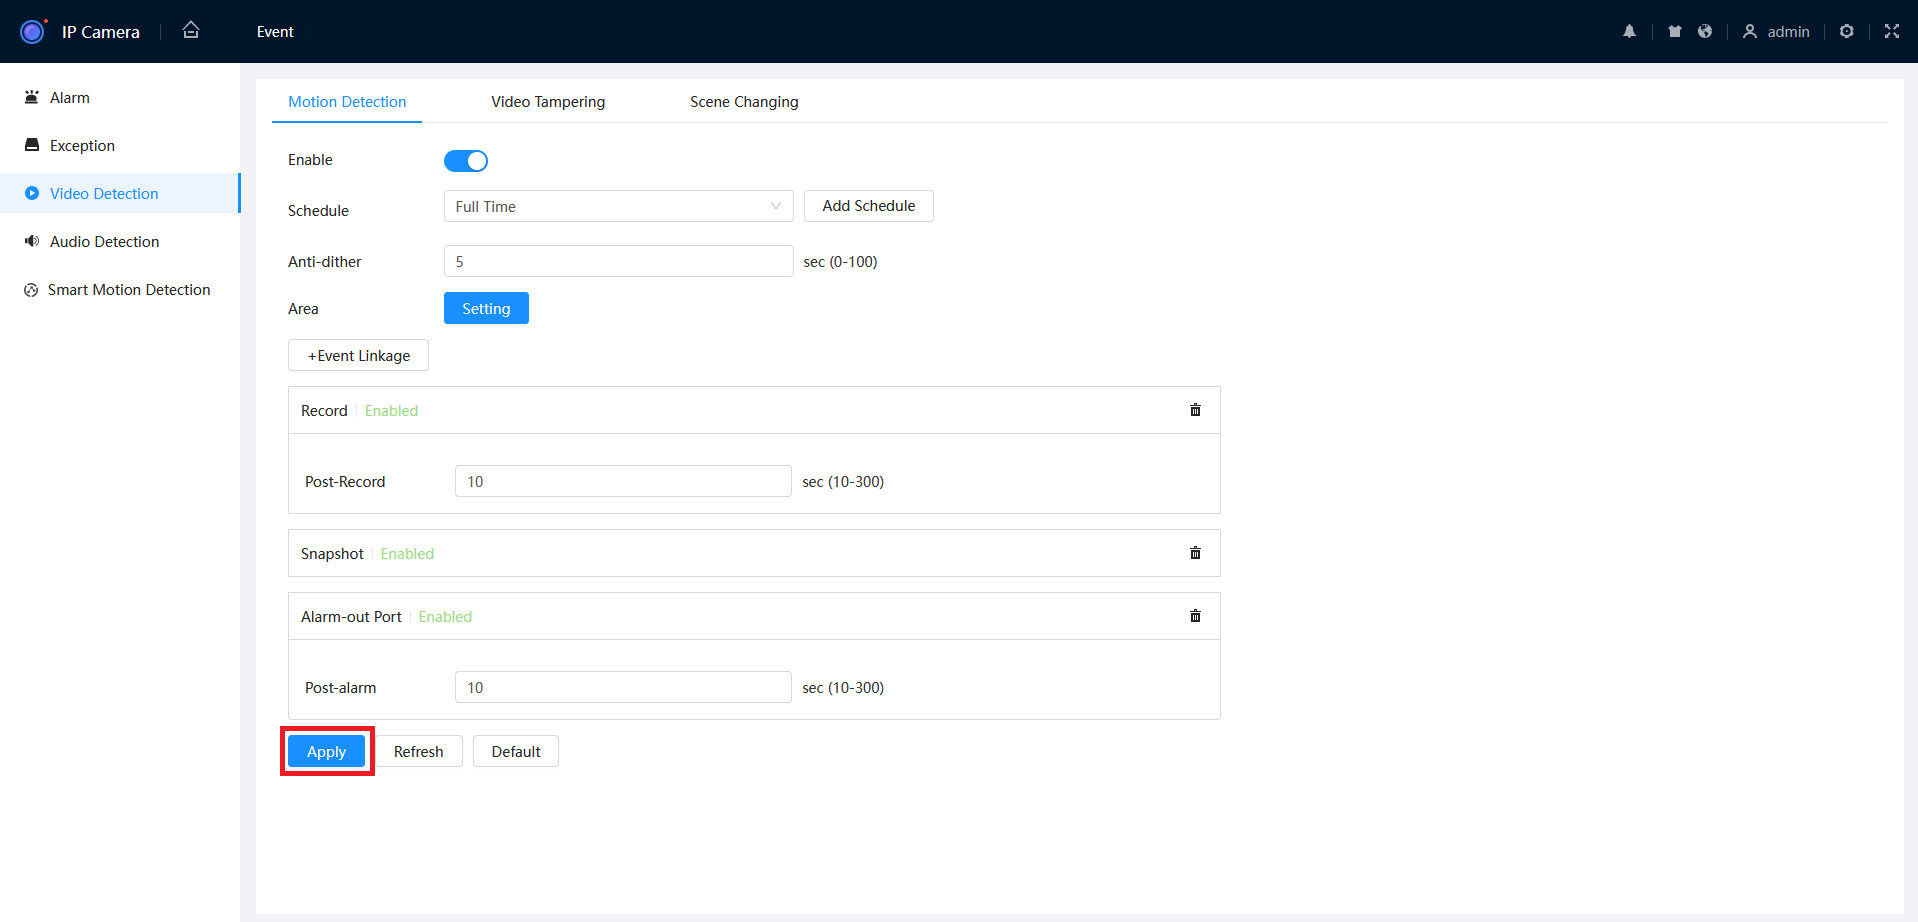
- Click the Enable switch to the on position (Blue).
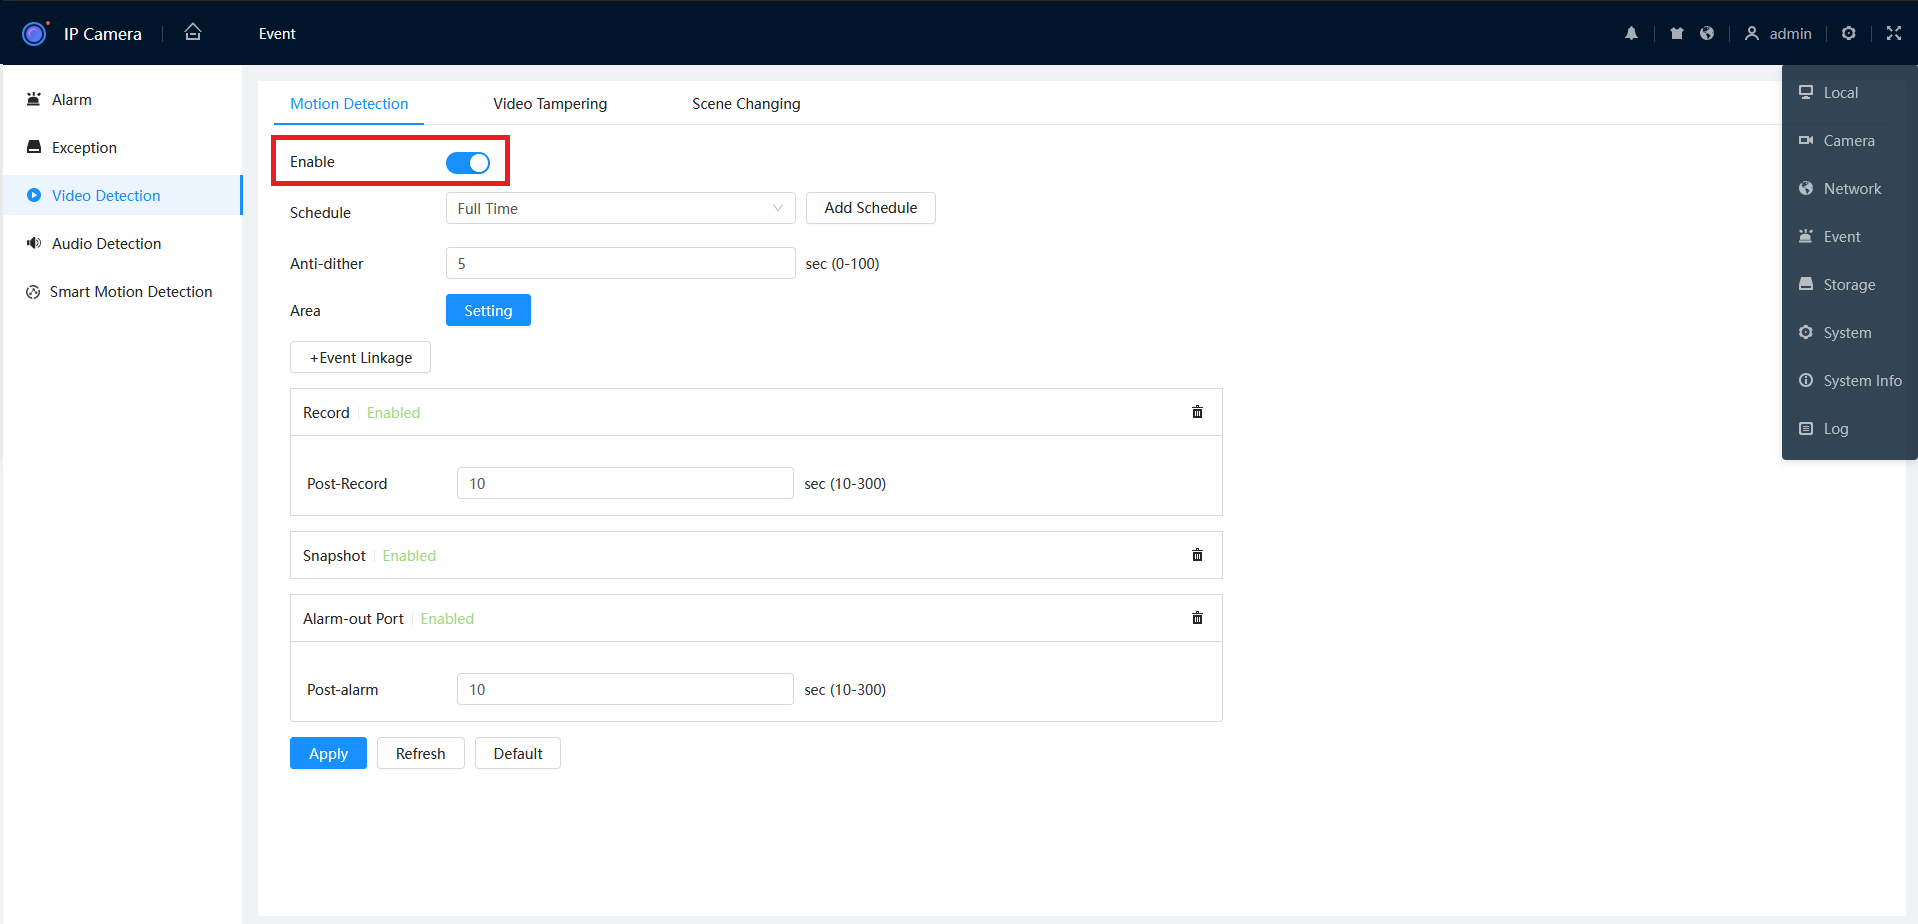
- If you only require motion during certain time periods, click Add Schedule.
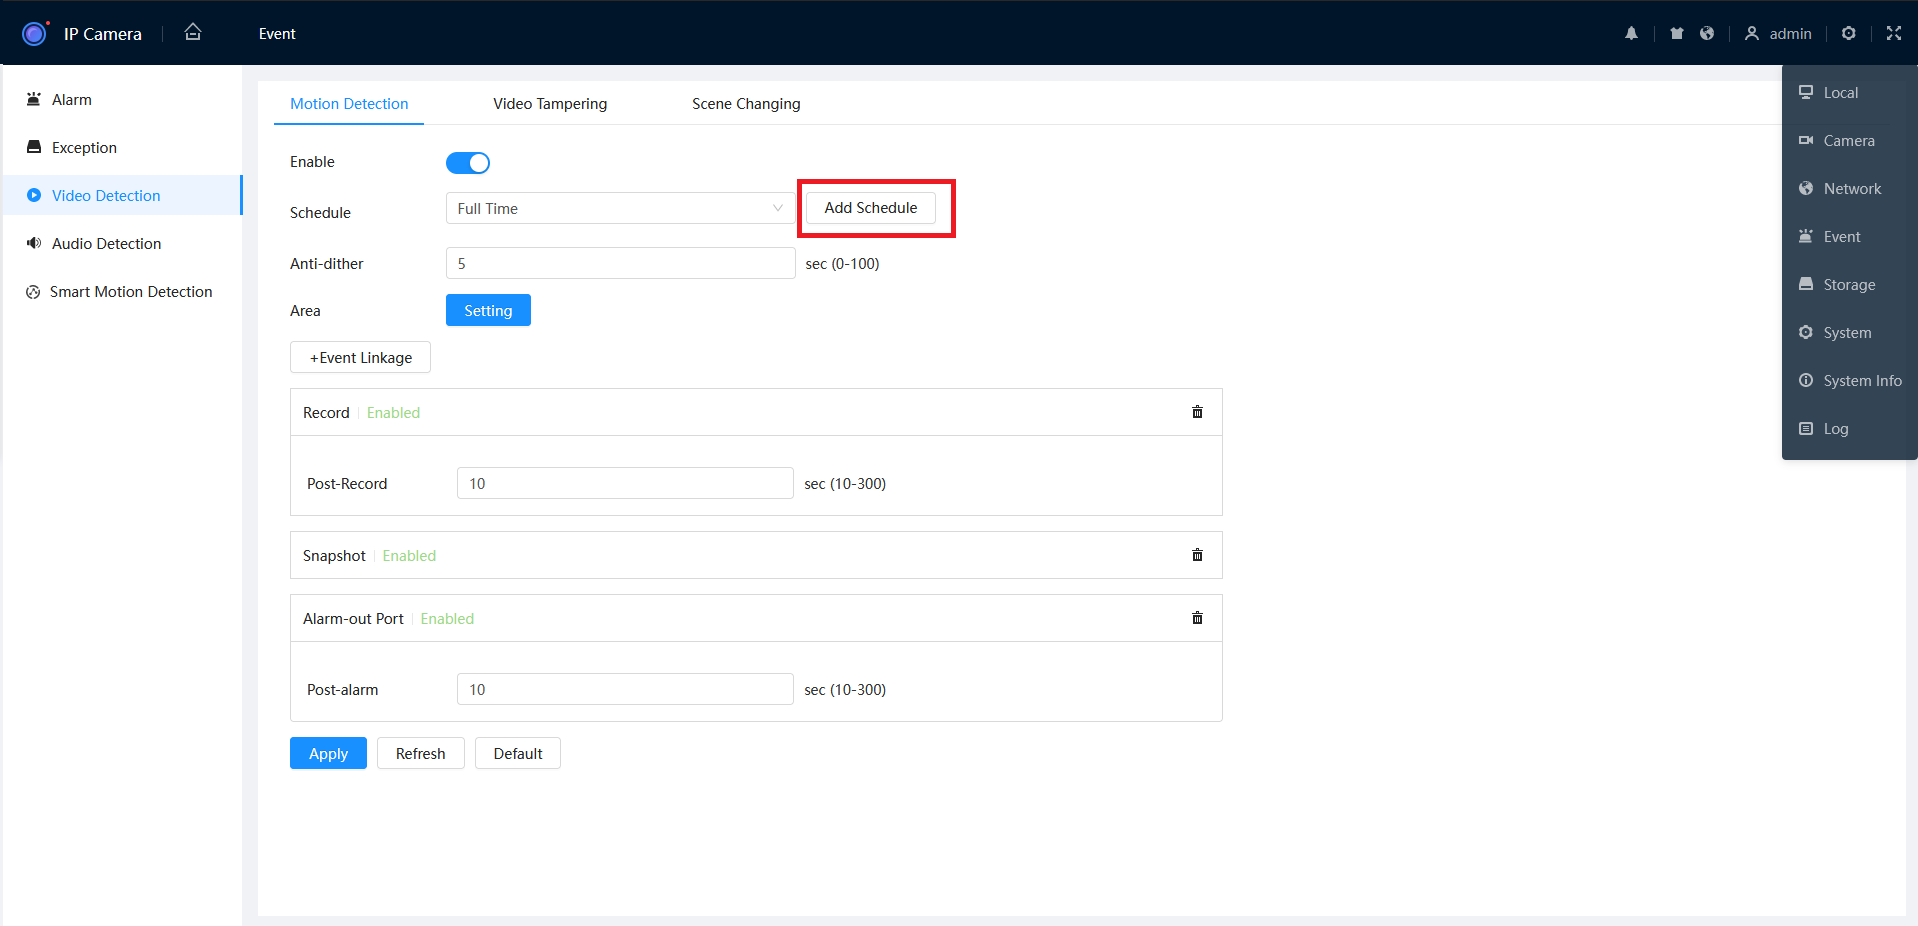
- From the "Add Schedule" you can now configure the active period for Motion Detection. Once the desired times are set, click Apply.
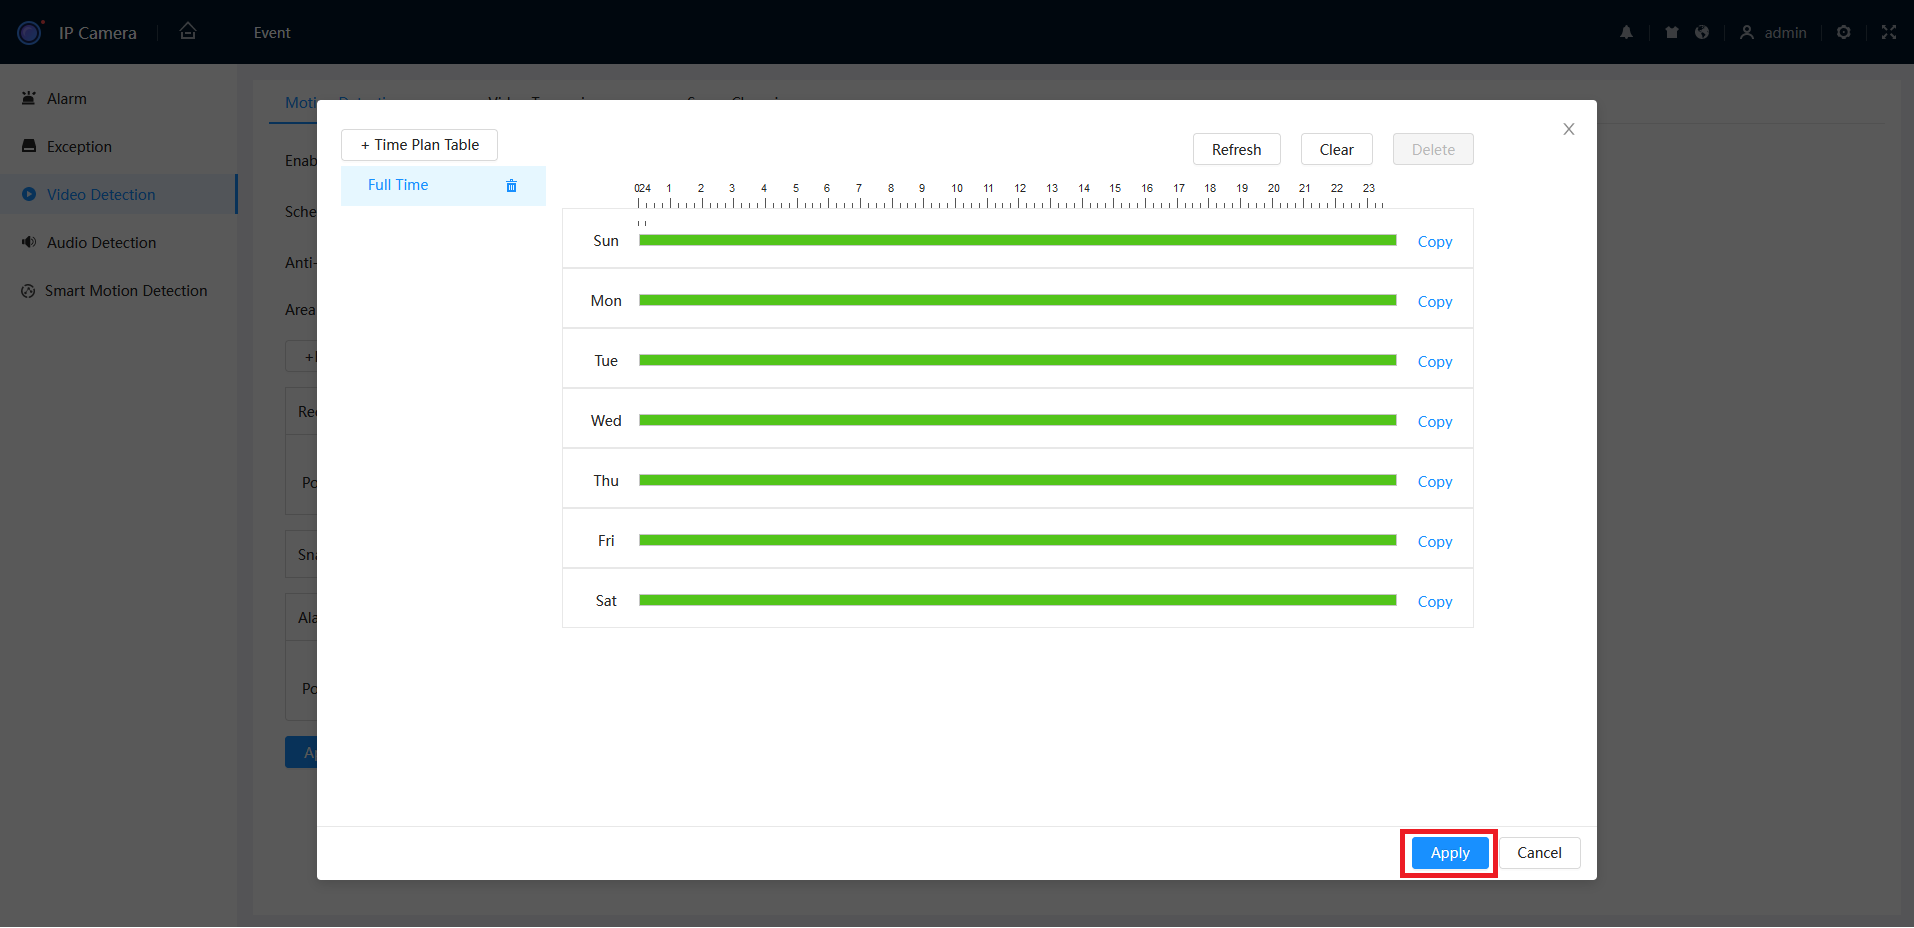
- Once the above steps are complete, click Apply.
Motion Detection via Camera Web Interface (Web 5.0)
- Navigate to Setting > Event > Video Detection > Motion Detection.
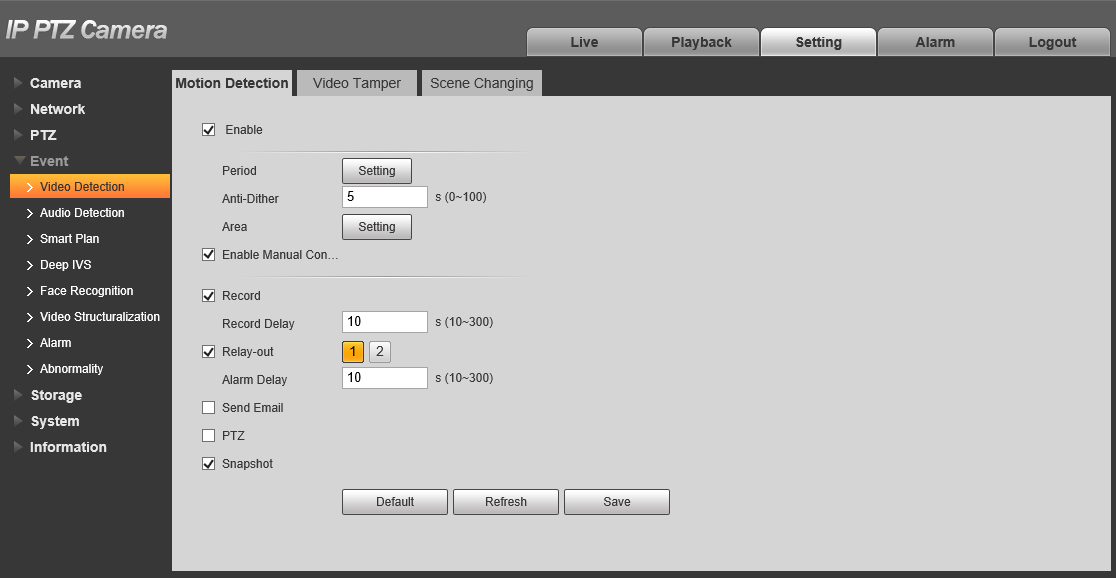

- Tick Enable to enable.

- If the camera is a PTZ, tick Enable Manual Control Trigger to exclude Motion Detection Event triggered by the PTZ being manually moved.

- Click
 next to Period to configure the active period for Motion Detection.
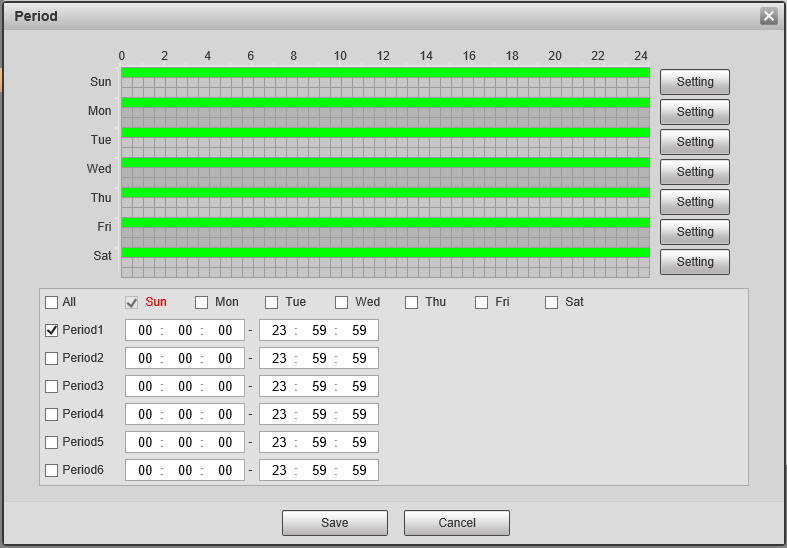
- Configure the schedule, then click
 .
. - Click
 .
.
Additional Settings
| Parameter | Description |
| Anti-Dither | Sets the Camera to only record one motion detection event in the set period. |
| Record | Enable this option if you wish for the camera to record when motion is detected. This requires Motion to be scheduled under Storage > Schedule > Record, and Auto to be selected for Record Mode under Storage > Record Control. |
| Record Delay | How long the camera will continue to record as part of the "motion event" after motion has stopped being detected |
| Relay-out | Enabling this will cause the relay of the camera to trigger when Motion is detected. |
| Alarm Delay | How long the relay will stay triggered for after motion is detected. Requires Relay-out to be enabled. |
| Send Email | Send an Email when Motion is detected. Requires configuration under Network > SMTP(Email) |
| PTZ | Set the PTZ to perform a configured Preset/Tour to Pattern when motion is detected. |
| Snapshot | A Snapshot will be taken when motion is detected. Motion Snapshots will need to be set in the Schedule under Storage > Schedule > Snapshot |
Smart Motion Detection (AI Cameras only)
Smart Detection filters Motion Detection events to only active if the object that triggers it is a Human and/or a Vehicle.
Smart Motion Detection via NVR (Black UI)
To enable Smart Motion Detection, follow the same steps for Motion Detection outlined above, then do the following:
- Return to the Main Menu and select AI.
- Select Parameters > SMD.
- Select the Channel to apply Smart Motion Detection for, then click Enable.
- Set a Sensitivity level, then which Effective Targets will trigger it (Humans, Vehicles or both).
Smart Motion Detection via Camera Web Interface (Web 5.0)
- Navigate to Setting > Event > Smart Motion Detection.
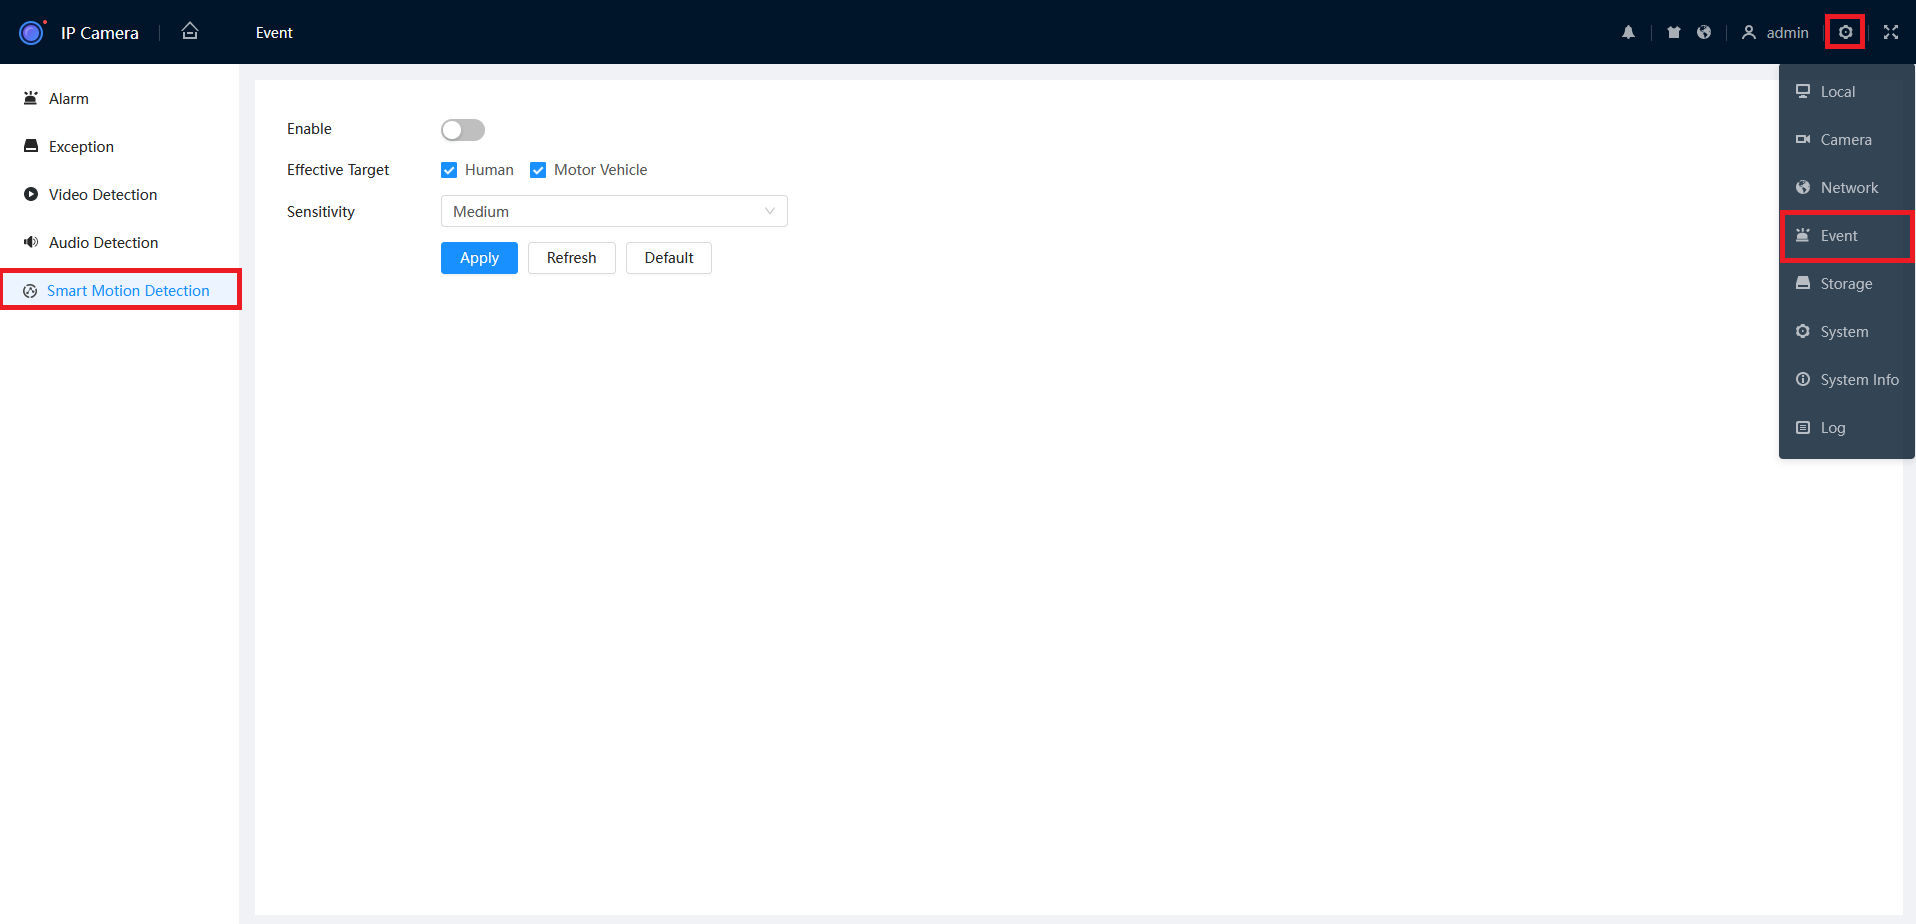
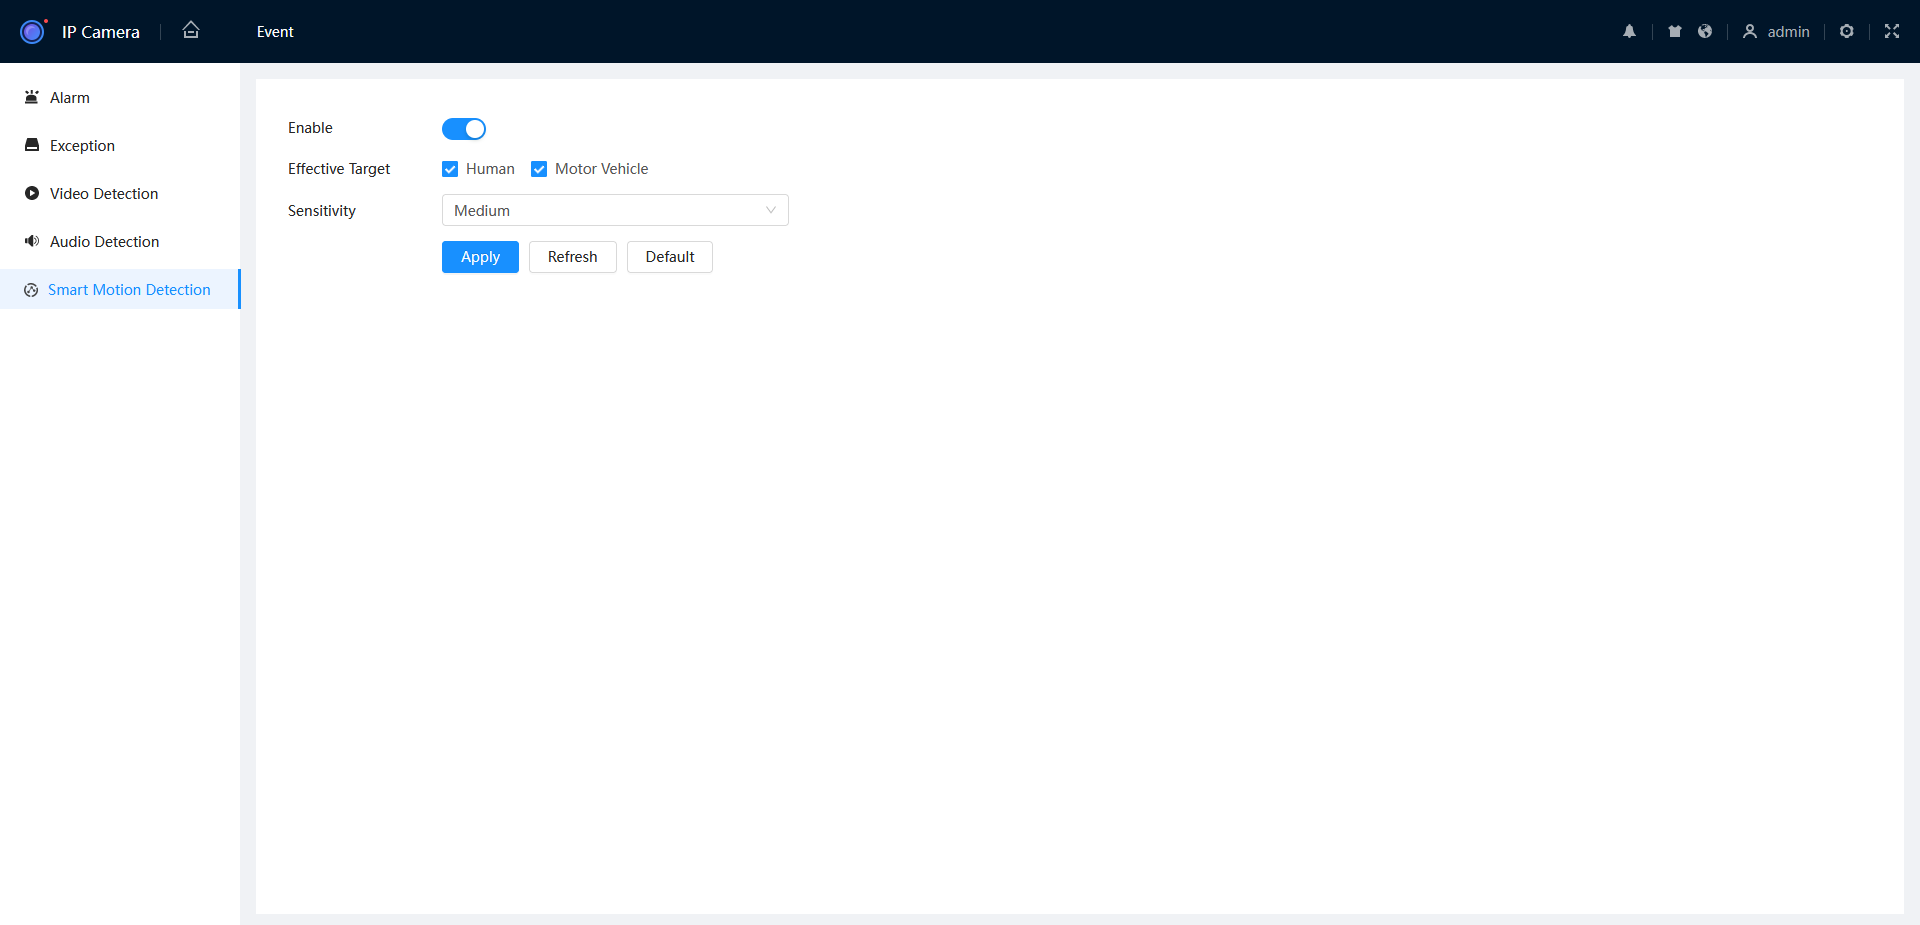
- Enable SMD, then click Apply.
Smart Motion Detection via Camera Web Interface (Web 3.0)
- Navigate to Setting > Event > Video Detection > Smart Motion Detection.
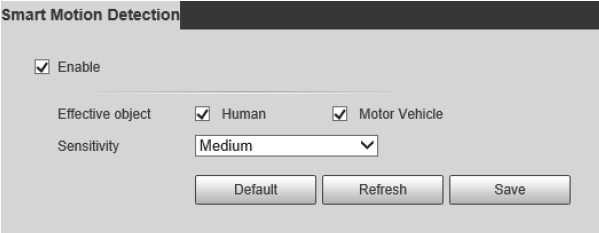
- Tick Enable to enable Smart Motion Detection.
- Tick Human and/or Motor Vehicle.
- Select the Sensitivity.
- Press
 to save your changes.
Additional Setup
Configuring Motion Detection Recording
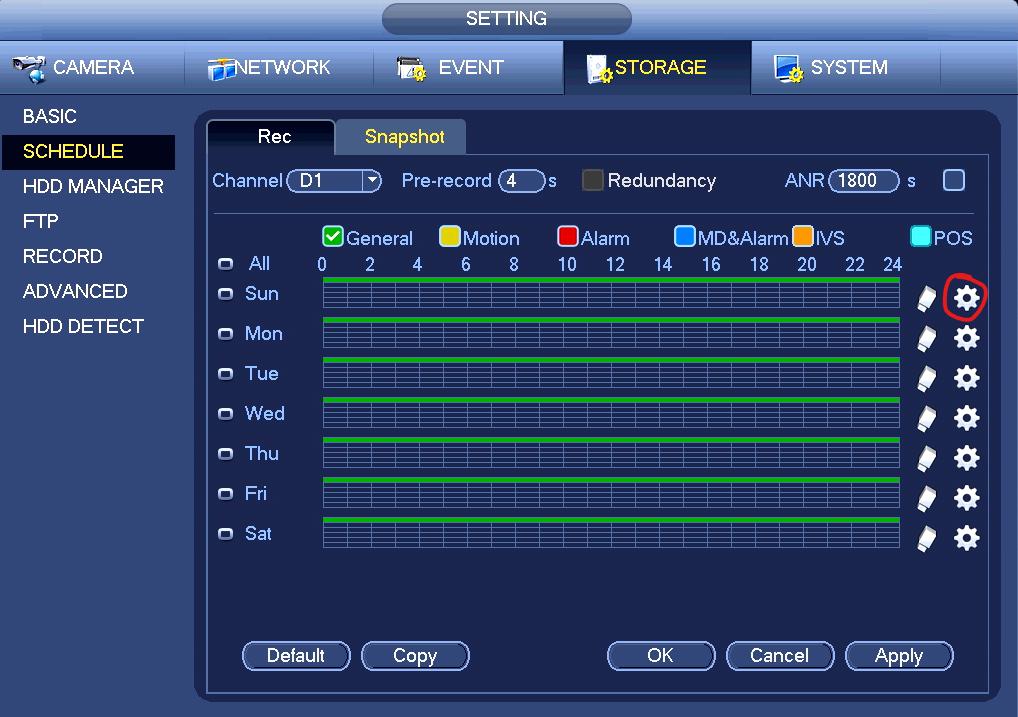
You can define the recorded footage schedule in the Record menu, and the recorded image snapshot schedule in the Snapshot menu. By default, cameras are set to non-stop Regular recording (24 hours a day, 7 days a week). Motion detection recording is not set by default. Schedules can be set in hourly periods for individual days for each camera, with colour-coded options for:
- Regular/General for all regular recording.
- MD/Motion for recording on motion detection.
- Alarm for recording on triggering an integrated alarm.
- MD & Alarm for simultaneous alarm/motion detection recording.
- IVS for recording on triggering IVS (Intelligent Video Surveillance) such as a virtual tripwire.
- POS for point of sale transactions.
We recommend adding MD & Alarm & IVS to all channels to accompany your regular recording.
NVR - Configuring Motion Detection & Intelligent Recording
(Black GUI)
- Click the Channel drop down to select All cameras.
- In the days column, toggle the All check box to simultaneously set recording schedule parameters for every day of the week.
- Check the yellow MD check box to select motion detection recording.
- Click the schedule to fill in areas for motion detection recording. We recommend a 24/7 schedule to mirror the Regular recording schedule.
- Repeat steps 3 & 4 with the blue IVS check box to set intelligent recording (tripwire, face detection, etc).
- Click Apply to the confirm recording schedule changes and move on to Snapshot Schedule.

(Blue GUI)
- Click the Channel drop down to select All cameras.
- In the days column, toggle the All check box to simultaneously set recording schedule parameters for every day of the week.
- Check the yellow Motion check box to select motion detection recording.
- Click the schedule to fill in areas for motion detection recording. We recommend a 24/7 schedule to mirror the Regular recording schedule.
- Repeat steps 3 & 4 with the blue IVS check box to set intelligent recording (tripwire, face detection, etc).
- Click Apply to the confirm recording schedule changes and move on to Snapshot Schedule.
Delete
Standalone IP Camera - Configuring Motion Detection & Intelligent Recording
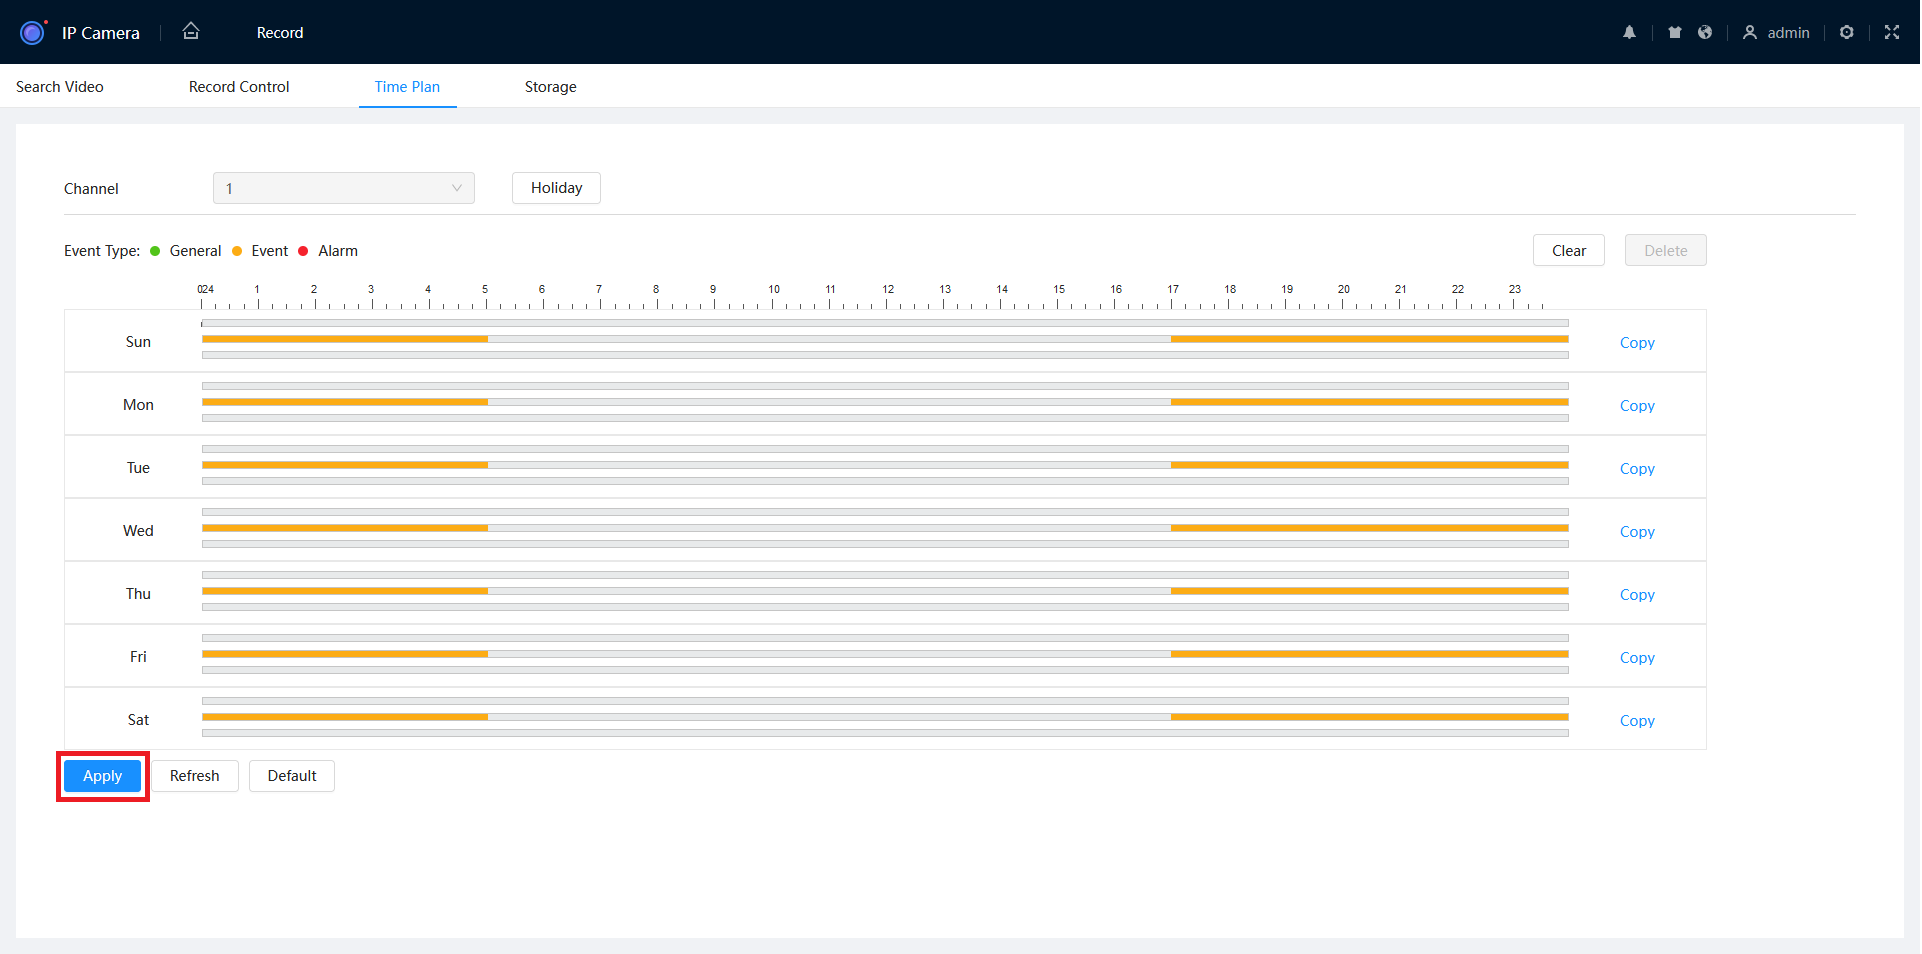
New GUI (White/Blue)
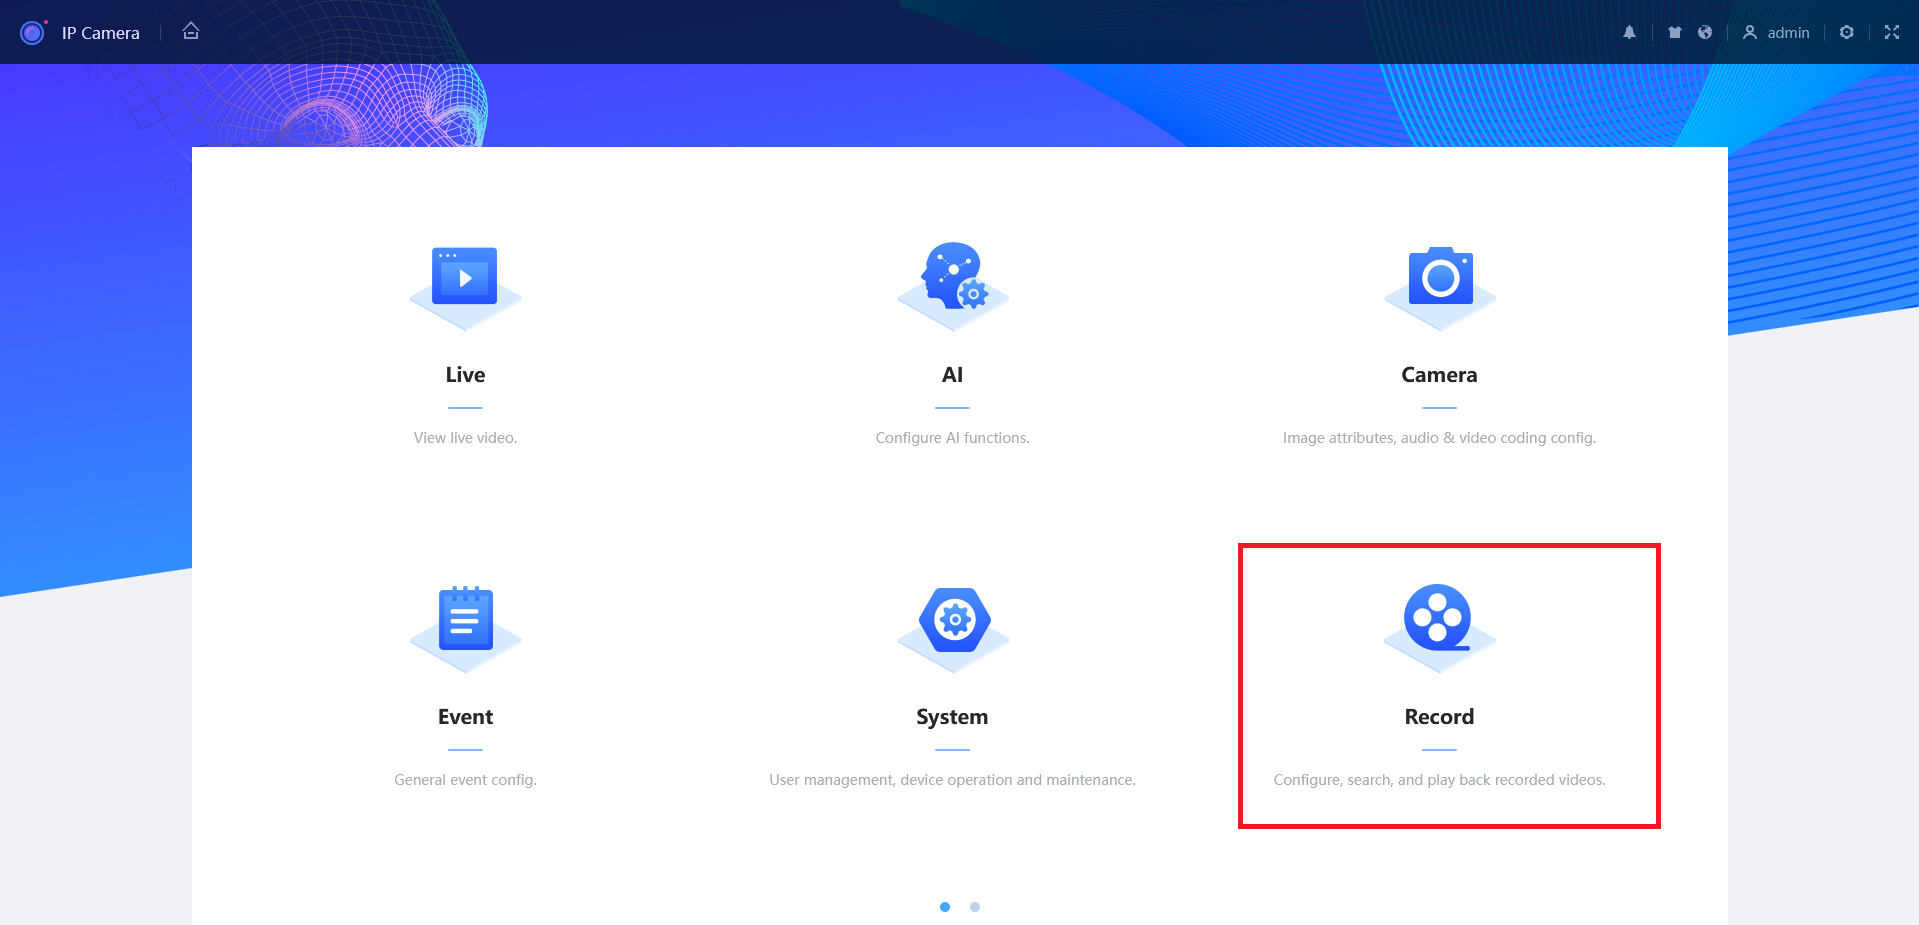
- From the Home page, select Record.
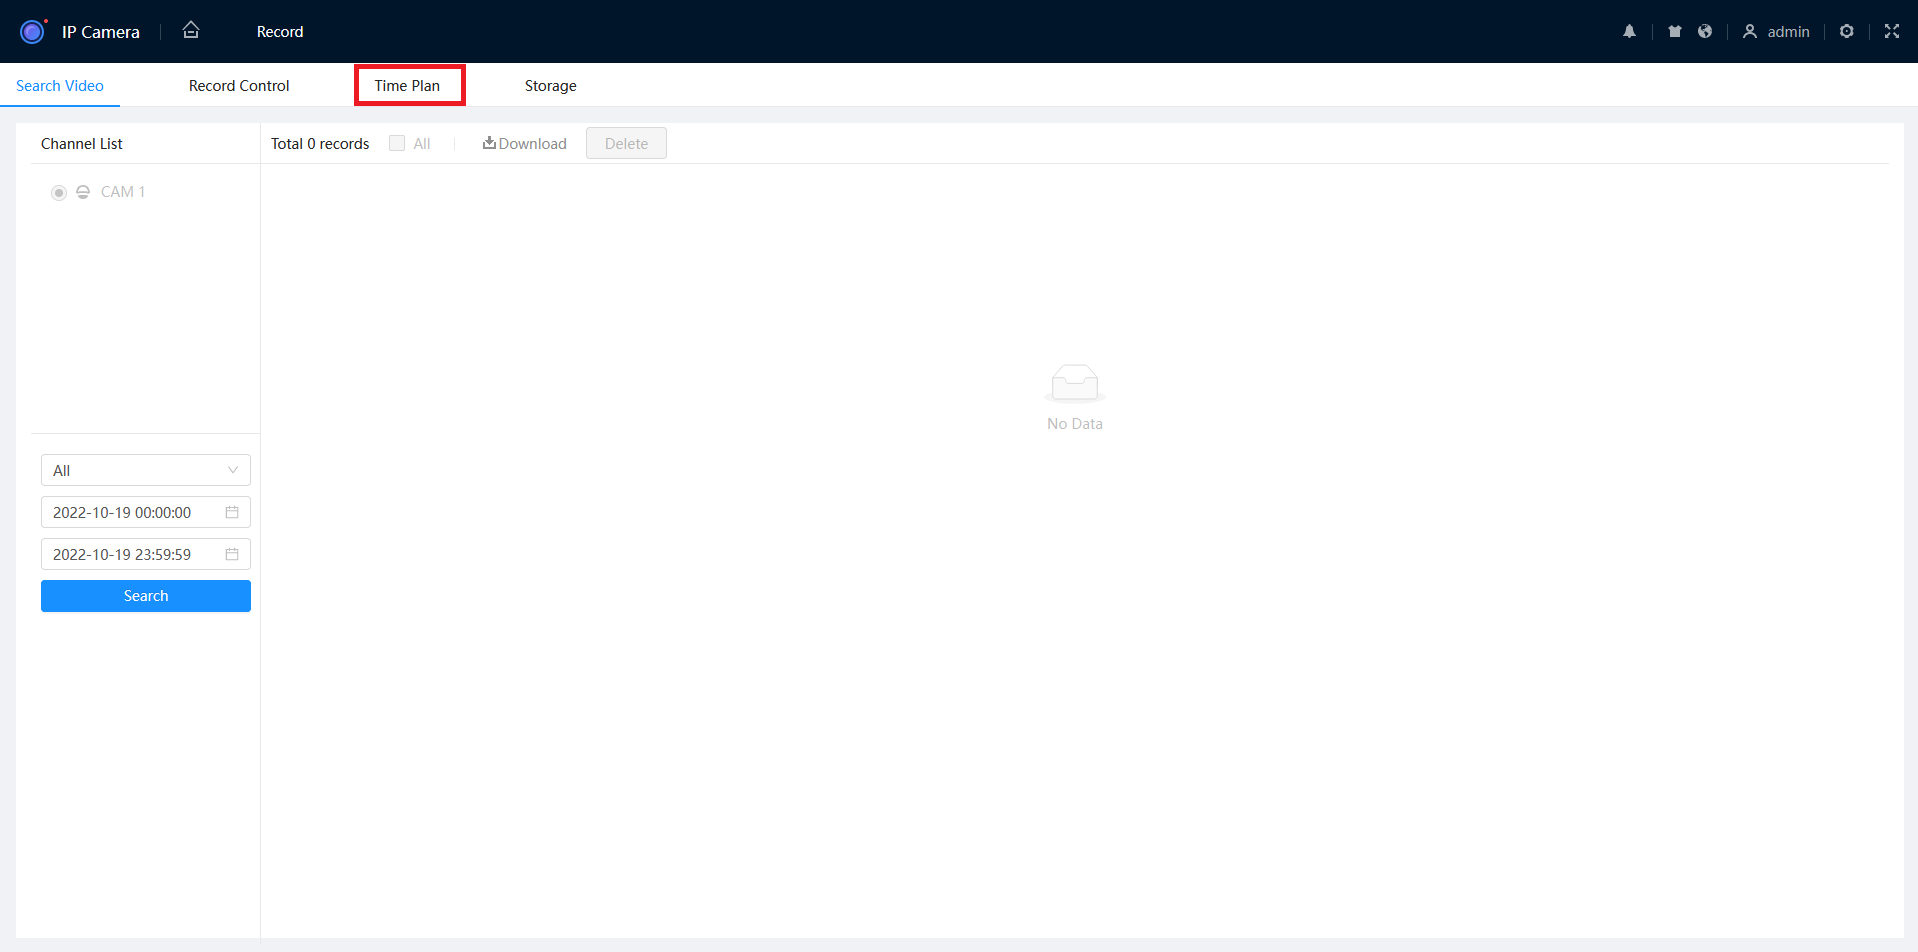
- Select Time Plan.
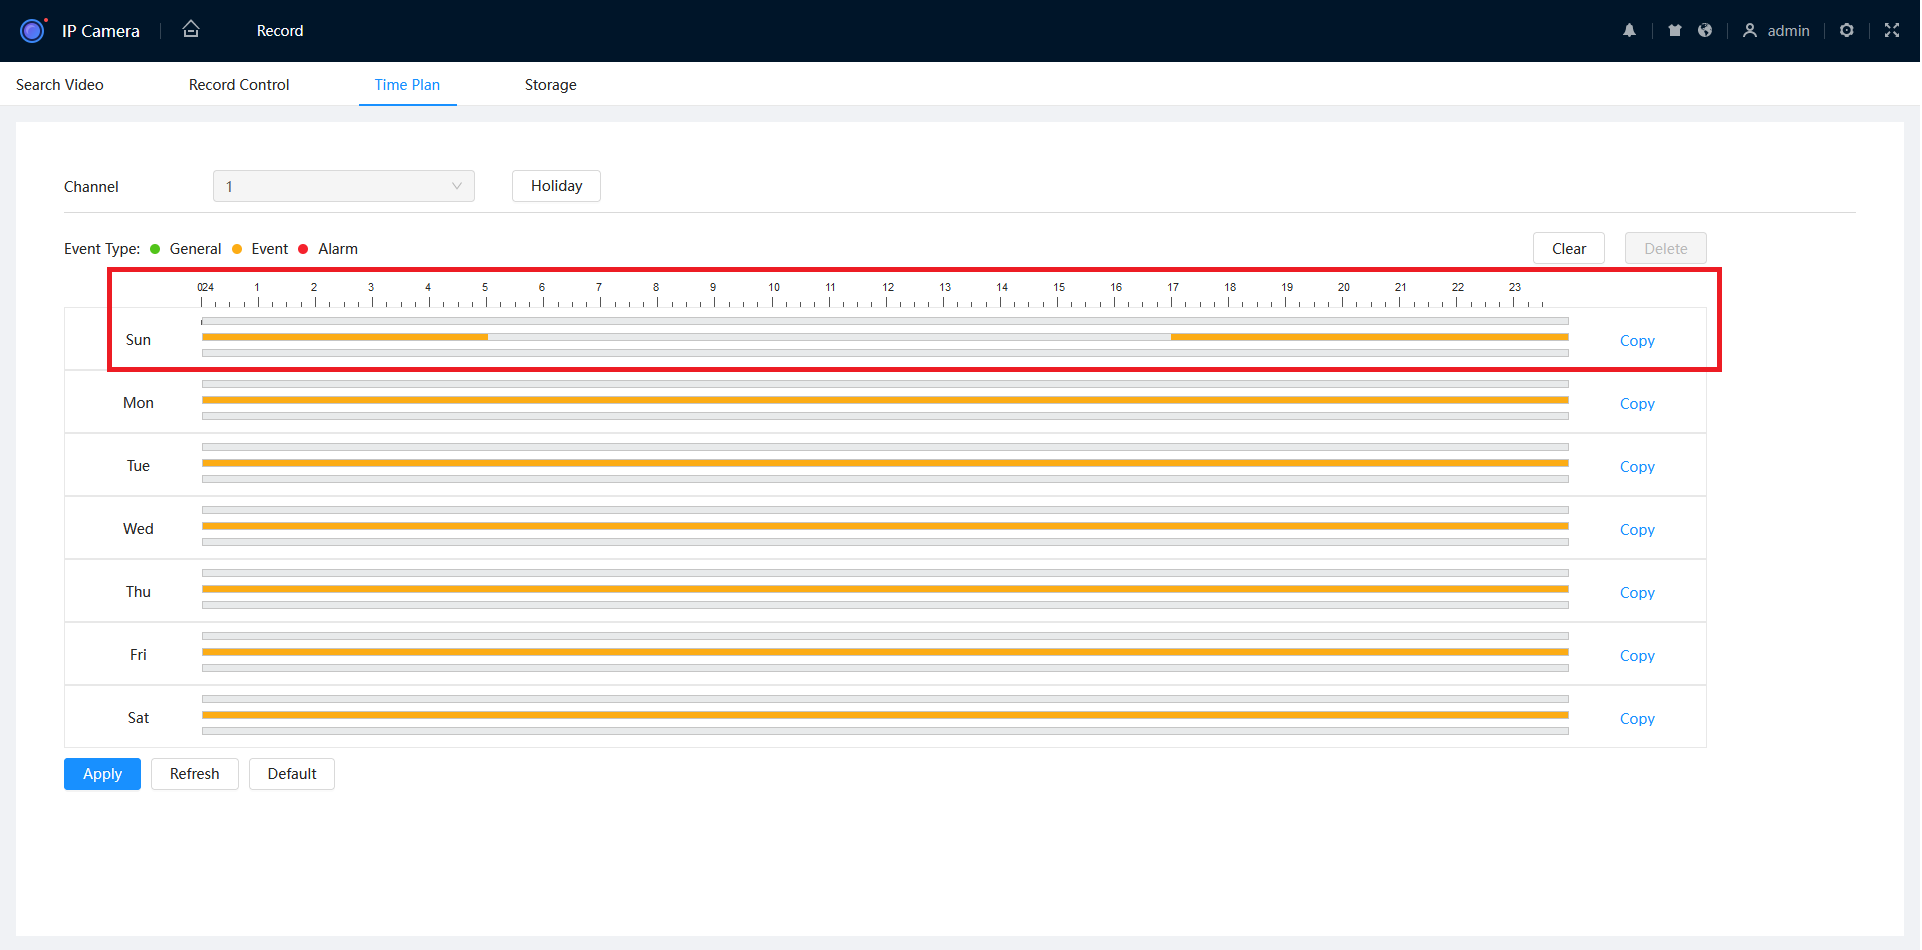
- Use the mouse to drag the Event line to the desired time. In this example we are setting Event recording to be active between 5pm and 5am.
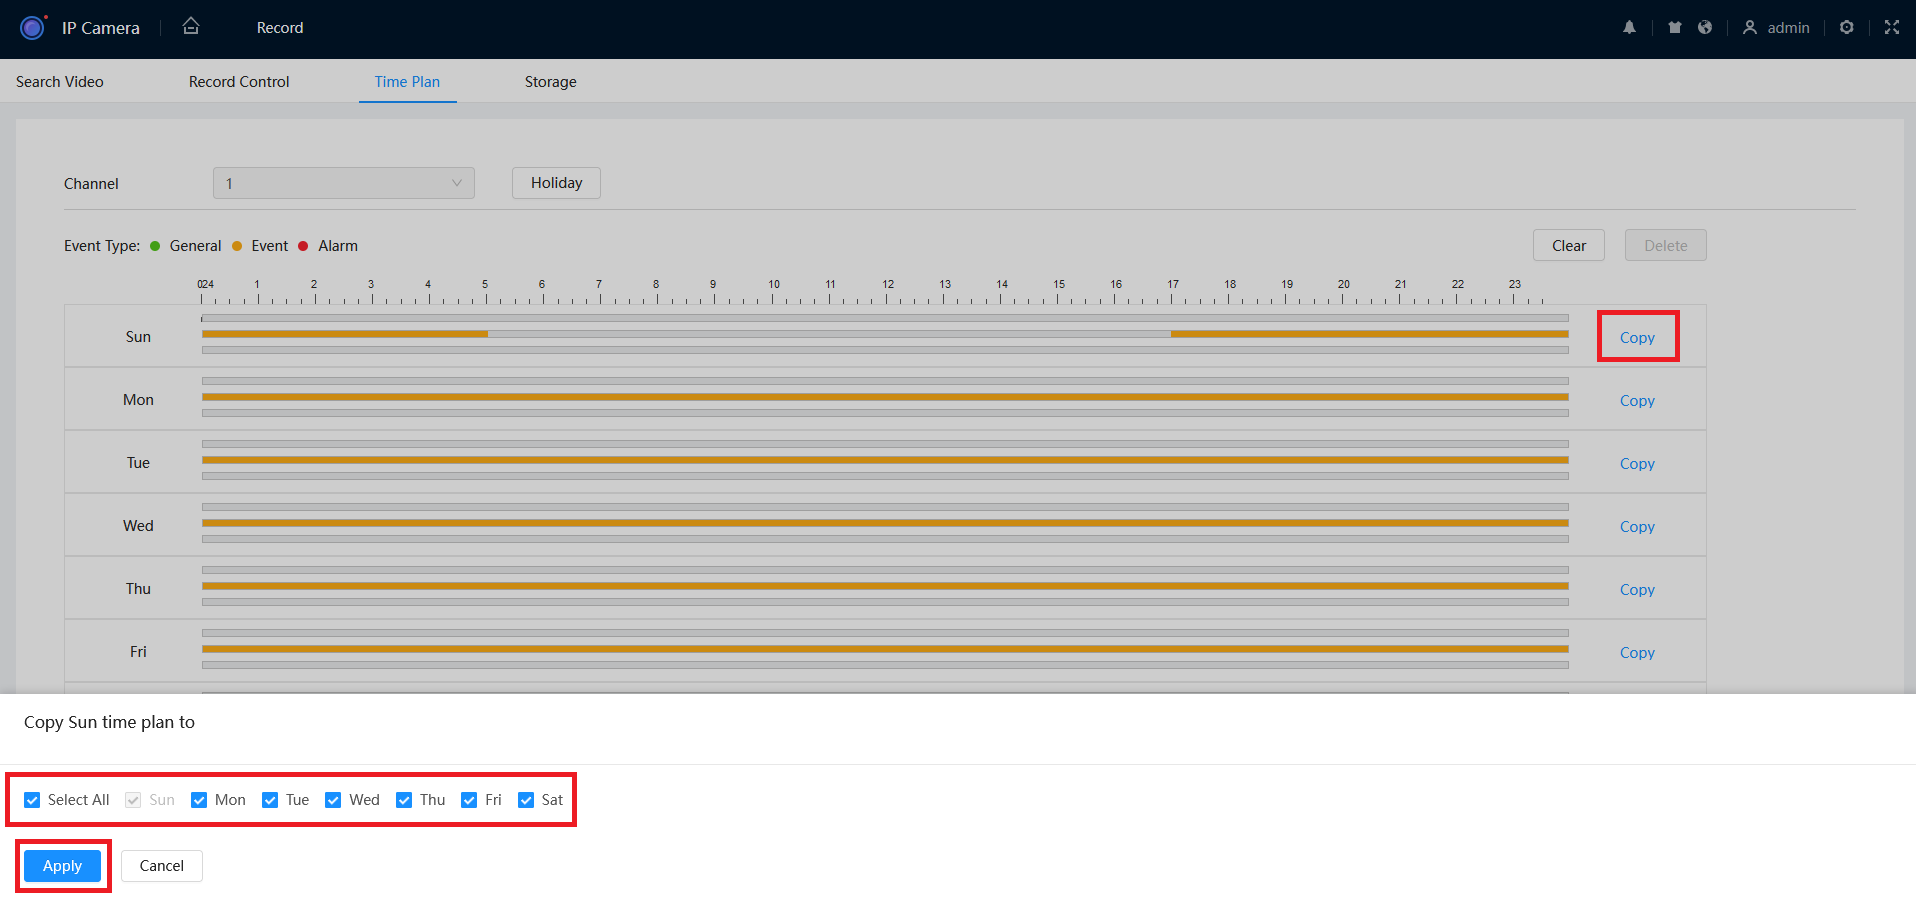
- Press Copy, then select each day that you want to apply this Time Plan too. Once selected, press Apply.
- Press Apply.
Old GUI (Grey)
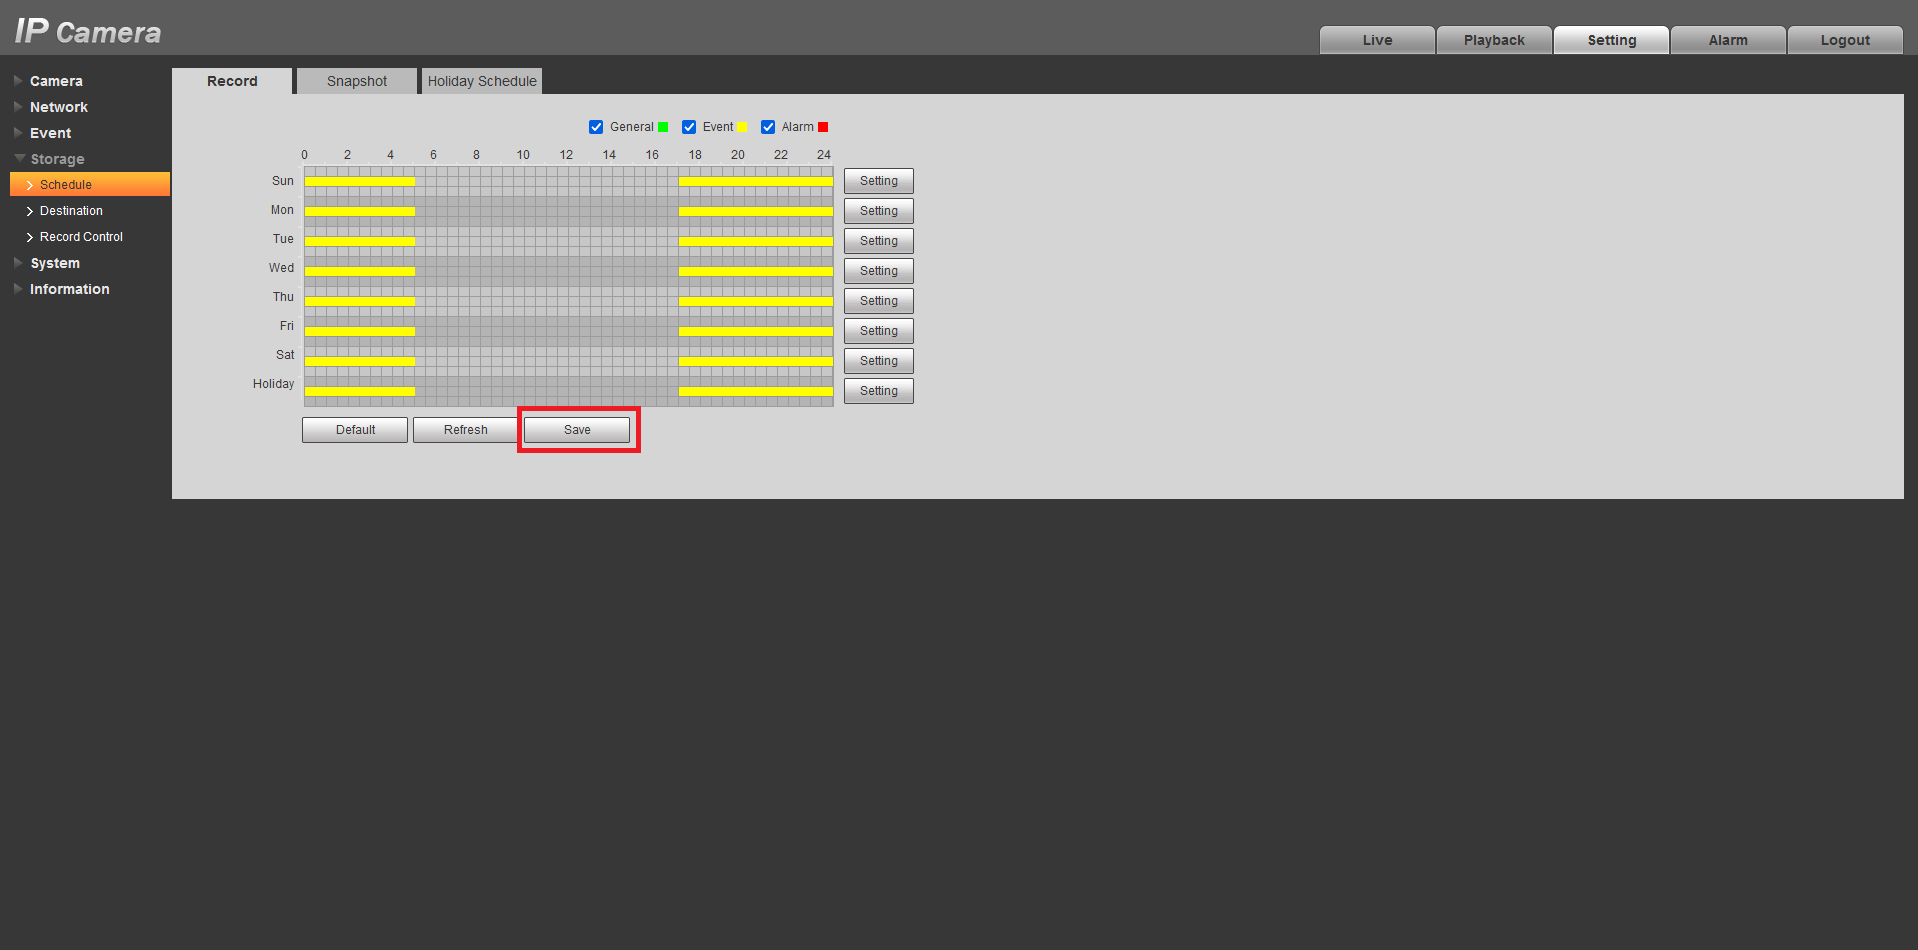
- Navigate to Setting > Storage > Schedule.
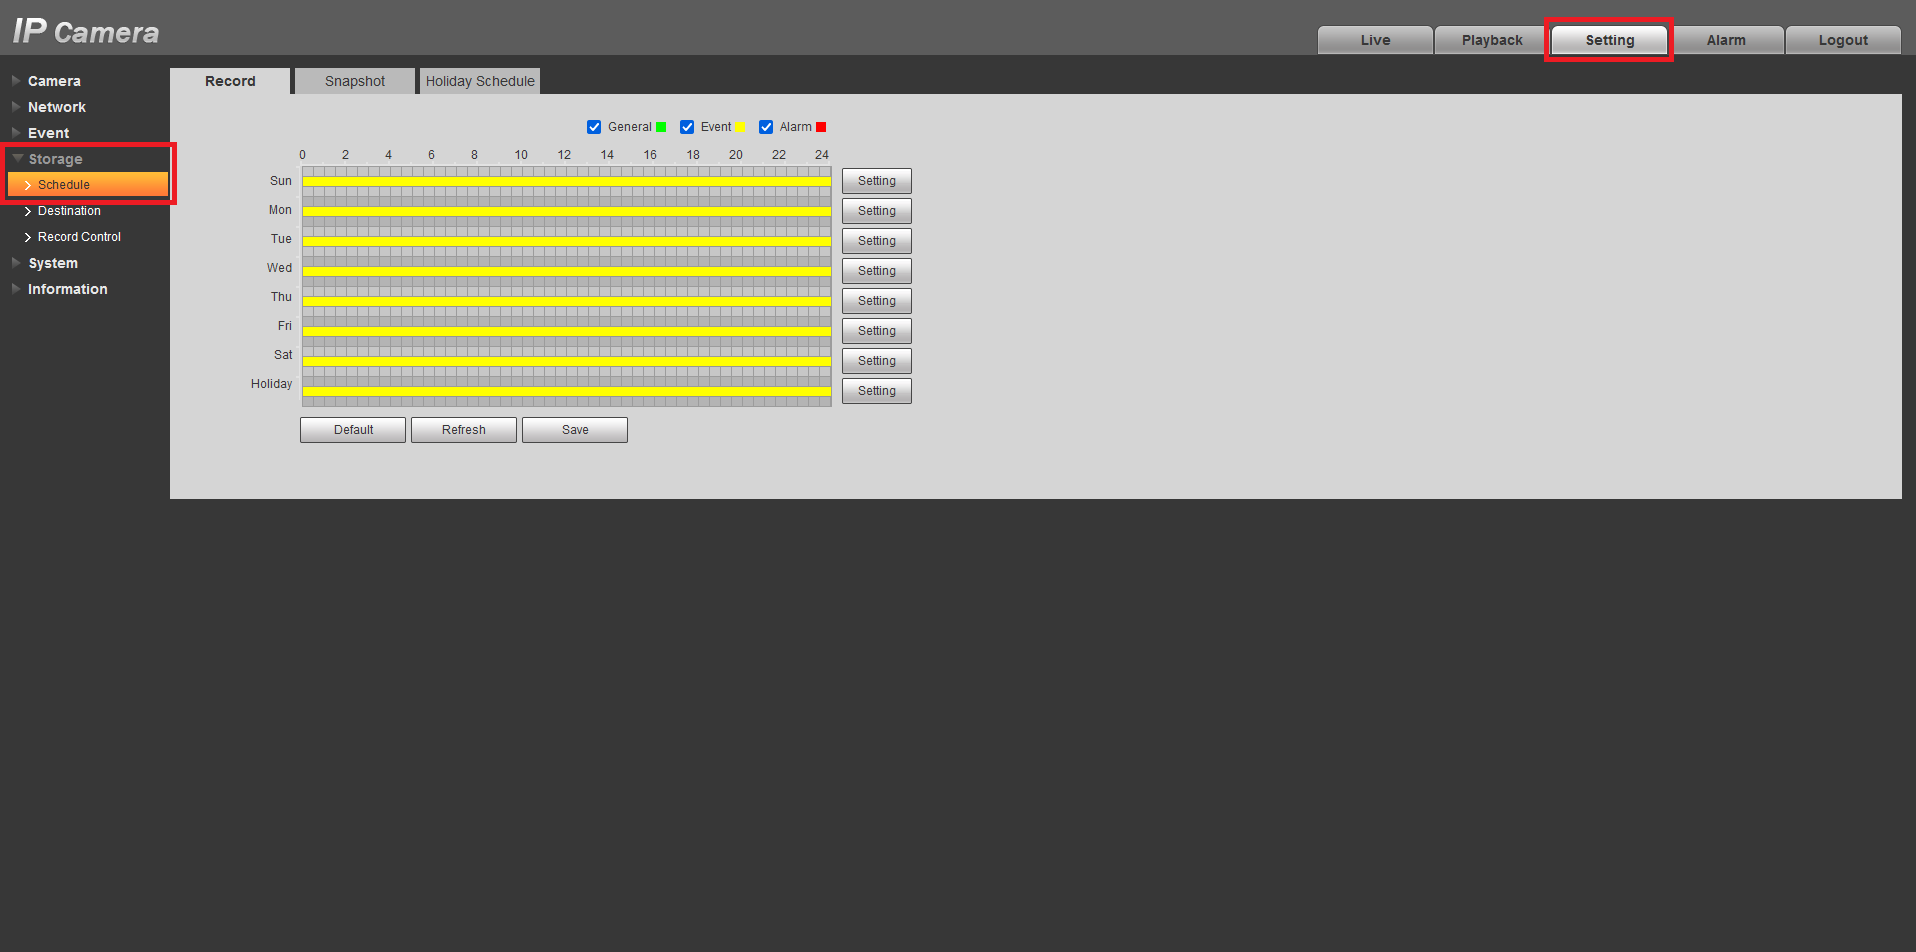
- Select Setting, then select the days you want to modify.
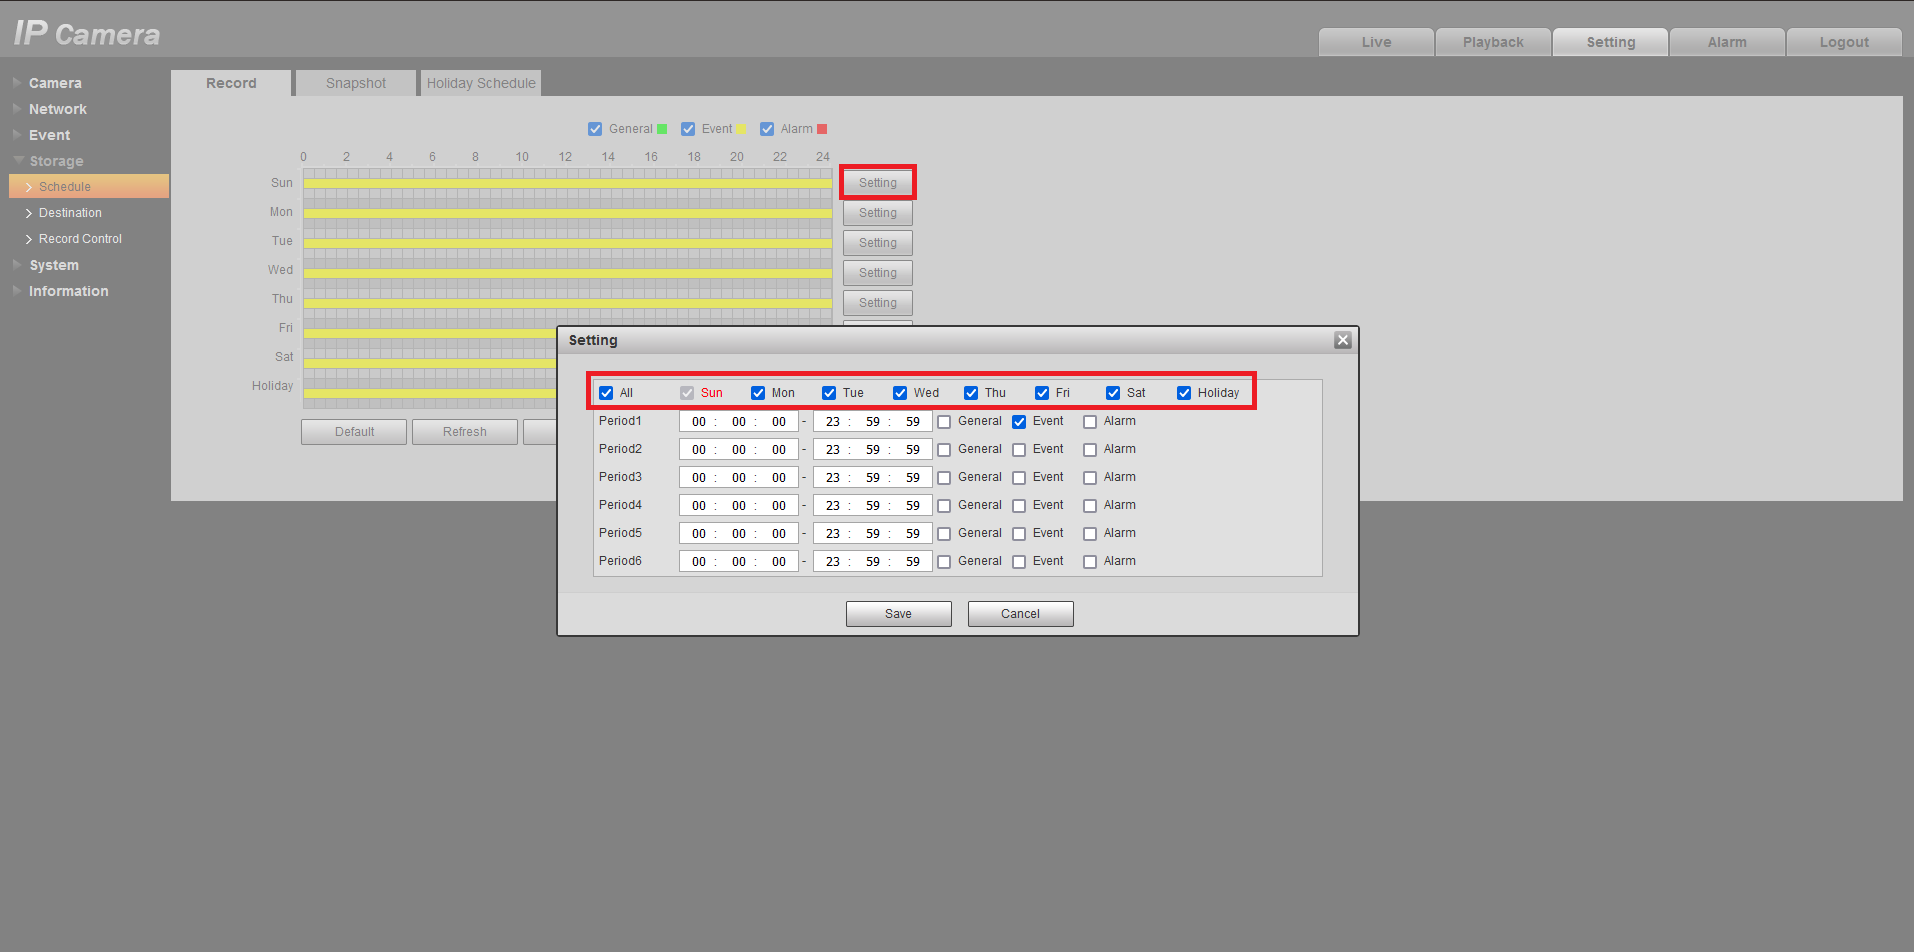
- Adjust the Period Settings to the desired time and recording type, then press Save. In this example we are setting Event recording to be active between 5pm and 5am.
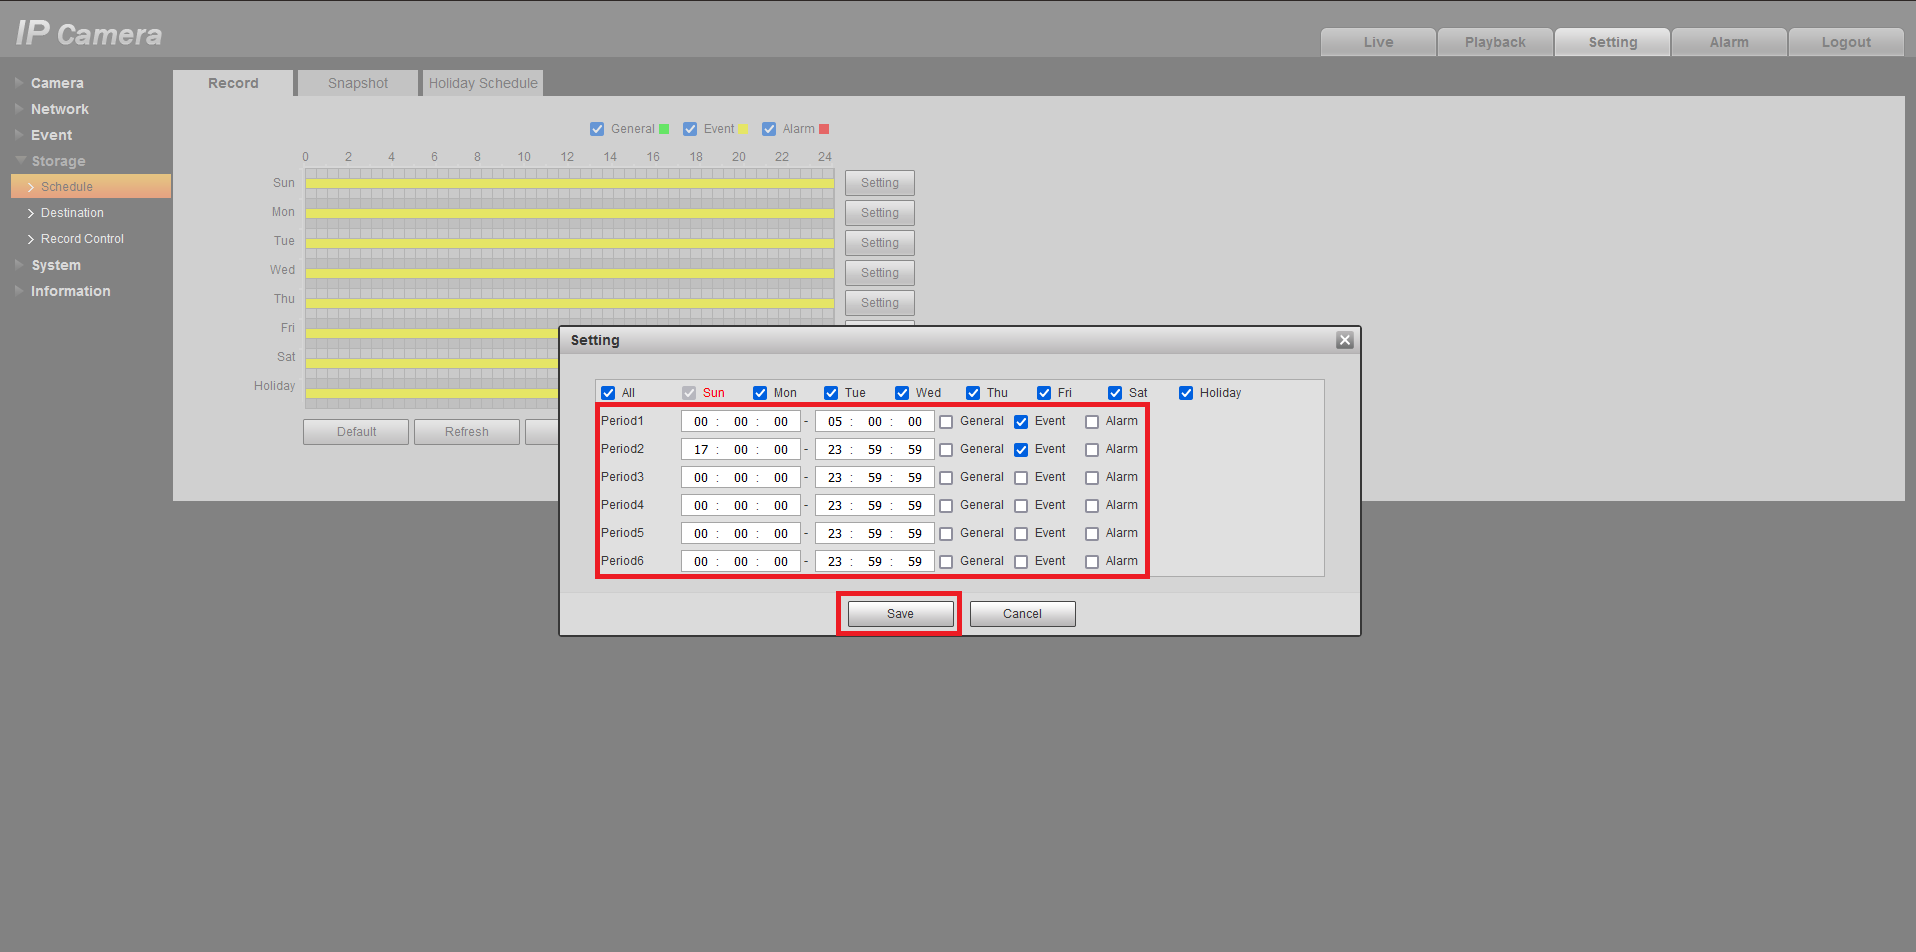
- Press Save.
Adjusting Motion Detection Sensitivity and Region
If motion detection is triggering too easily, follow the below steps to adjust the sensitivity and region of detection.
Black GUI
- Go to Main Menu, then Alarm.
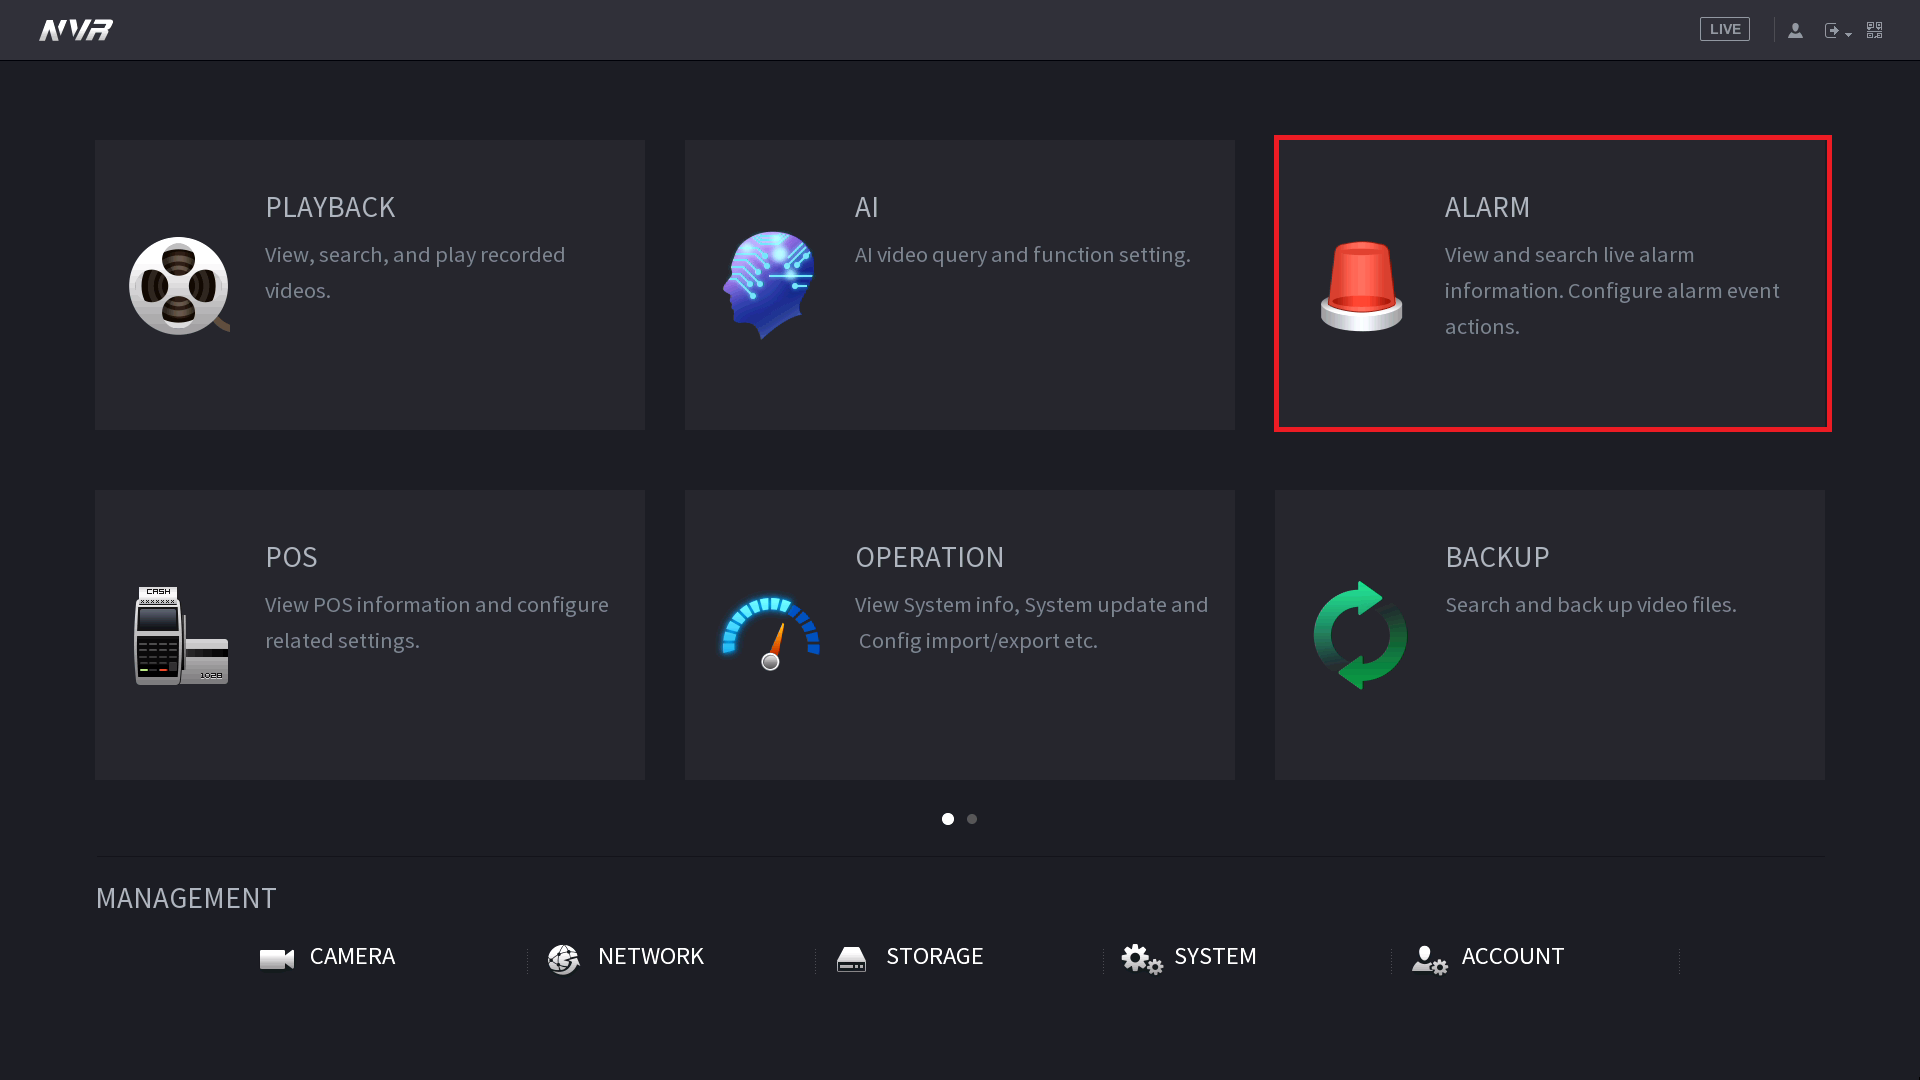
- On the left hand side select Video Detection. Select the Region Setting button.

-
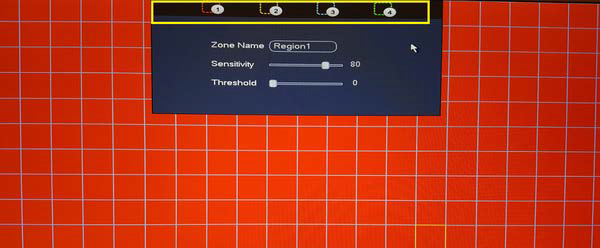
Adjust the Sensitivity and Threshold. There are multiple region settings if you wish to set different Sensitivity and Threshold settings for different parts of the image. Sensitivity is how easy it is to trigger (30-70 is recommended).Threshold is how much motion is required to trigger an event. (1-10 is recommended).

- Adjust the area of detection by clicking and dragging on the red squares. Red squares are where motion will be detected. Clear squares are where motion will not be detected. Right Click to exit, and select Apply.
Blue GUI
Go to Main Menu > Event > Video Detection > Motion Detection
- Click the Setup/Setting button next to Region to access the zone, sensitivity and threshold settings for motion detection.
- Adjust the Sensitivity & Threshold to suit your environment. High Sensitivity, Low Threshold mans it will be easy to trigger. Low Sensitivity, High Threshold means it is hard to trigger.
- Adjust the area of detection by clicking and dragging on the red squares. Red squares are where motion will be detected. Clear squares are where motion will not be detected. Right Click to exit, and select Apply.
Sensitivity: Determines how sensitive the zone is to movement. 1 being the lowest and 100 the highest. (30-70 is recommended)
Threshold: Determines the minimum size of an object that can trigger motion detection. 1 Being the lowest and 100 the highest (1-10 is recommended).
Camera Web Interface
- Navigate to Setting > Event > Video Detection > Motion Detection
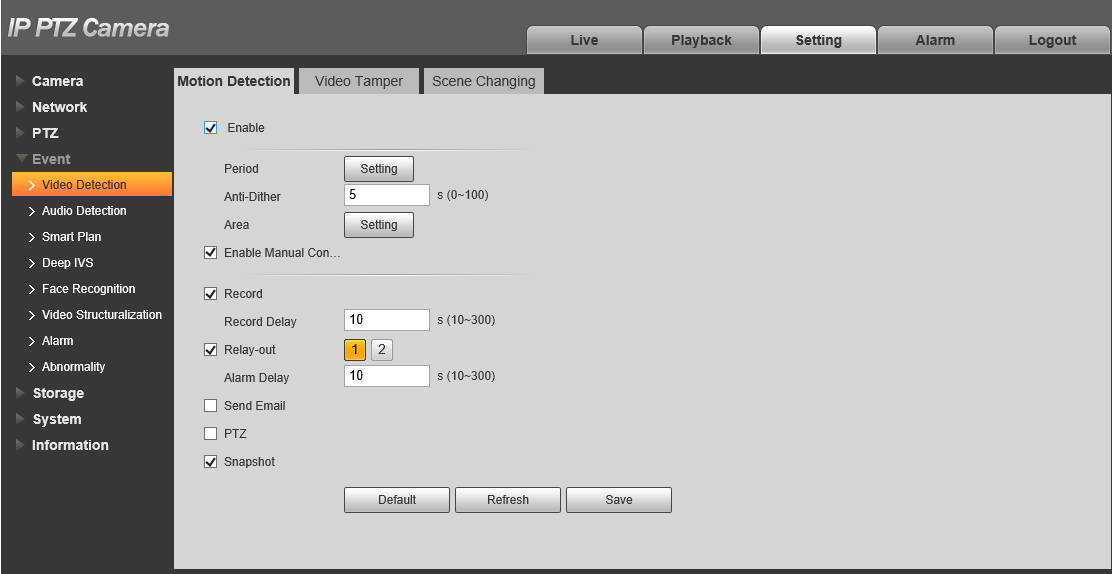
- Click
 next to Period to configure the active period for Motion Detection.
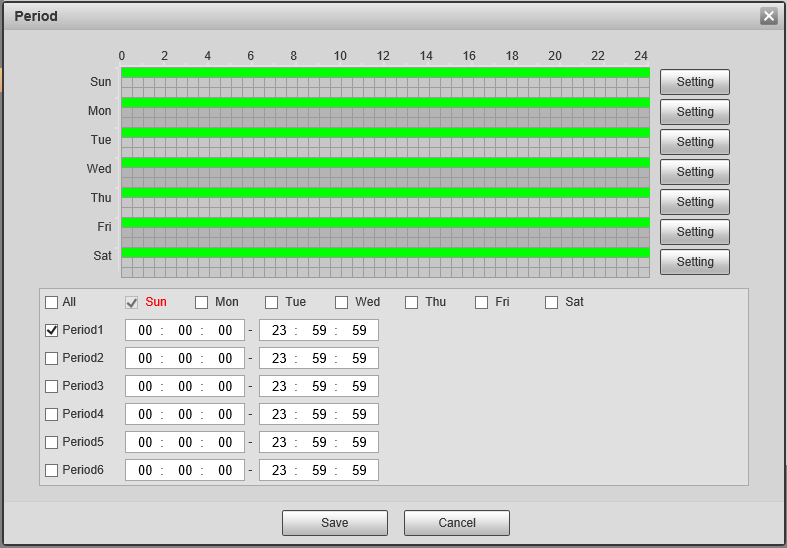
- Configure the schedule, then click
 .
. - Click
 next to Area to configure the active motion detection area and it's sensitivity.
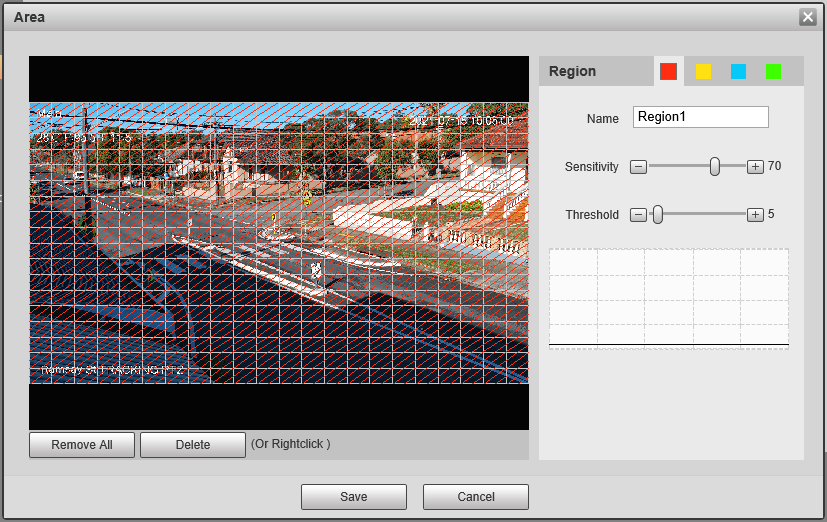
- Add/Remove the coloured squares to configure where motion will be detected. For example you may want to remove the coloured squares that overlap trees.
- Adjust Sensitivity & Threshold if necessary. There are four different colours so you can have four different settings.
Sensitivity is how easy it is to trigger 30-70 is recommended.
Threshold is how much has to move to trigger 1-10 is recommended.
High Sensitivity/Low Threshold will pick up motion easier, whereas Low Sensitivity/High Threshold will be harder to trigger. - Click
 .
.