Config Error 18 or conf.LoginErrorNo-18 means that a camera needs to be initialised before it can be used on the NVR.
To initialise a camera you will need a laptop with Config Tool and either a PoE switch or a 12V power supply.
Connect a laptop to the switch the camera is connected to and open Config Tool.
(Alternatively, power the camera with a 12V power supply and connect it to the laptop using an ethernet cable)
Initialising a Camera
Initialising a camera is the process of setting a password on it. All cameras manufactured post 2018 need to be initialised before use.
If connected to the POE Port of an NVR manufacturer post 2018 this process should happen automatically.
Option 1 - Initialisation via the Web Interface
The Camera will need to be connected to the Laptop via an Ethernet cable.
You can access the Web Interface by entering the camera's IP address into the address bar of Internet Explorer. 192.168.1.108 is the default IP of our cameras.
You may need to change the IP address of your computer to reach it.
How to change the IP Address of your computer
Windows 10
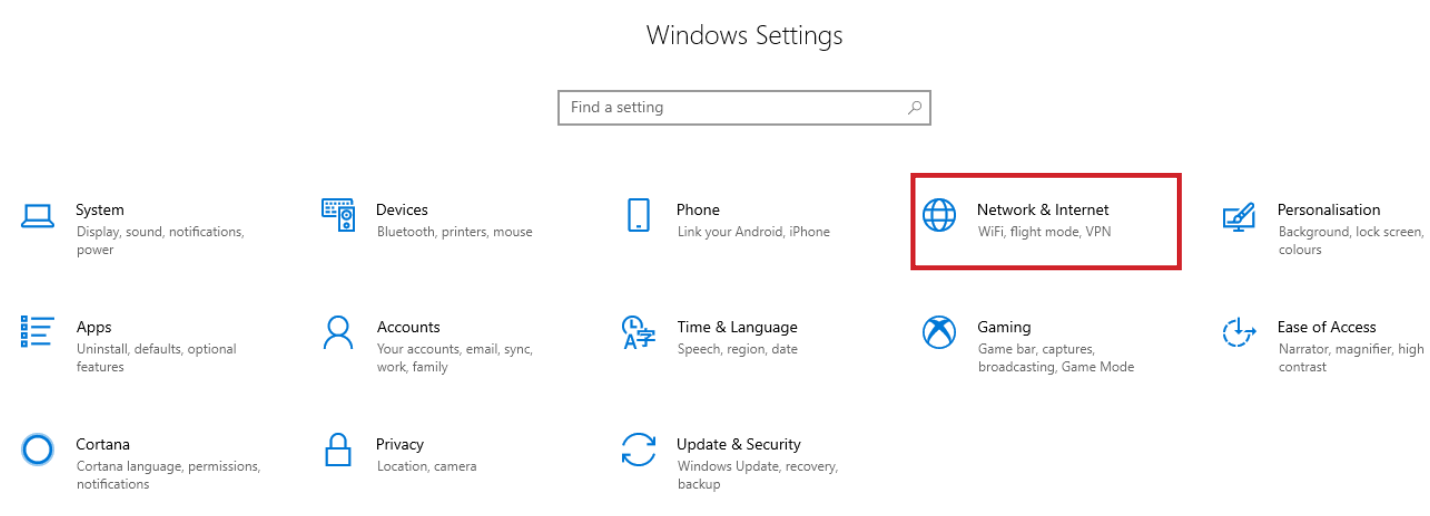
- Open Settings.
- Select Network & Internet.
- Select Status, then Change Adapter Options.
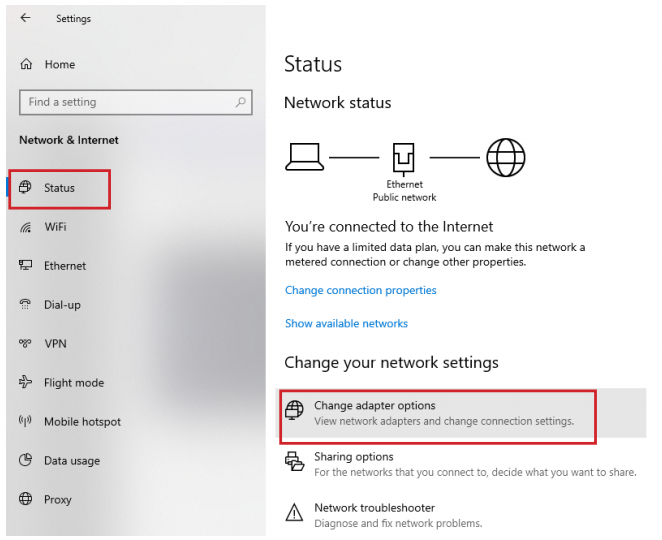
-
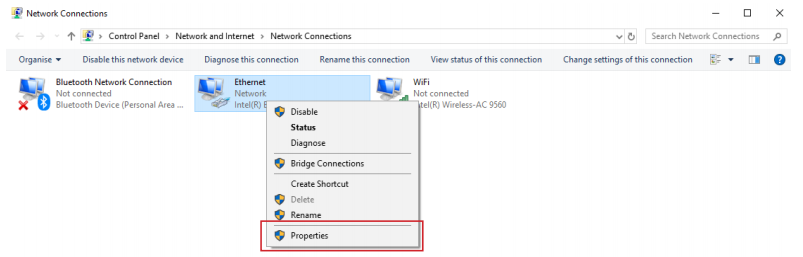
Right-click the network adapter you want to change the IP address for, and select Properties.
-
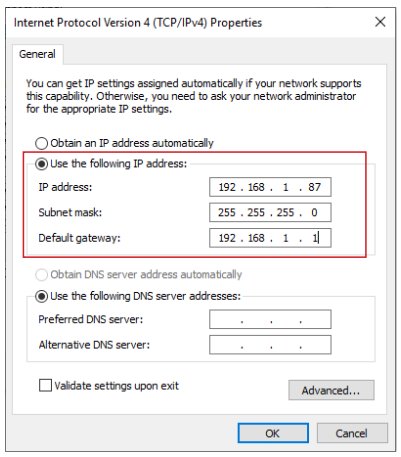
Double-click the Internet Protocol Version 4 (TCP/IPv4) item.
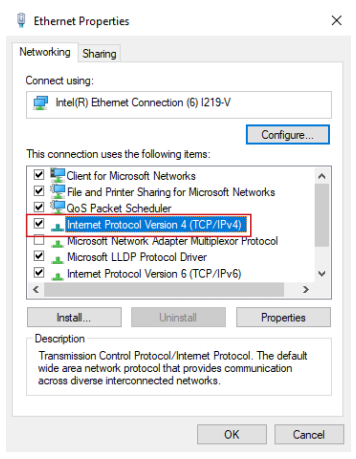
- Click Use the following IP address and enter an IP address in the same range as the device you are trying to access. (E.g when trying to access 192.168.1.108 use a IP address in the 192.168.1.x range.) Note: This cannot be the same as the device you are trying to connect to or any other device on the same network. Save your changes on both windows.
- Type the IP address of the device you are trying to access into the address bar of your web browser.
- Once finished configuring the device, change the adapter settings back to normal by following steps 1-5 and clicking Obtain an IP address automatically.
Windows 11
1. In the Windows search bar at the bottom of the page, type Control Panel and press enter.
2. Select Network and Internet.

3. Select Network and Sharing Centre.

4. Select the link for Connections in the network that you want to change the IP address for.

5. Select Properties.

6. Double-click the Internet Protocol Version 4 (TCP/IPv4) item.

7. Click Use the following IP address and enter an IP address in the same range as the device you are trying to access. (E.g when trying to access 192.168.1.108 use a IP address in the 192.168.1.x range.) Note: This cannot be the same as the device you are trying to connect to or any other device on the same network. Save your changes on both windows.

8. Type the IP address of the device you are trying to access into the address bar of your web browser.
9. Once finished configuring the device, change the adapter settings back to normal by following steps 1-6 and clicking Obtain an IP address automatically.
See the video below for a visual guide of the steps above:
Shortcut
1. In the Windows search bar at the bottom of the page, type Ncpa.cpl and press enter.
2. Right-click the network adapter you want to change the IP address for, and select Properties.
3. Select the Internet Protocol Version 4 (TCP/IPv4) item.

4. Click Use the following IP address and enter an IP address in the same range as the device you are trying to access. (E.g when trying to access 192.168.1.108 use a IP address in the 192.168.1.x range.) Note: This cannot be the same as the device you are trying to connect to or any other device on the same network. Save your changes on both windows.
5. Type the IP address of the device you are trying to access into the address bar of your web browser.
6. Once finished configuring the device, change the adapter settings back to normal by following steps 1-3 and clicking Obtain an IP address automatically.
See the video below for a visual guide of the steps above:
Delete
How to initialise a camera via Web interface 5.0
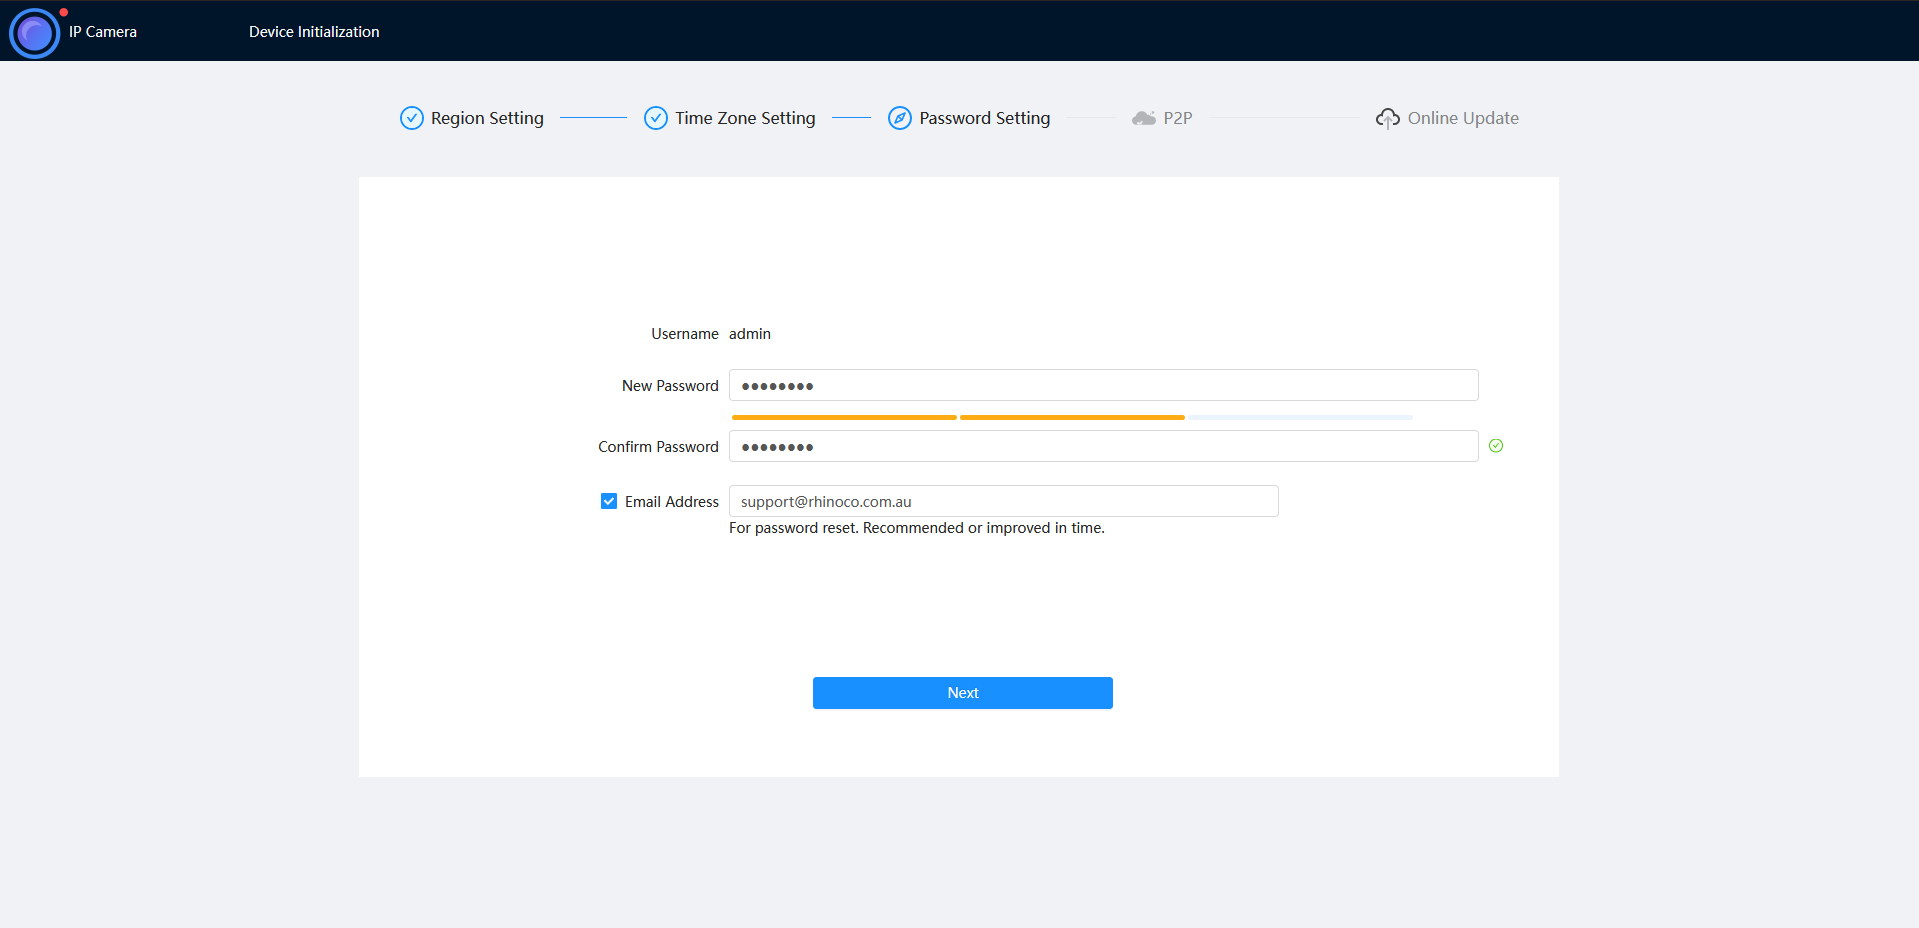
- Select your Region and Language.
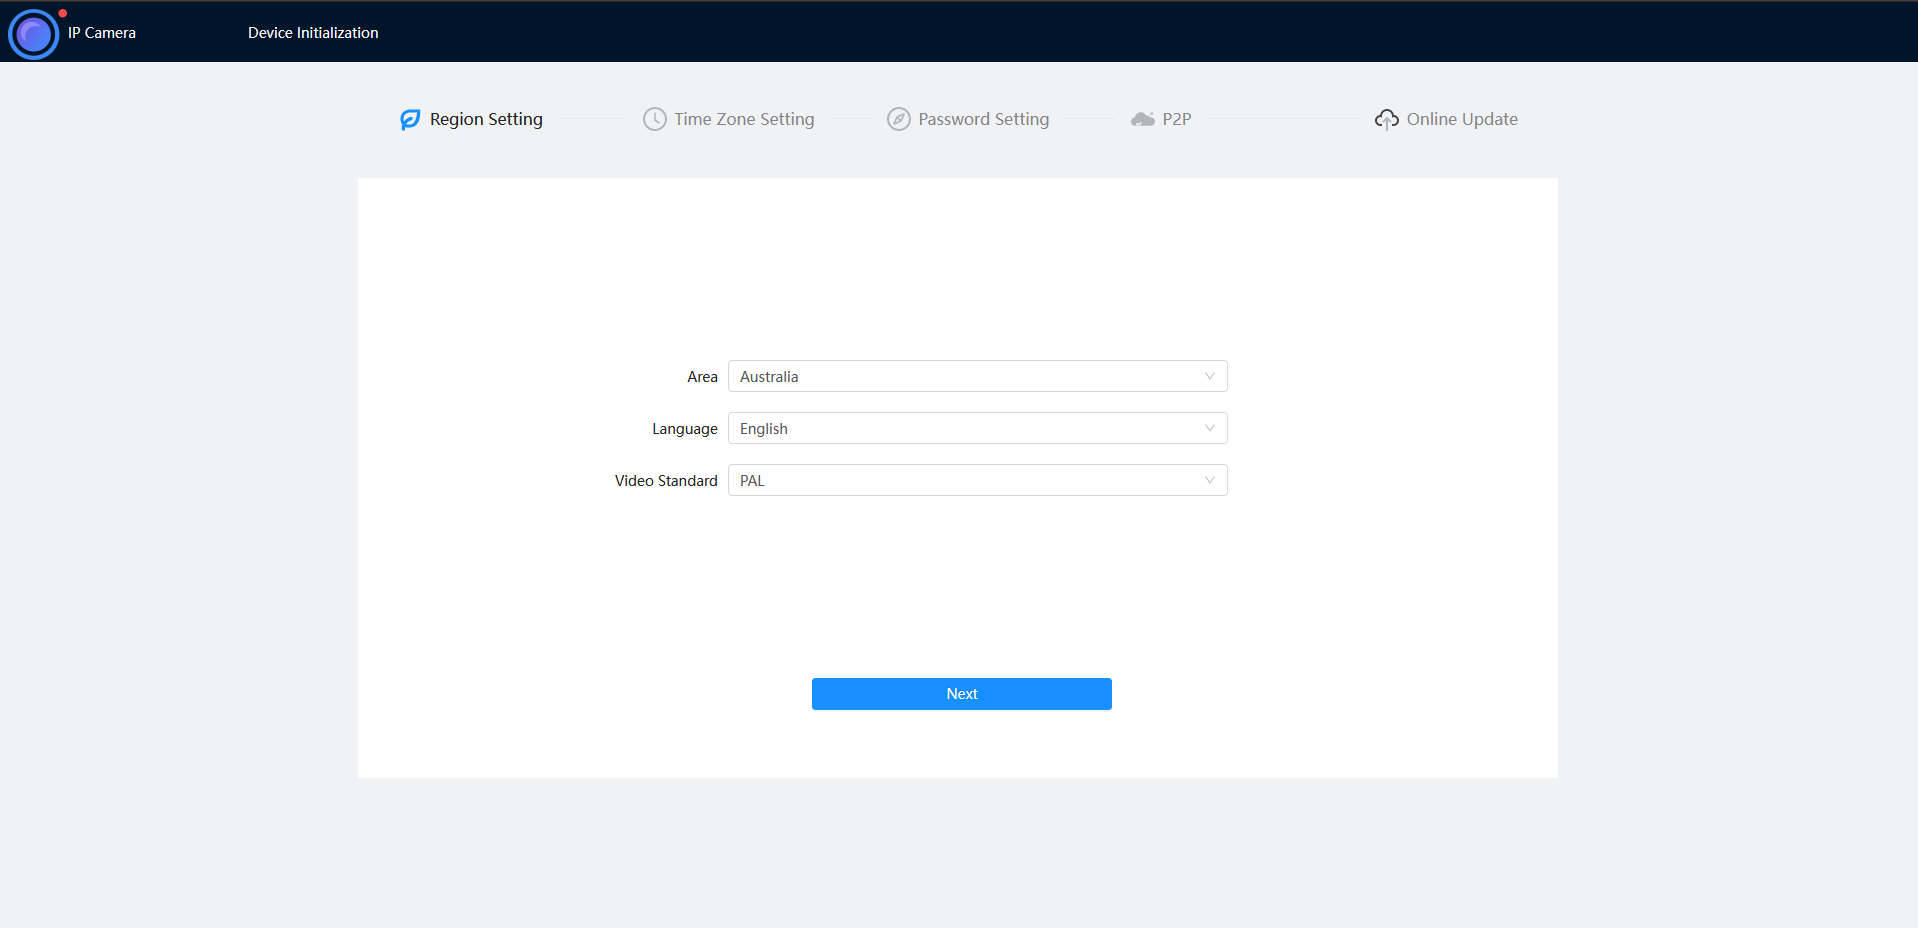
- Select your Time Zone, then press Sync with PC to sync your cameras time with the PCs time.
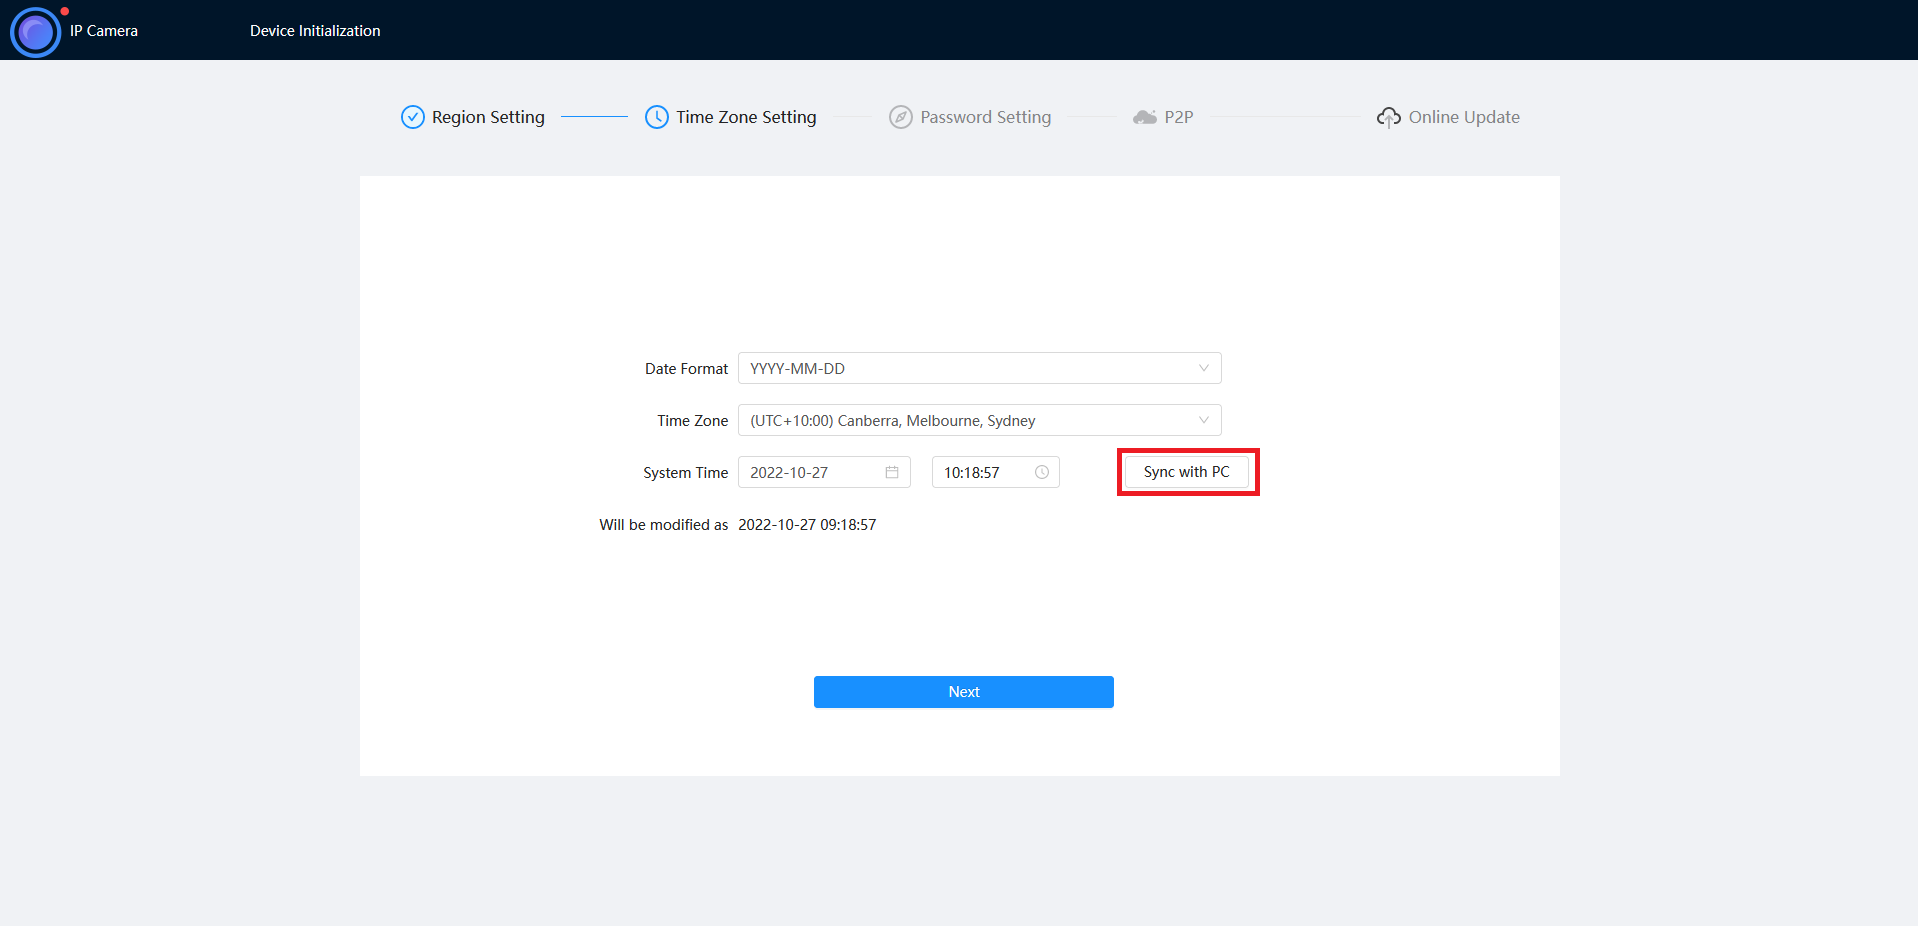
- Enter a password and recovery email.
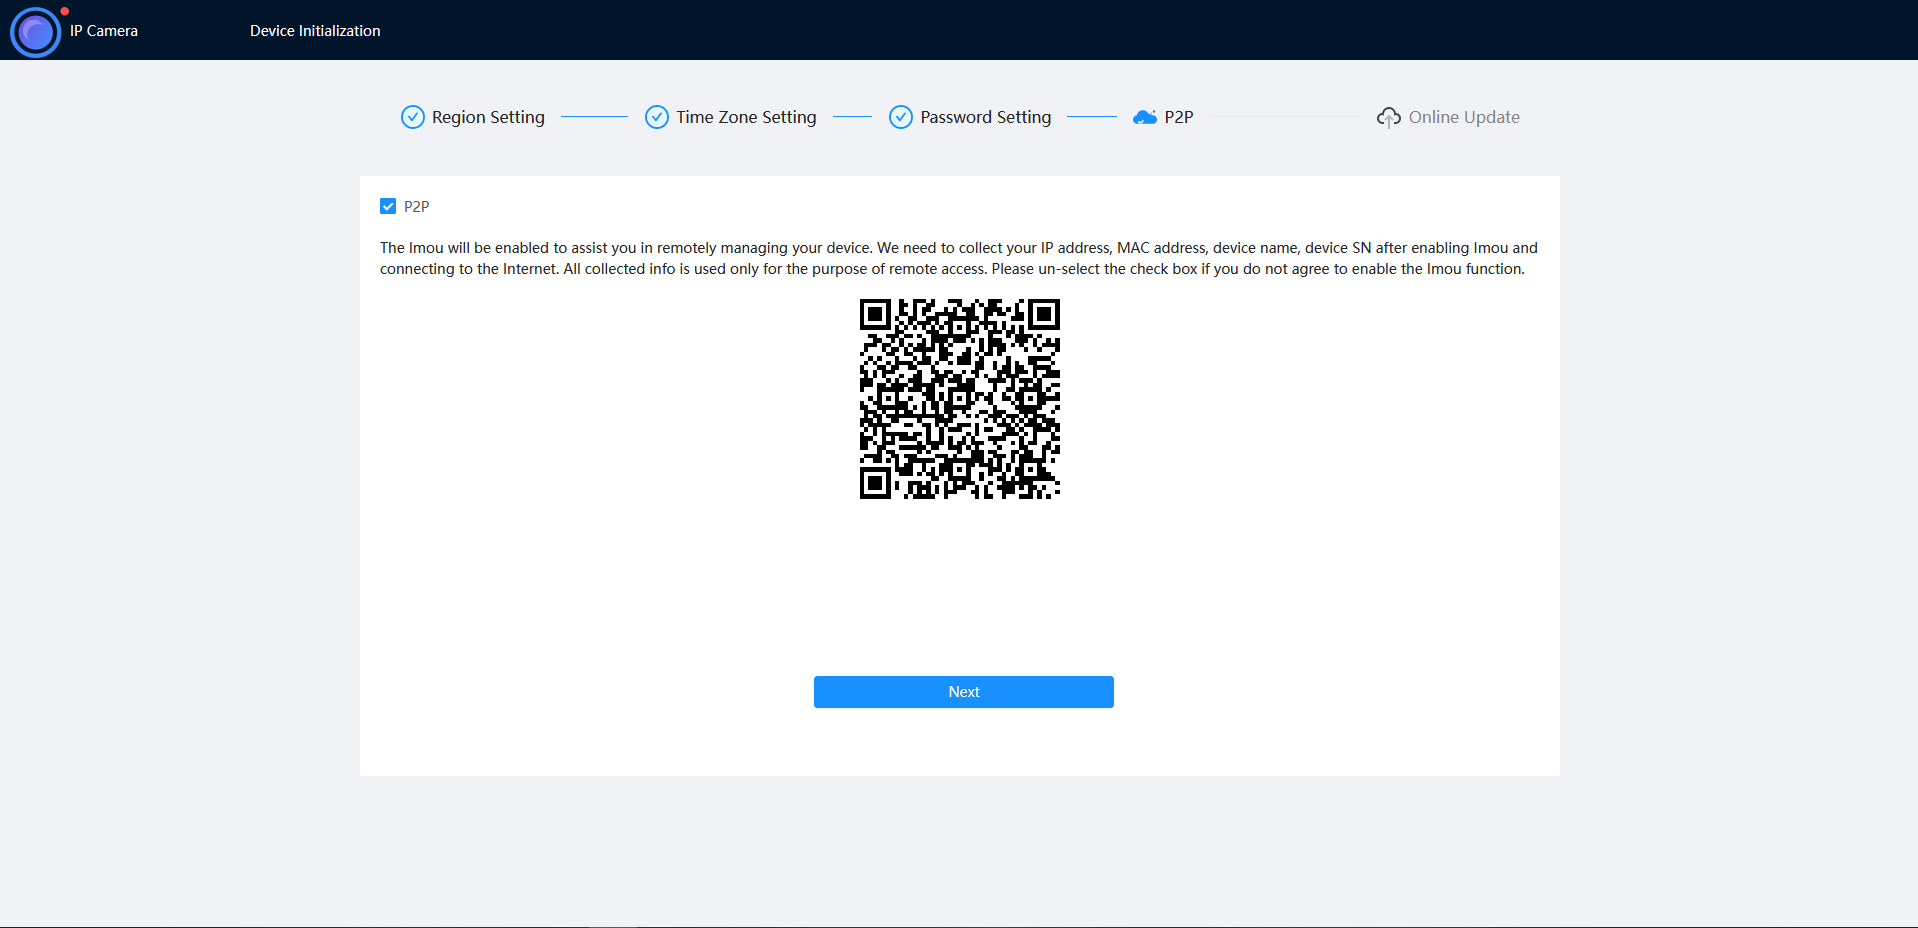
- Ensure P2P is enabled, then press Next.
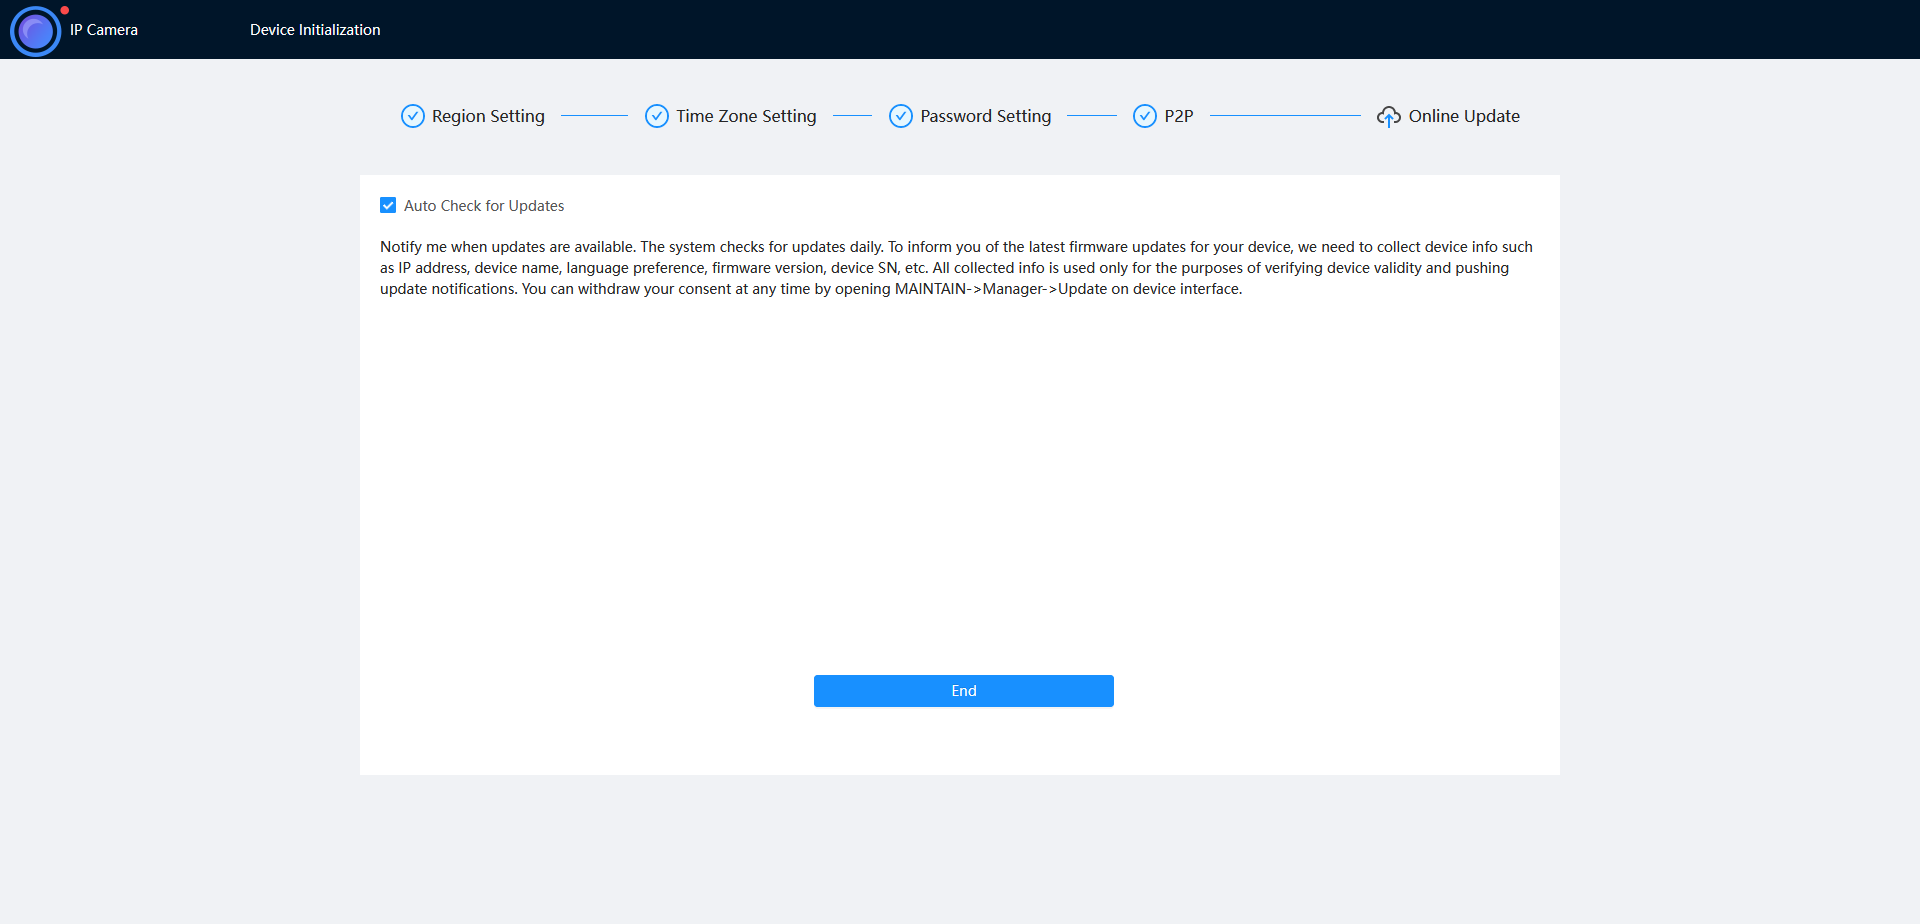
- Click End.
How to initialise a camera via Web interface 3.0
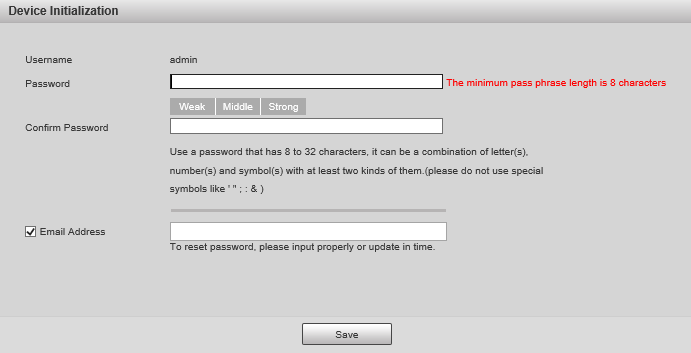
Initialize the camera by entering a new password (It will need to be at least 8 characters long), then click Save.
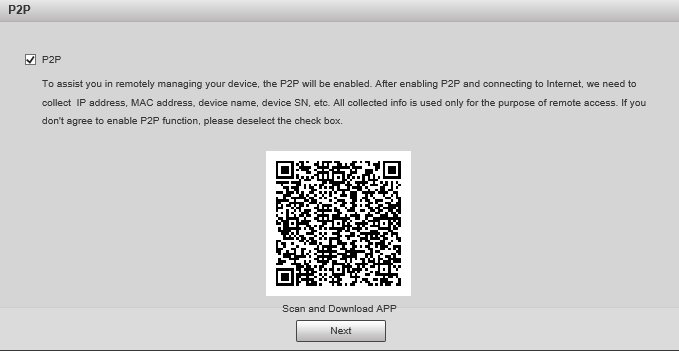
Ensure P2P is enabled and click Next
Click Next.
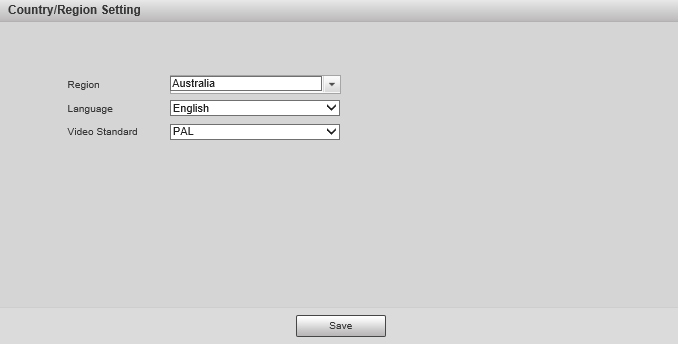
If prompted, select a region and click Save
DeleteOption 2 - Initialisation via the Config Tool
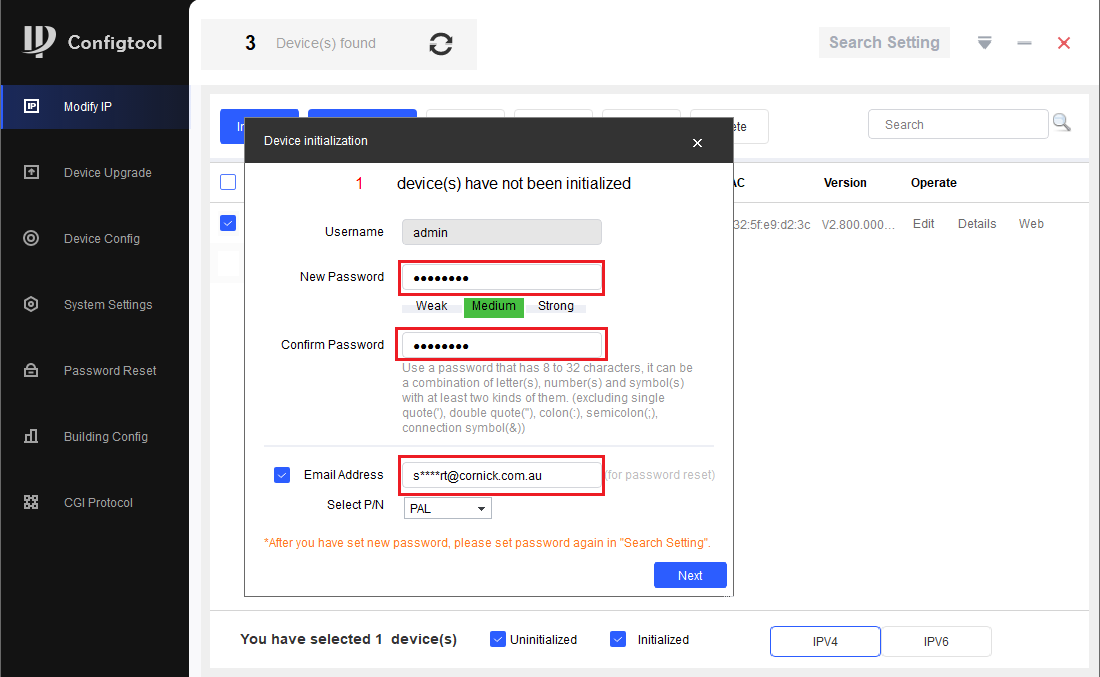
The initialisation process can also be performed using the latest version of our Config Tool - Please see the images below showing how this is done. To speed up the process the Config Tool also allows you to initialise multiple cameras at once.
- Download and open Config Tool.
- Put a check in the box
 next to the device you would like to Initialise, and select the Initialize button.
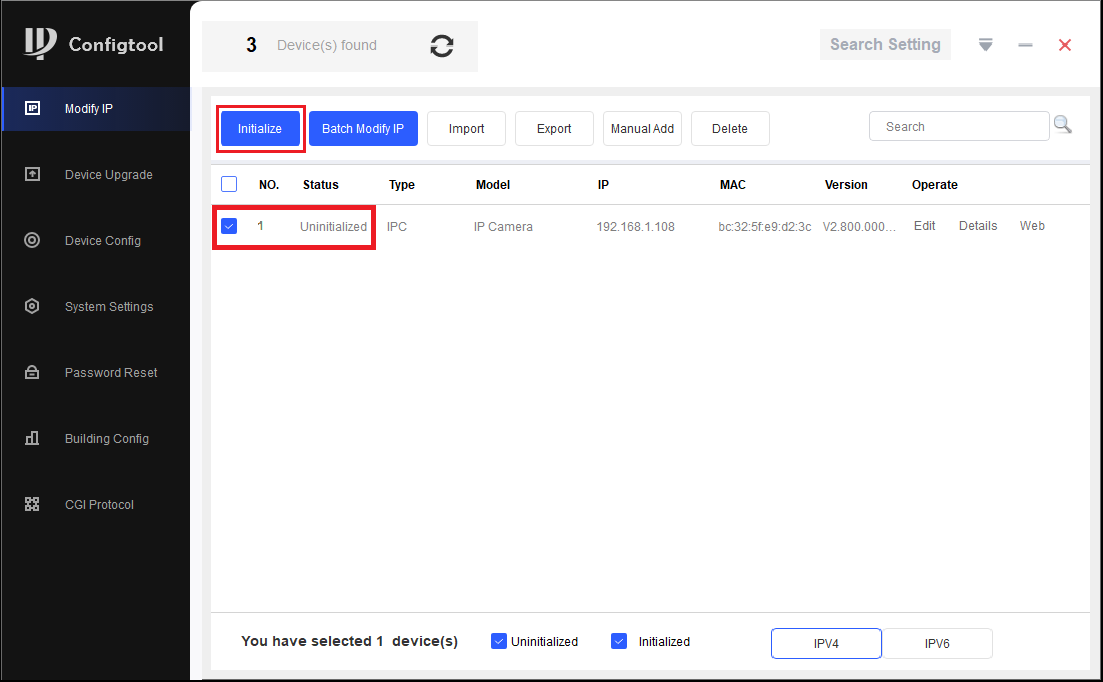
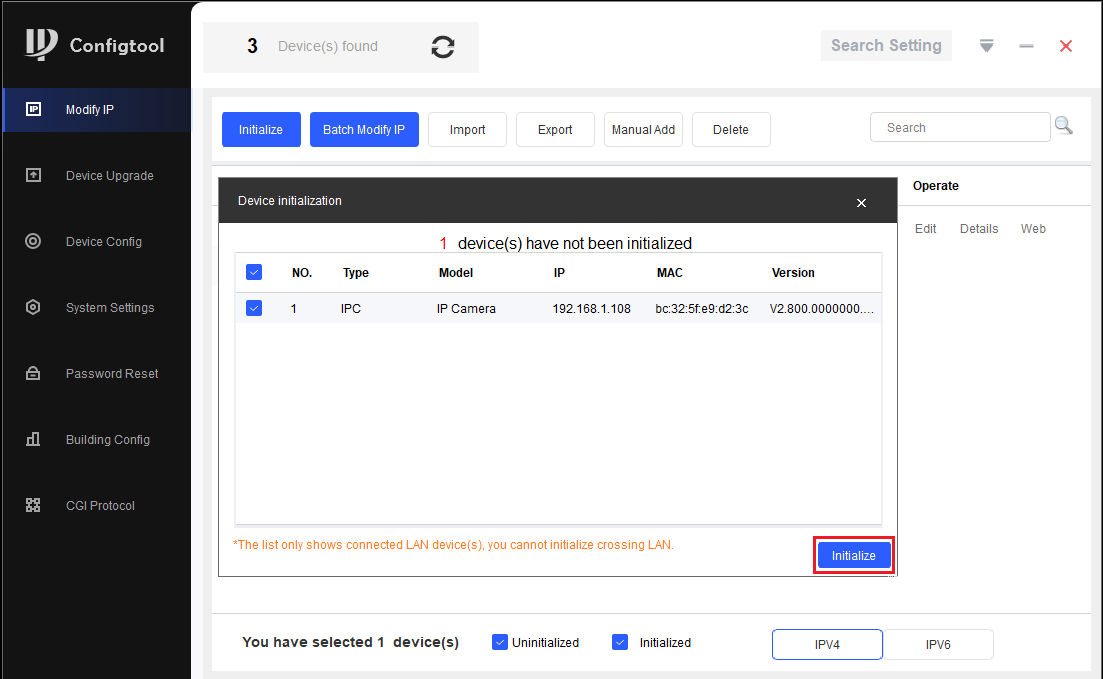
- Select the Initialize button.
- Enter a password, that is at least 8 characters, and is a mix of letters and numbers. Enter an email address, this will be used if the password is ever forgotten. Select Next.
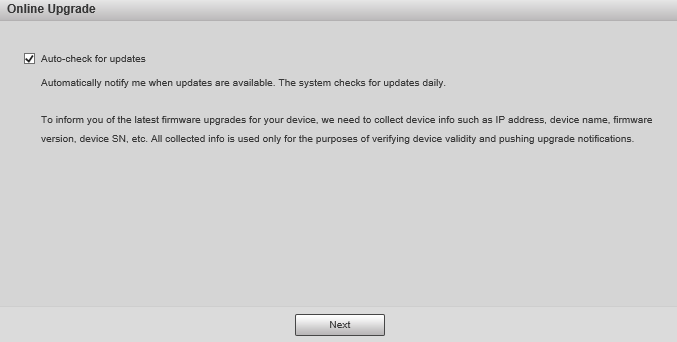
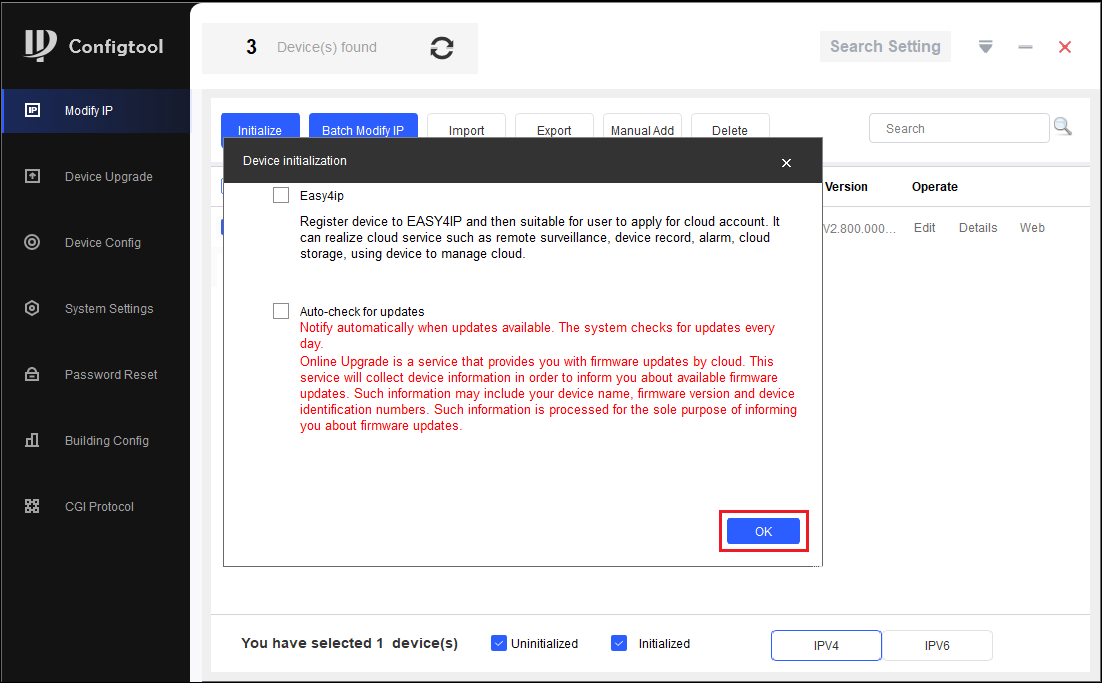
- Depending on the installation requirements, you can check or uncheck the boxes for Easy4IP (P2P Remote Access) and Auto-check for updates. Select OK.
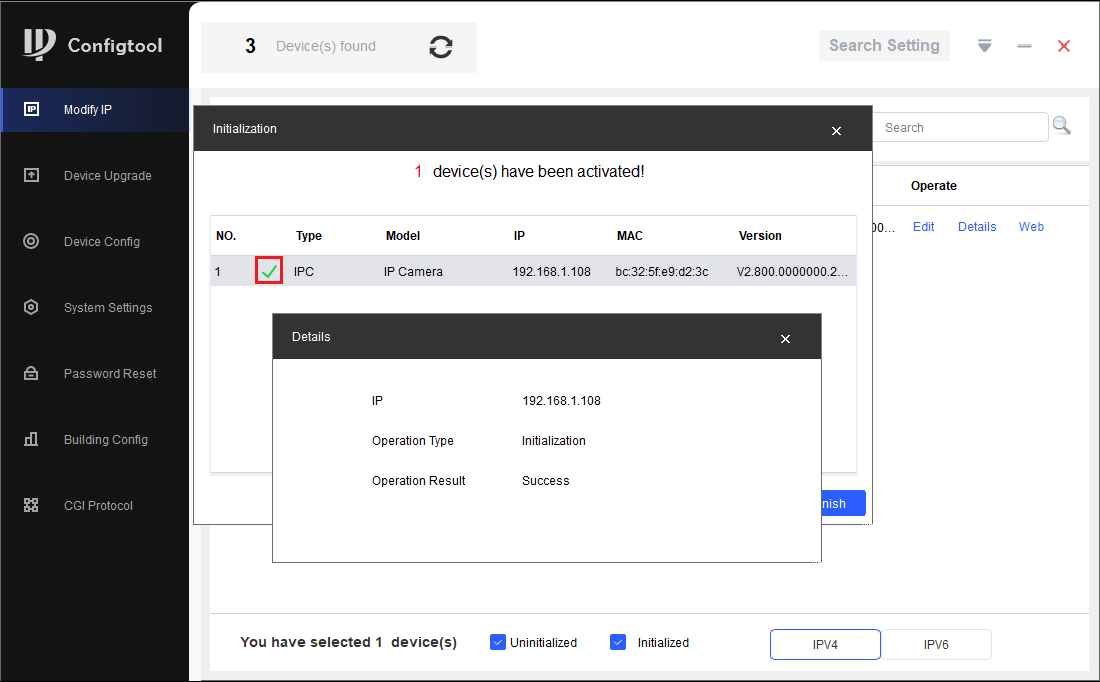
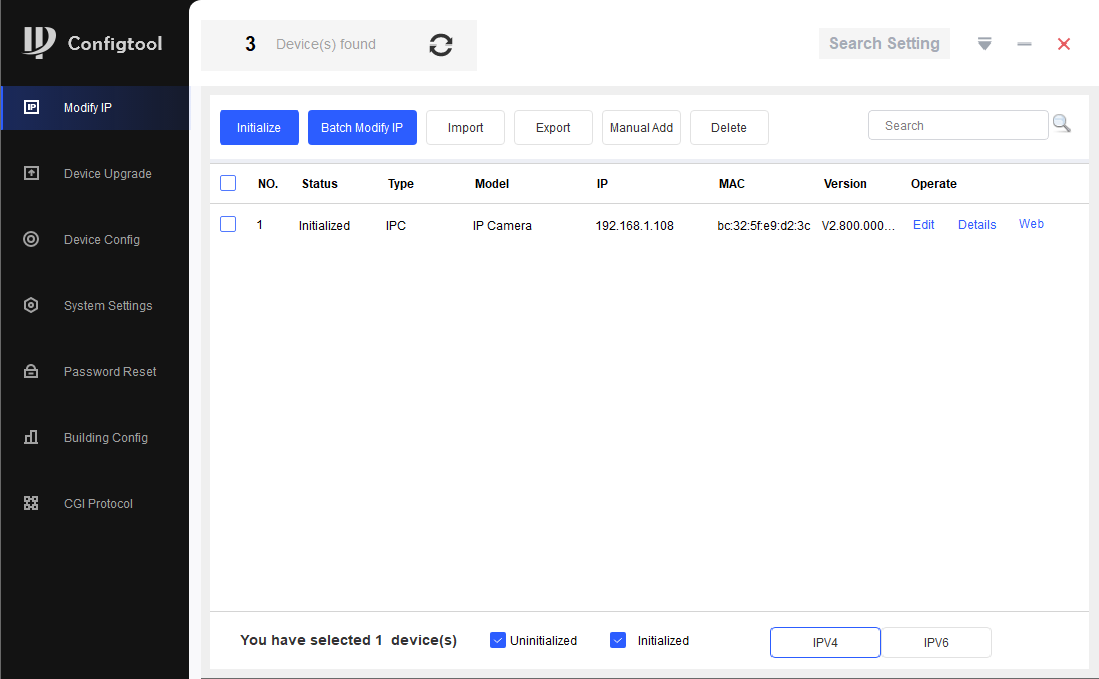
- If the status shows as Initialized, the process was completed successfully.
Resolving "Invalid Username/Password" OR "Account Locked" Errors
If you have see the error message "Invalid Username/Password" or "Account Locked", it means Camera Registration is trying to access your camera with the incorrect login information.
Resolving "Invalid Username/Password" OR "Account Locked" Errors
If you see this error, it means Camera Registration is trying to access your camera with the incorrect login information.
Cameras plugged into a Switch
If you know the password of the camera, you will just need to update the password of the camera in Camera Registration.
(Black GUI) Update Password in Camera List
Open Camera Registration by right clicking and selecting Main Menu > Camera > Camera List
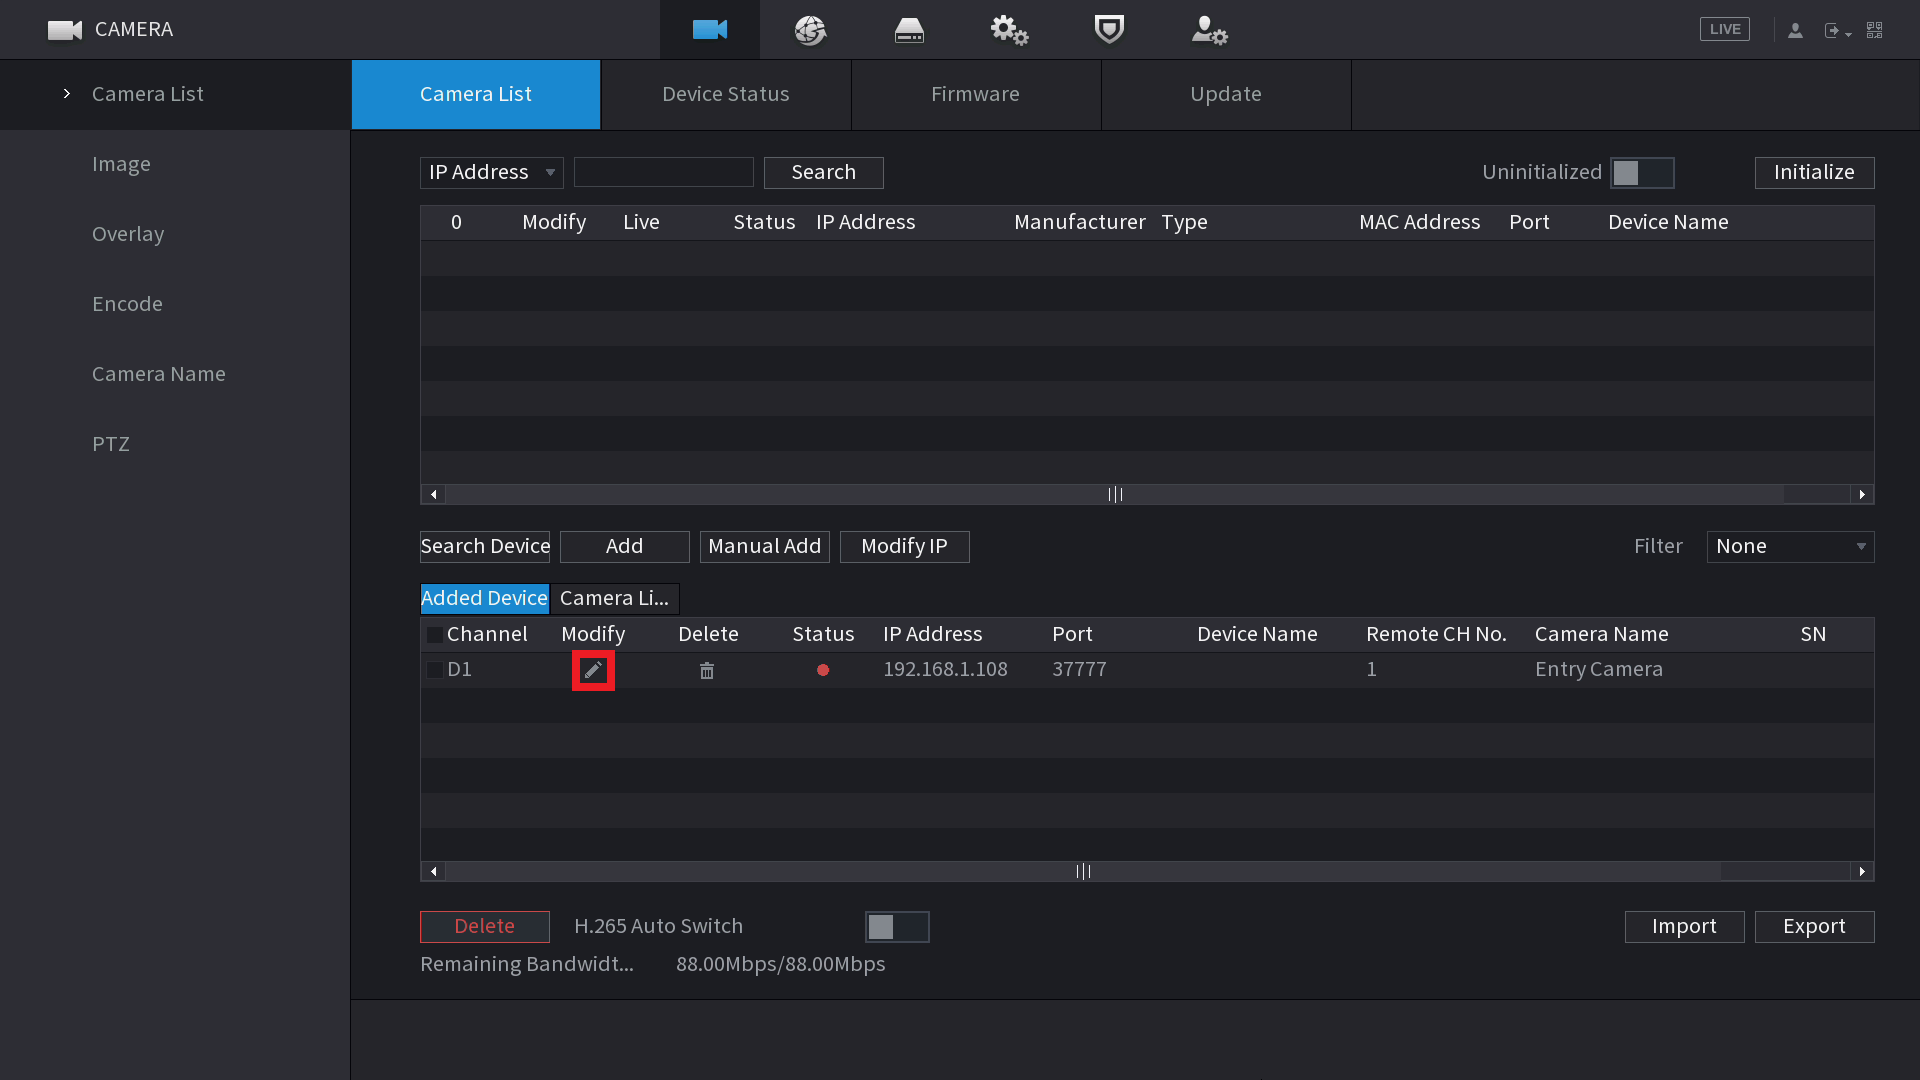
Click on the Modify pencil  of the camera with the error. It's Status will likely be red.
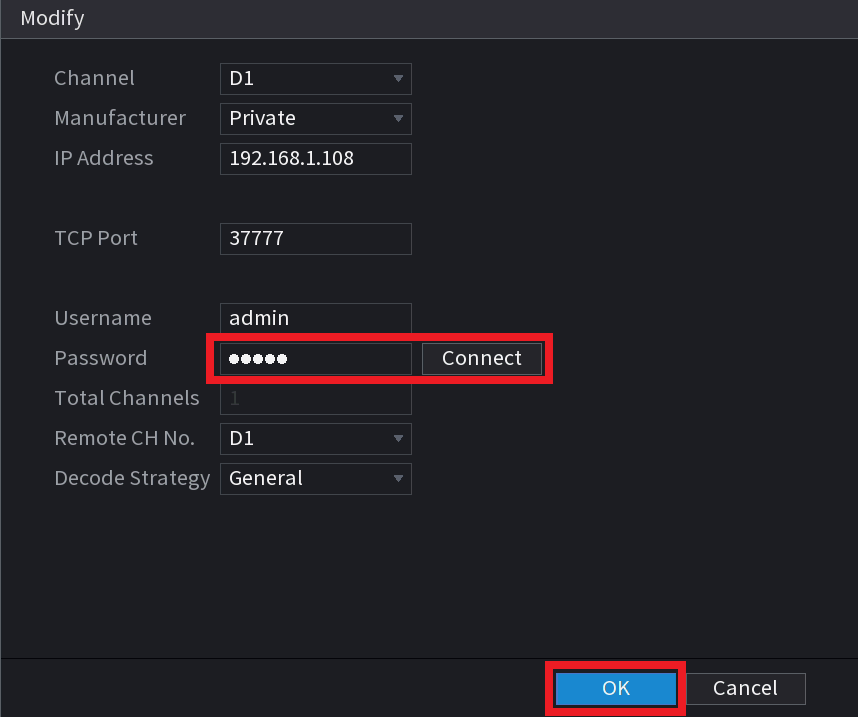
Enter the password of the Camera (You would have set this during the initialisation process in Config Tool) and click Connect, then OK.
If you still see the Account Locked error, you may need to reboot the camera by unplugging it briefly.
(Blue GUI) Update Password in Camera Registration
Open Camera Registration by right clicking and selecting Camera Registration OR by Navigating to Main Menu > Camera > Registration
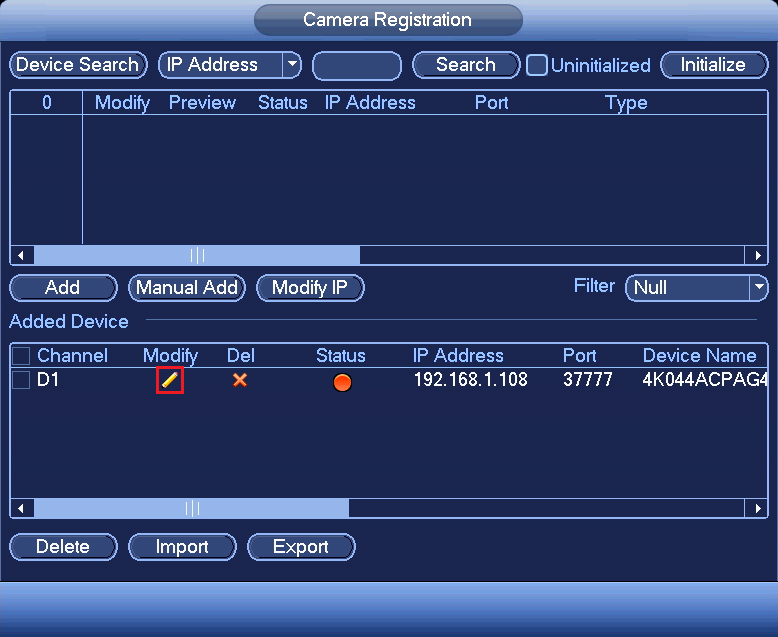
Click on the Modify pencil  of the camera with the error. It's Status will likely be red.
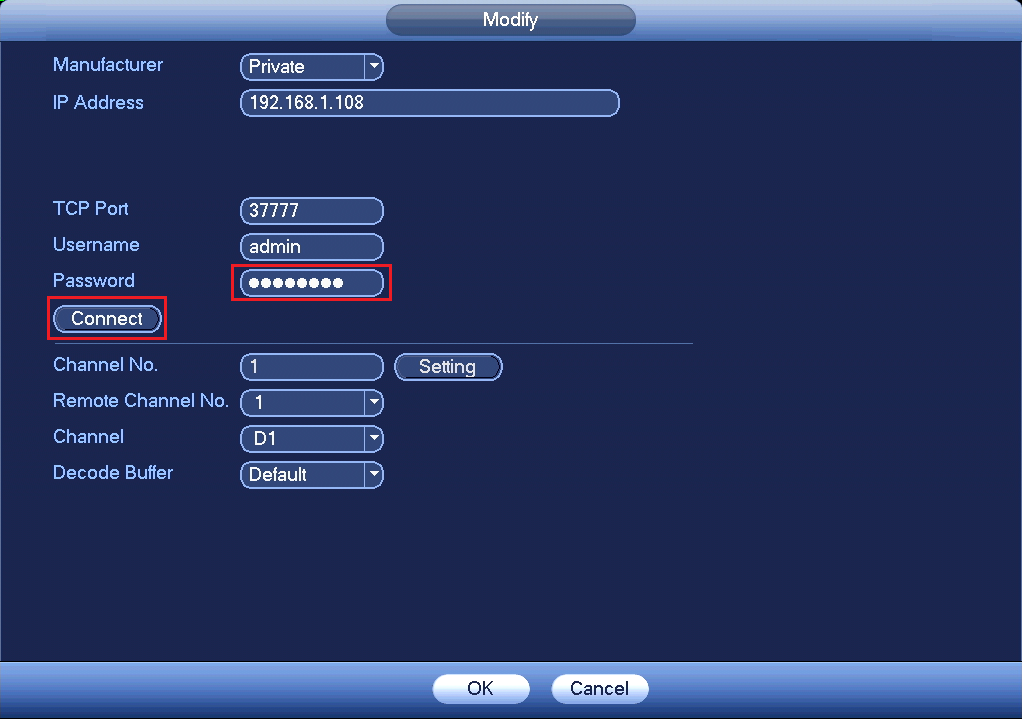
Enter the password of the Camera (You would have set this during the initialisation process in Config Tool) and click Connect, then OK.
If you still see the Account Locked error, you may need to reboot the camera by unplugging it briefly.
If you don't know the password of the Camera you will have to reset it.
Reset IP Camera Guide
Turret Cameras
Reset Button under Flap
AI turret cameras, or turret cameras built post 2021 usually have their reset button located under a flap next to the MicroSD card slot. Press and hold the reset button for 30 seconds while the camera is powered on to reset the camera.

Reset Button on Mainboard
Cameras built pre-2021 require the camera to be opened to expose the mainboard.
Once opened, the button will on the edge of the mainboard (see left image), press and hold this button for 30 seconds while the camera is powered on. In some cases you may need to undo two screws holding the mainboard in place, as the the button may be on the underside or on the second board.
When no button can be found, the reset may be performed by shorting two copper pads (see right image) for 30 seconds using a paperclip while the camera is powered on.

Turret Camera reset locations for specific models
|
VSIPC-4DIRMG You will need to undo some screws to lift up the mainboard to access this reset button. |
 |
|
VSIP1MPVDMINIIRC VSIP3MPVDMINIIRC |
 |
|
VSIP4MPVDMINIIRCA3.6 You will have to undo 2x screws on the metal plate in order to lift up the mainboard to find this reset. |
 |
|
VSIPE4MPVDMINIIRCB2.8 VSIPE6MPVDMINIIRC3.6 VSIPC-6DIRC |
 |
| VSIPE8MPVDIRMG |  |
|
VSIP4MPVDIRME |
 |
Vandal Dome Cameras
To access the reset button on large vandal dome cameras, you will need to first remove the vandal dome (see left image) by removing 3 screws.
The most common style of reset button will be the one in the middle image. Press and hold it for 30 seconds while the camera is powered on to reset it.
If there is no button, there may be copper pads you can short out for 30 seconds to reset the camera (right side of right image). There may also be four silver pads located where the reset button would usually be (left side of right image) you can short out two of vertically or diagonally for 30 seconds to reset the camera. Do not attempt to short any other part of the camera as you may cause irreversible damage.

Large Vandal Dome Cameras
To access the reset button on large vandal dome cameras, you will need to first remove the vandal dome (see left image) by removing 3 screws.
The reset button will then be located toward the edge of the housing, recessed into the plastic (see right image). Press and hold the button for 30 seconds to reset the camera.

Vandal Dome Camera reset locations for specific models
|
VSIPC-4DIRD Short out the two silver pins (E.g. by using a paperclip) for 30 seconds while the camera is powered on. OR short out the two copper coloured holes (Right side of image) |
 |
|
VSIPC-4DIRMD Press and hold the button for 30 seconds OR if no button exists, short out 2 silver pins diagonally with wire for 30 seconds |
 |
| VSIP4MPVDIRMD |  |
| VSIP3MPVDIRM2.8-12 |  |
|
VSIP3MPVDMINIIR (Mainboard may be black instead of green) VSIP4MPVDMINIIR |
 |
| VSIP2MPVDIRLV2 VSIPE8MPVDIRM |
 |
Bullet Cameras
Most Bullet Cameras will have a flap that will reveal the MicroSD card slot and reset button. Press and hold the button for 30 seconds to reset the camera. Some cameras will not have a reset button, instead they will have two copper pads (see right image) which you can short out with a paperclip for 30 seconds to reset the camera.

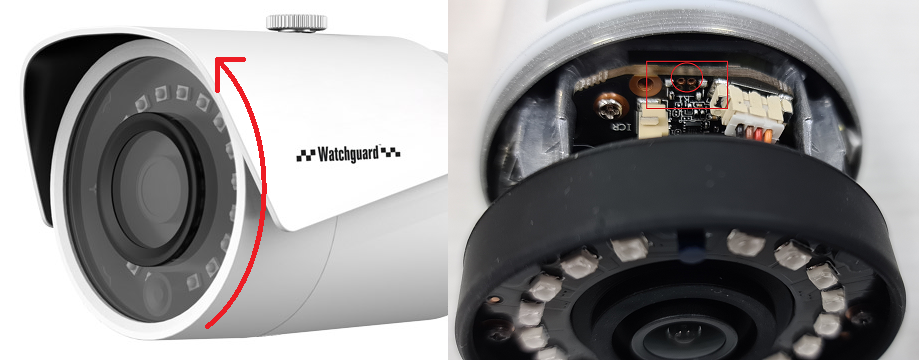
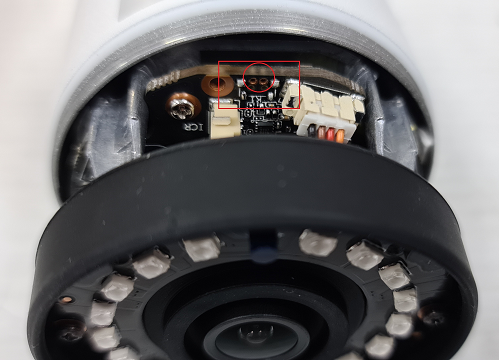
Bullet cameras without a flap
For cameras without a reset flap you will need to remove the front of the camera (e.g by unscrewing it for cylindrical cameras) to access the reset button. Some cameras will have a physical button to press and hold for 30 seconds to reset it. Other cameras (see right image) will have copper pads to short out for 30 seconds to reset the camera.
Bullet Camera reset locations for specific models
|
VSIPC-4BIRS Short out two of the copper pads (E.g by using a paperclip) for 30 seconds while the camera is powered on. |
 |
|
VSIP3MPFBIRM2.8-12 Short out two of the copper pads (E.g by using a paperclip) for 30 seconds while the camera is powered on. |
 |
|
VSIP4MPFBIRM2.8-12 Short out two of the silver pins (E.g by using a paperclip) for 30 seconds while the camera is powered on. |
 |
|
VSIP4MPFBIRMD VSIP8MPFBIRMD |
 |
| VSIPE2MPFBMINIIR |
 |
PTZ Cameras
PTZ Camera reset locations for specific models
|
VIP2MPPTZIRW You will have to undo 4 screws on the back to get access. |
 |
|
VSIP2MPPTZCV3 Remove the outer shell and round lens cover (4 x Phillips screws) Press & hold button for 30 seconds. |
 |
|
VSIP2MPPTZV3 There will be two screws on opposite sides that you will need to remove to take the plastic housing off. Then Press & hold the gold button for 30 seconds to reset the camera. |
 
|
Fisheye Cameras
To reset a fisheye camera, you will need to undo three screws on the base of the camera to expose the mainboard.
Once the Mainboard is exposed, press and hold the reset button for 30 seconds to reset the camera.

You will then need to initialise and add the camera to the recorder again.
Camera Initialisation Guide
Initialising a camera is the process of setting a password on it. All cameras manufactured post 2018 need to be initialised before use.
If connected to the POE Port of an NVR manufacturer post 2018 this process should happen automatically.
Option 1 - Initialisation via the Web Interface
The Camera will need to be connected to the Laptop via an Ethernet cable.
You can access the Web Interface by entering the camera's IP address into the address bar of Internet Explorer. 192.168.1.108 is the default IP of our cameras.
You may need to change the IP address of your computer to reach it.
How to change the IP Address of your computer
Windows 10
- Open Settings.
- Select Network & Internet.
- Select Status, then Change Adapter Options.
-
Right-click the network adapter you want to change the IP address for, and select Properties.
-
Double-click the Internet Protocol Version 4 (TCP/IPv4) item.
- Click Use the following IP address and enter an IP address in the same range as the device you are trying to access. (E.g when trying to access 192.168.1.108 use a IP address in the 192.168.1.x range.) Note: This cannot be the same as the device you are trying to connect to or any other device on the same network. Save your changes on both windows.
- Type the IP address of the device you are trying to access into the address bar of your web browser.
- Once finished configuring the device, change the adapter settings back to normal by following steps 1-5 and clicking Obtain an IP address automatically.
Windows 11
1. In the Windows search bar at the bottom of the page, type Control Panel and press enter.
2. Select Network and Internet.
3. Select Network and Sharing Centre.
4. Select the link for Connections in the network that you want to change the IP address for.
5. Select Properties.
6. Double-click the Internet Protocol Version 4 (TCP/IPv4) item.
7. Click Use the following IP address and enter an IP address in the same range as the device you are trying to access. (E.g when trying to access 192.168.1.108 use a IP address in the 192.168.1.x range.) Note: This cannot be the same as the device you are trying to connect to or any other device on the same network. Save your changes on both windows.
8. Type the IP address of the device you are trying to access into the address bar of your web browser.
9. Once finished configuring the device, change the adapter settings back to normal by following steps 1-6 and clicking Obtain an IP address automatically.
See the video below for a visual guide of the steps above:
Shortcut
1. In the Windows search bar at the bottom of the page, type Ncpa.cpl and press enter.
2. Right-click the network adapter you want to change the IP address for, and select Properties.
3. Select the Internet Protocol Version 4 (TCP/IPv4) item.
4. Click Use the following IP address and enter an IP address in the same range as the device you are trying to access. (E.g when trying to access 192.168.1.108 use a IP address in the 192.168.1.x range.) Note: This cannot be the same as the device you are trying to connect to or any other device on the same network. Save your changes on both windows.
5. Type the IP address of the device you are trying to access into the address bar of your web browser.
6. Once finished configuring the device, change the adapter settings back to normal by following steps 1-3 and clicking Obtain an IP address automatically.
See the video below for a visual guide of the steps above:
Delete
How to initialise a camera via Web interface 5.0
- Select your Region and Language.
- Select your Time Zone, then press Sync with PC to sync your cameras time with the PCs time.
- Enter a password and recovery email.
- Ensure P2P is enabled, then press Next.
- Click End.
How to initialise a camera via Web interface 3.0
Initialize the camera by entering a new password (It will need to be at least 8 characters long), then click Save.
Ensure P2P is enabled and click Next
Click Next.
If prompted, select a region and click Save
DeleteOption 2 - Initialisation via the Config Tool
The initialisation process can also be performed using the latest version of our Config Tool - Please see the images below showing how this is done. To speed up the process the Config Tool also allows you to initialise multiple cameras at once.
- Download and open Config Tool.
- Put a check in the box next to the device you would like to Initialise, and select the Initialize button.
- Select the Initialize button.
- Enter a password, that is at least 8 characters, and is a mix of letters and numbers. Enter an email address, this will be used if the password is ever forgotten. Select Next.
- Depending on the installation requirements, you can check or uncheck the boxes for Easy4IP (P2P Remote Access) and Auto-check for updates. Select OK.
- If the status shows as Initialized, the process was completed successfully.
Camera plugged into back of an NVR
If you know the password of the camera, you will just need to update the password of the camera in Camera Registration.
(Black GUI) Update Password in Camera Registration
Open Camera Registration by right clicking and selecting Main Menu > Camera > Camera List
Click on the Modify pencil of the camera with the error. It's Status will likely be red.
Enter the password of the Camera (You would have set this during the initialisation process in Config Tool) and click "Connect", then "OK".
If you still see the Account Locked error, you may need to reboot the camera by unplugging it briefly.
(Blue GUI) Update Password in Camera Registration
Open Camera Registration by right clicking and selecting "Camera Registration" OR by Navigating to Main Menu > Camera > Registration
Click on the Modify pencil of the camera with the error. It's Status will likely be red.
Enter the password of the Camera (You would have set this during the initialisation process in Config Tool) and click "Connect", then "OK".
If you still see the Account Locked error, you may need to reboot the camera by unplugging it briefly.
If you don't know the password of the camera, you will need to reset it.
Reset IP Camera Guide
Turret Cameras
Reset Button under Flap
AI turret cameras, or turret cameras built post 2021 usually have their reset button located under a flap next to the MicroSD card slot. Press and hold the reset button for 30 seconds while the camera is powered on to reset the camera.
Reset Button on Mainboard
Cameras built pre-2021 require the camera to be opened to expose the mainboard.
Once opened, the button will on the edge of the mainboard (see left image), press and hold this button for 30 seconds while the camera is powered on. In some cases you may need to undo two screws holding the mainboard in place, as the the button may be on the underside or on the second board.
When no button can be found, the reset may be performed by shorting two copper pads (see right image) for 30 seconds using a paperclip while the camera is powered on.
Turret Camera reset locations for specific models
|
VSIPC-4DIRMG You will need to undo some screws to lift up the mainboard to access this reset button. |
|
|
VSIP1MPVDMINIIRC VSIP3MPVDMINIIRC |
|
|
VSIP4MPVDMINIIRCA3.6 You will have to undo 2x screws on the metal plate in order to lift up the mainboard to find this reset. |
|
|
VSIPE4MPVDMINIIRCB2.8 VSIPE6MPVDMINIIRC3.6 VSIPC-6DIRC |
|
| VSIPE8MPVDIRMG | |
|
VSIP4MPVDIRME |
|
Vandal Dome Cameras
To access the reset button on large vandal dome cameras, you will need to first remove the vandal dome (see left image) by removing 3 screws.
The most common style of reset button will be the one in the middle image. Press and hold it for 30 seconds while the camera is powered on to reset it.
If there is no button, there may be copper pads you can short out for 30 seconds to reset the camera (right side of right image). There may also be four silver pads located where the reset button would usually be (left side of right image) you can short out two of vertically or diagonally for 30 seconds to reset the camera. Do not attempt to short any other part of the camera as you may cause irreversible damage.
Large Vandal Dome Cameras
To access the reset button on large vandal dome cameras, you will need to first remove the vandal dome (see left image) by removing 3 screws.
The reset button will then be located toward the edge of the housing, recessed into the plastic (see right image). Press and hold the button for 30 seconds to reset the camera.
Vandal Dome Camera reset locations for specific models
|
VSIPC-4DIRD Short out the two silver pins (E.g. by using a paperclip) for 30 seconds while the camera is powered on. OR short out the two copper coloured holes (Right side of image) |
|
|
VSIPC-4DIRMD Press and hold the button for 30 seconds OR if no button exists, short out 2 silver pins diagonally with wire for 30 seconds |
|
| VSIP4MPVDIRMD | |
| VSIP3MPVDIRM2.8-12 | |
|
VSIP3MPVDMINIIR (Mainboard may be black instead of green) VSIP4MPVDMINIIR |
|
| VSIP2MPVDIRLV2 VSIPE8MPVDIRM |
|
Bullet Cameras
Most Bullet Cameras will have a flap that will reveal the MicroSD card slot and reset button. Press and hold the button for 30 seconds to reset the camera. Some cameras will not have a reset button, instead they will have two copper pads (see right image) which you can short out with a paperclip for 30 seconds to reset the camera.
Bullet cameras without a flap
For cameras without a reset flap you will need to remove the front of the camera (e.g by unscrewing it for cylindrical cameras) to access the reset button. Some cameras will have a physical button to press and hold for 30 seconds to reset it. Other cameras (see right image) will have copper pads to short out for 30 seconds to reset the camera.
Bullet Camera reset locations for specific models
|
VSIPC-4BIRS Short out two of the copper pads (E.g by using a paperclip) for 30 seconds while the camera is powered on. |
|
|
VSIP3MPFBIRM2.8-12 Short out two of the copper pads (E.g by using a paperclip) for 30 seconds while the camera is powered on. |
|
|
VSIP4MPFBIRM2.8-12 Short out two of the silver pins (E.g by using a paperclip) for 30 seconds while the camera is powered on. |
|
|
VSIP4MPFBIRMD VSIP8MPFBIRMD |
|
| VSIPE2MPFBMINIIR |
|
PTZ Cameras
PTZ Camera reset locations for specific models
|
VIP2MPPTZIRW You will have to undo 4 screws on the back to get access. |
|
|
VSIP2MPPTZCV3 Remove the outer shell and round lens cover (4 x Phillips screws) Press & hold button for 30 seconds. |
|
|
VSIP2MPPTZV3 There will be two screws on opposite sides that you will need to remove to take the plastic housing off. Then Press & hold the gold button for 30 seconds to reset the camera. |
|
Fisheye Cameras
To reset a fisheye camera, you will need to undo three screws on the base of the camera to expose the mainboard.
Once the Mainboard is exposed, press and hold the reset button for 30 seconds to reset the camera.