Follow the steps below to configure your recorder for Remote Access.
Blue Interface (Pre Oct 2019)
Navigate to Network > TCP/IP
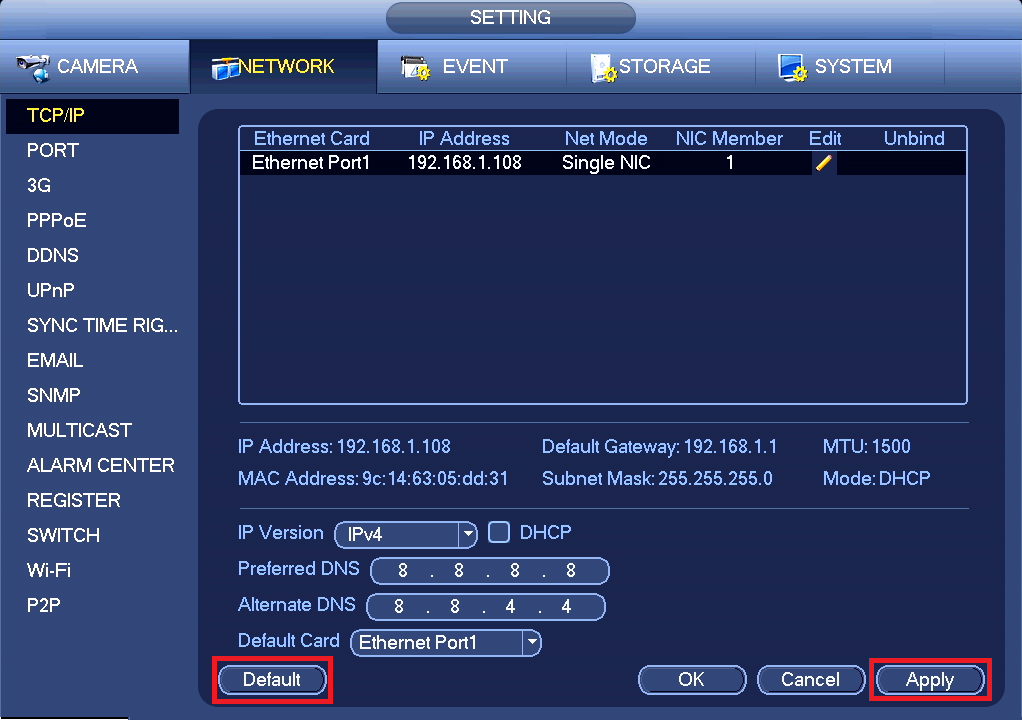
Click Default, then click Apply
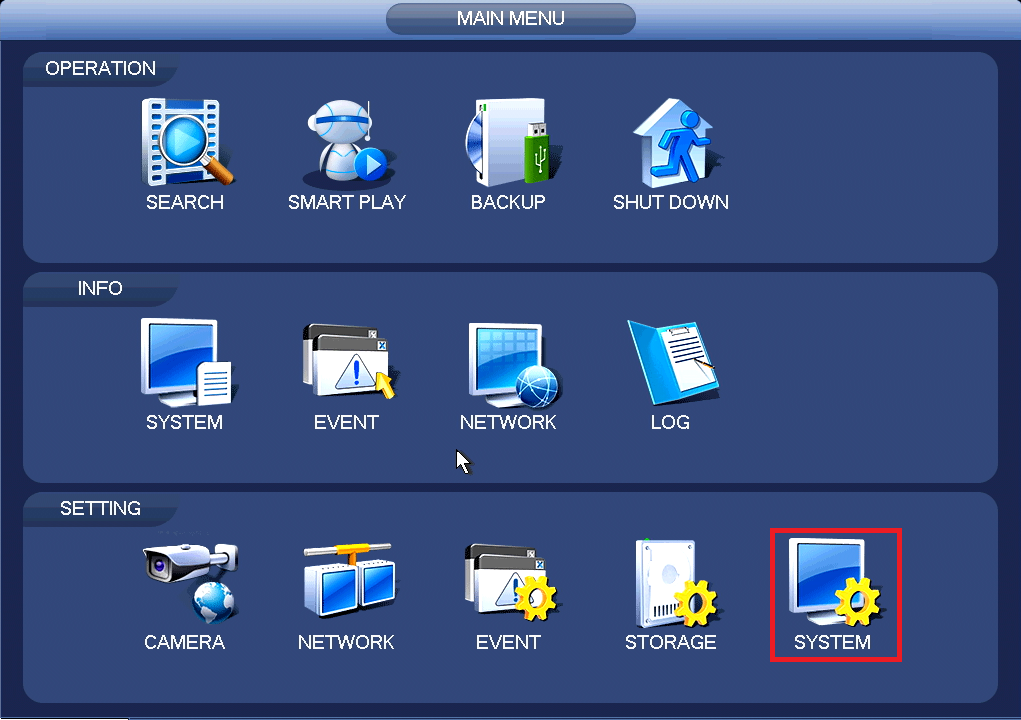
Click on System
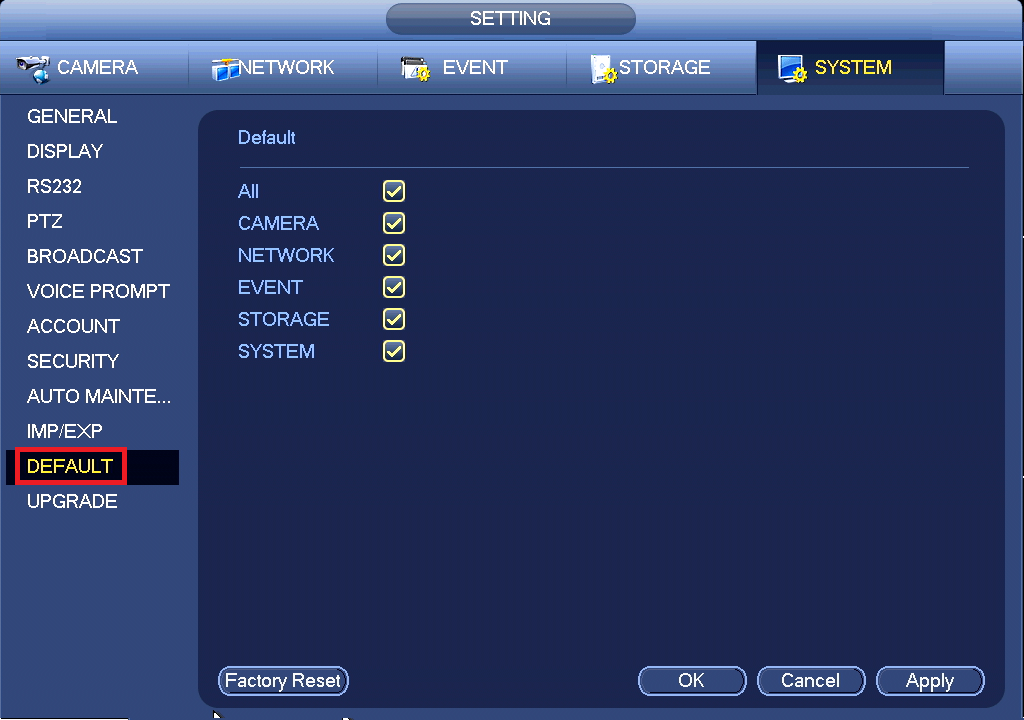
Click on Default
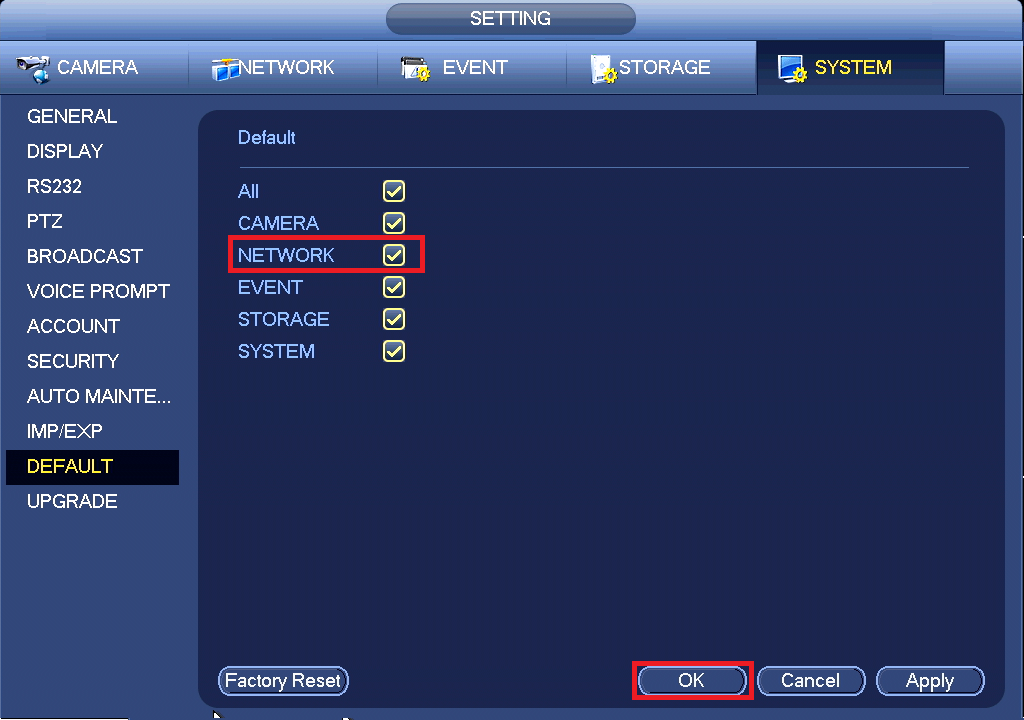
Untick everything except for Network, then click Apply.
Black Interface (Post Oct 2019)
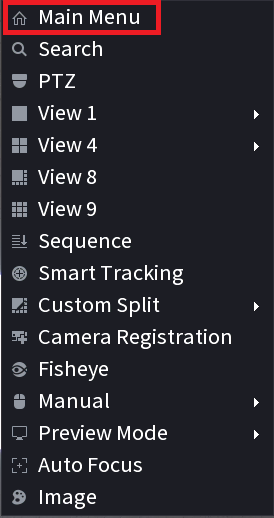
Right click and select Main Menu
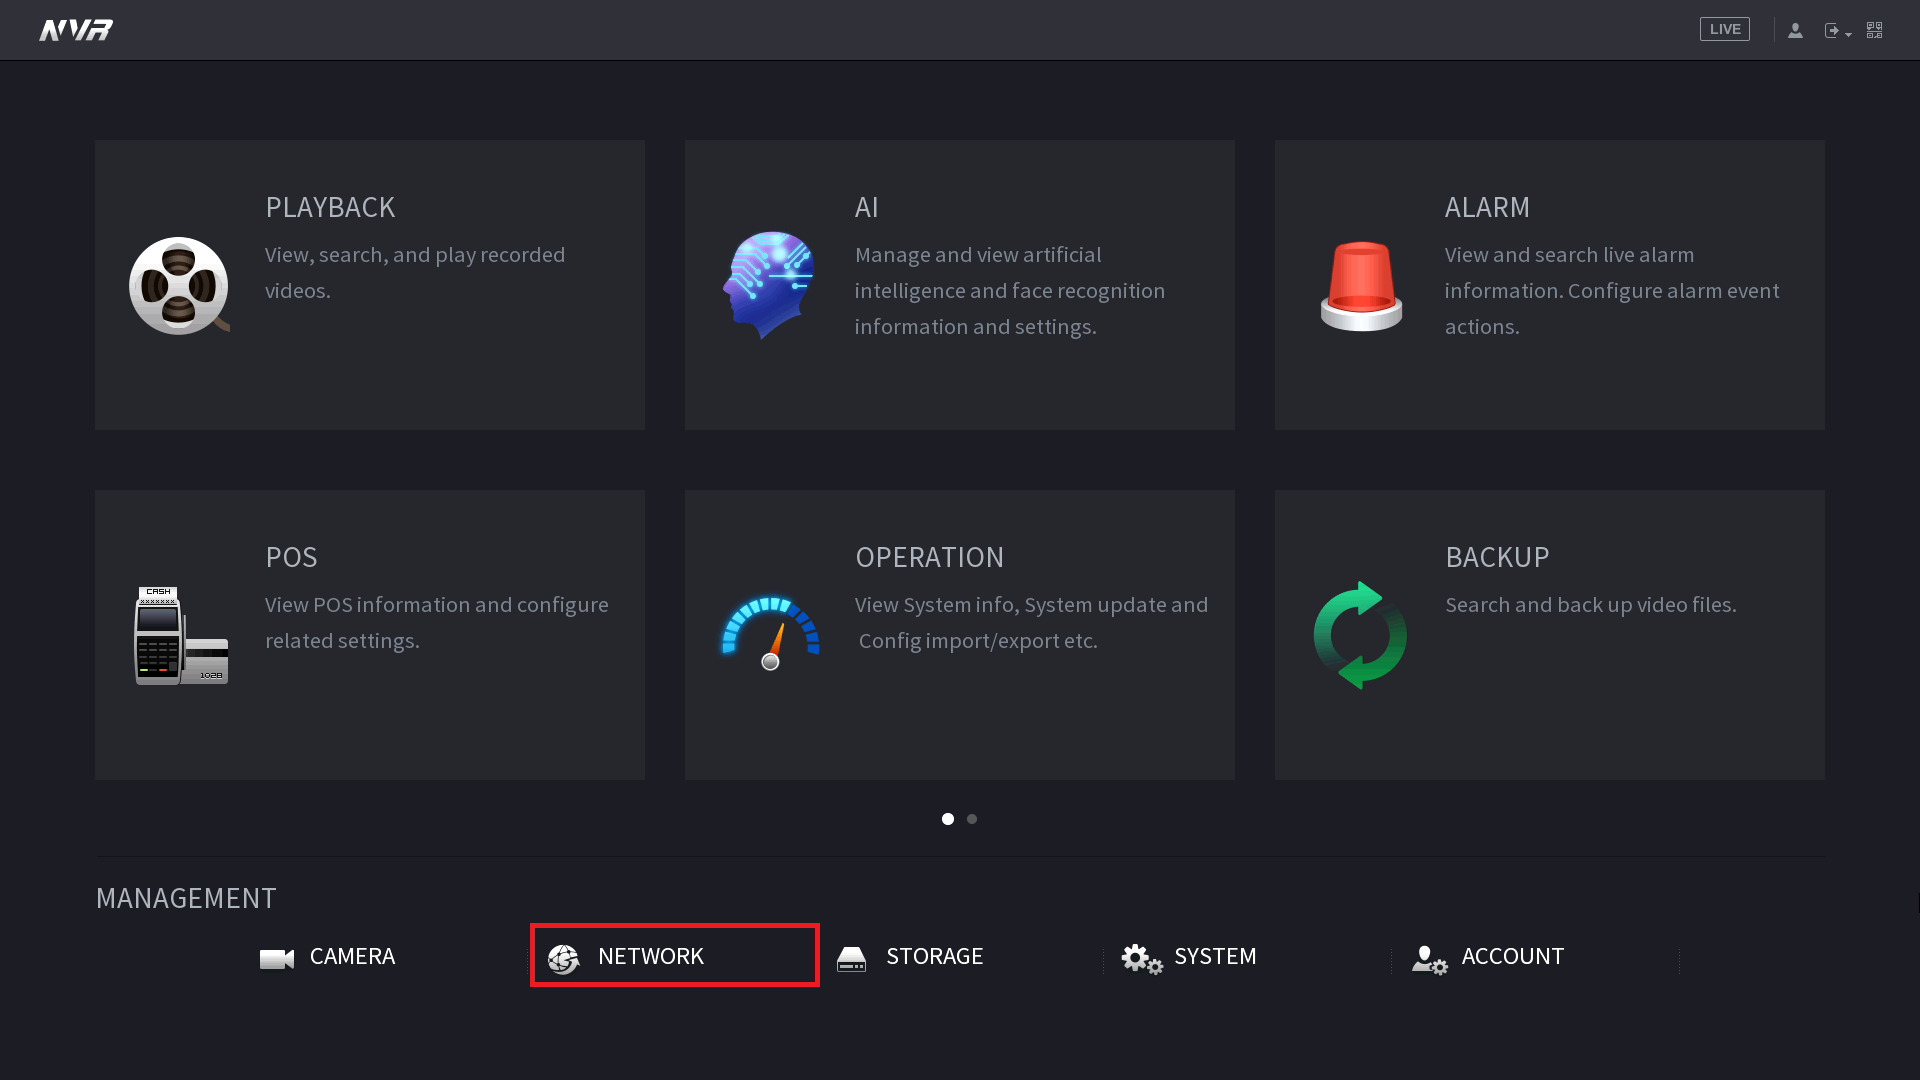 Click on Network
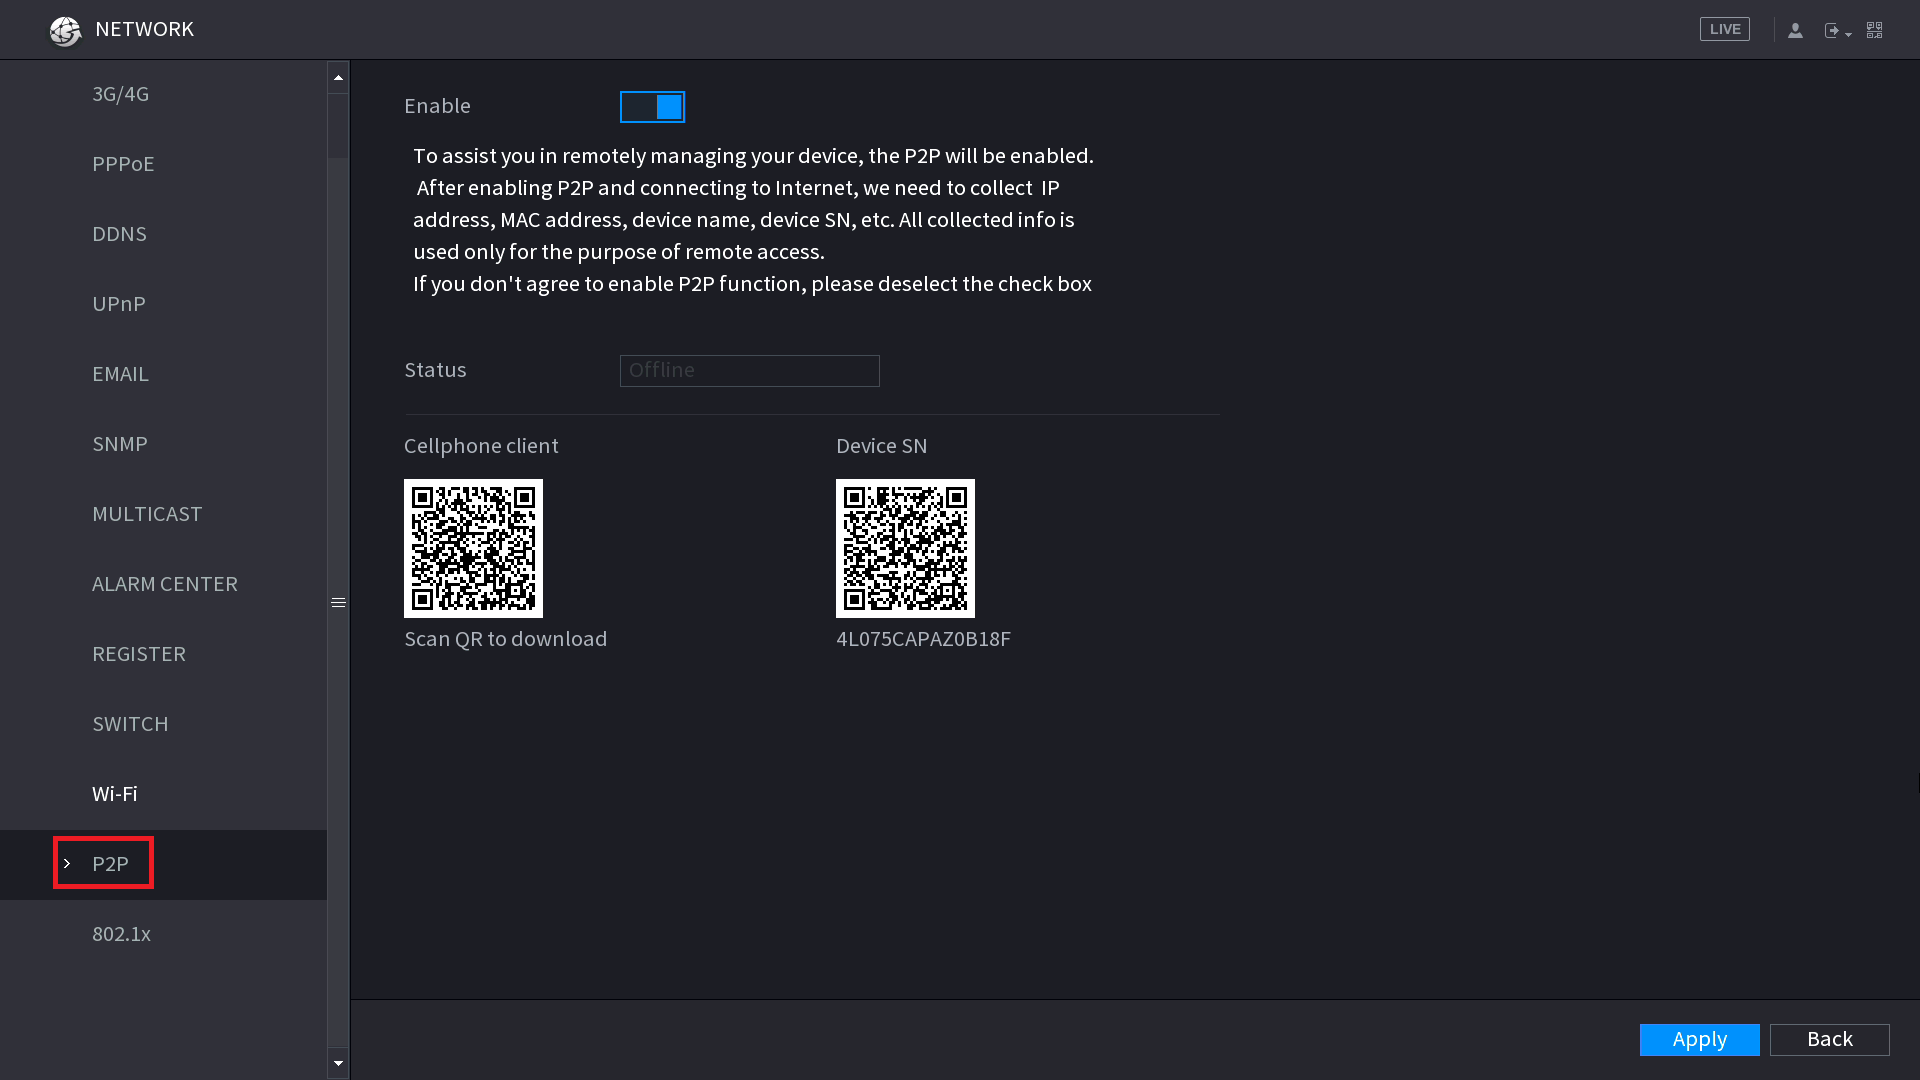 Click on P2P
Blue Interface (Pre Oct 2019)
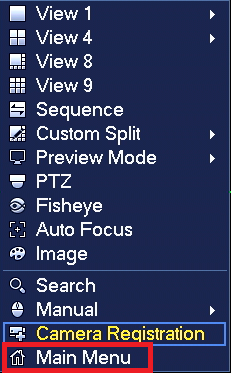
Right click and select Main Menu
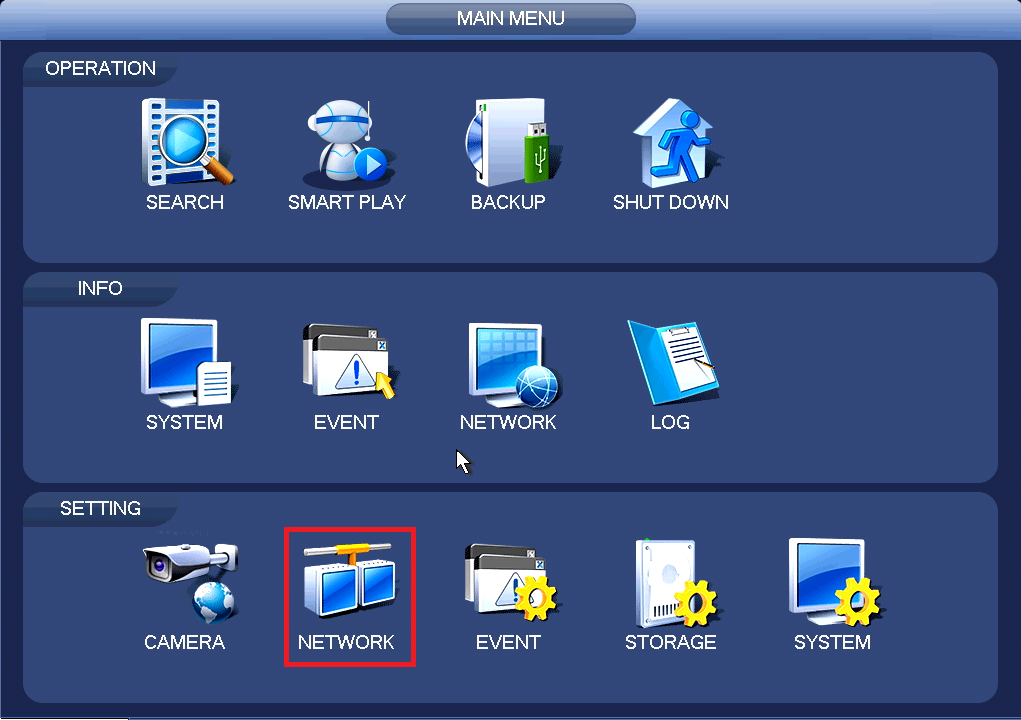
Click on Network
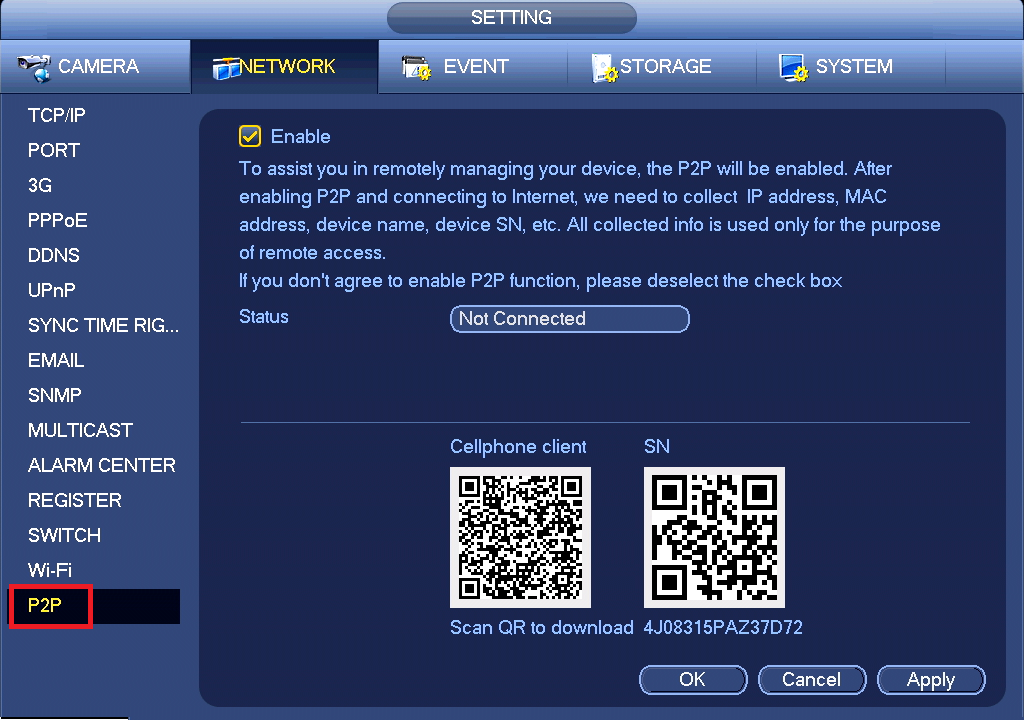
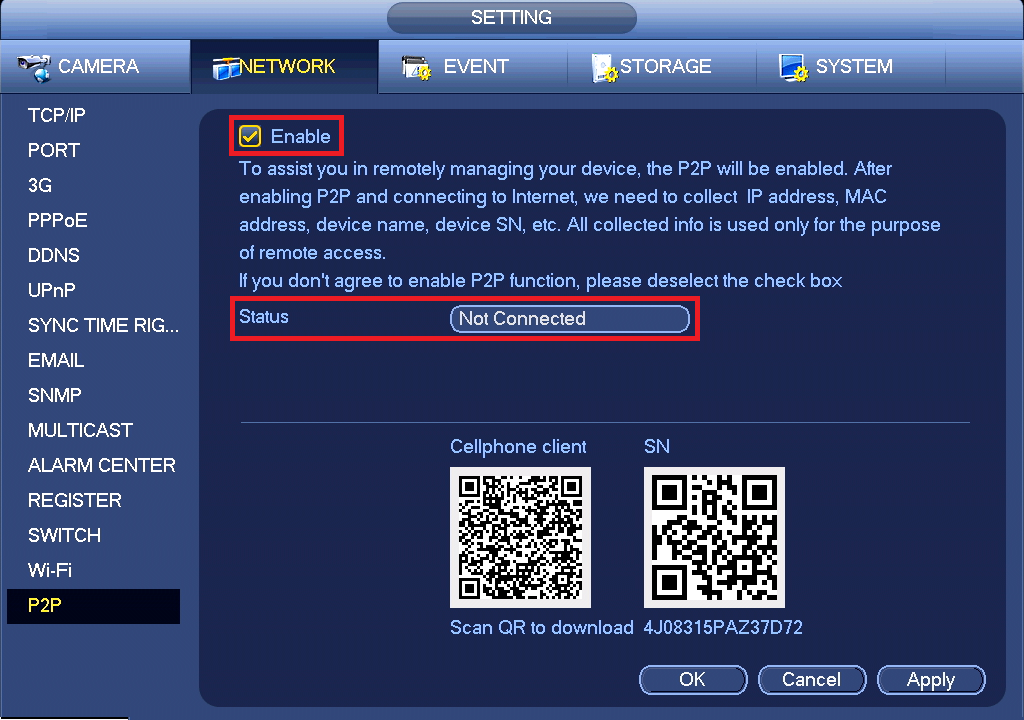
Click on P2P (Or Easy4IP on older recorders)
Black Interface (Post Oct 2019)
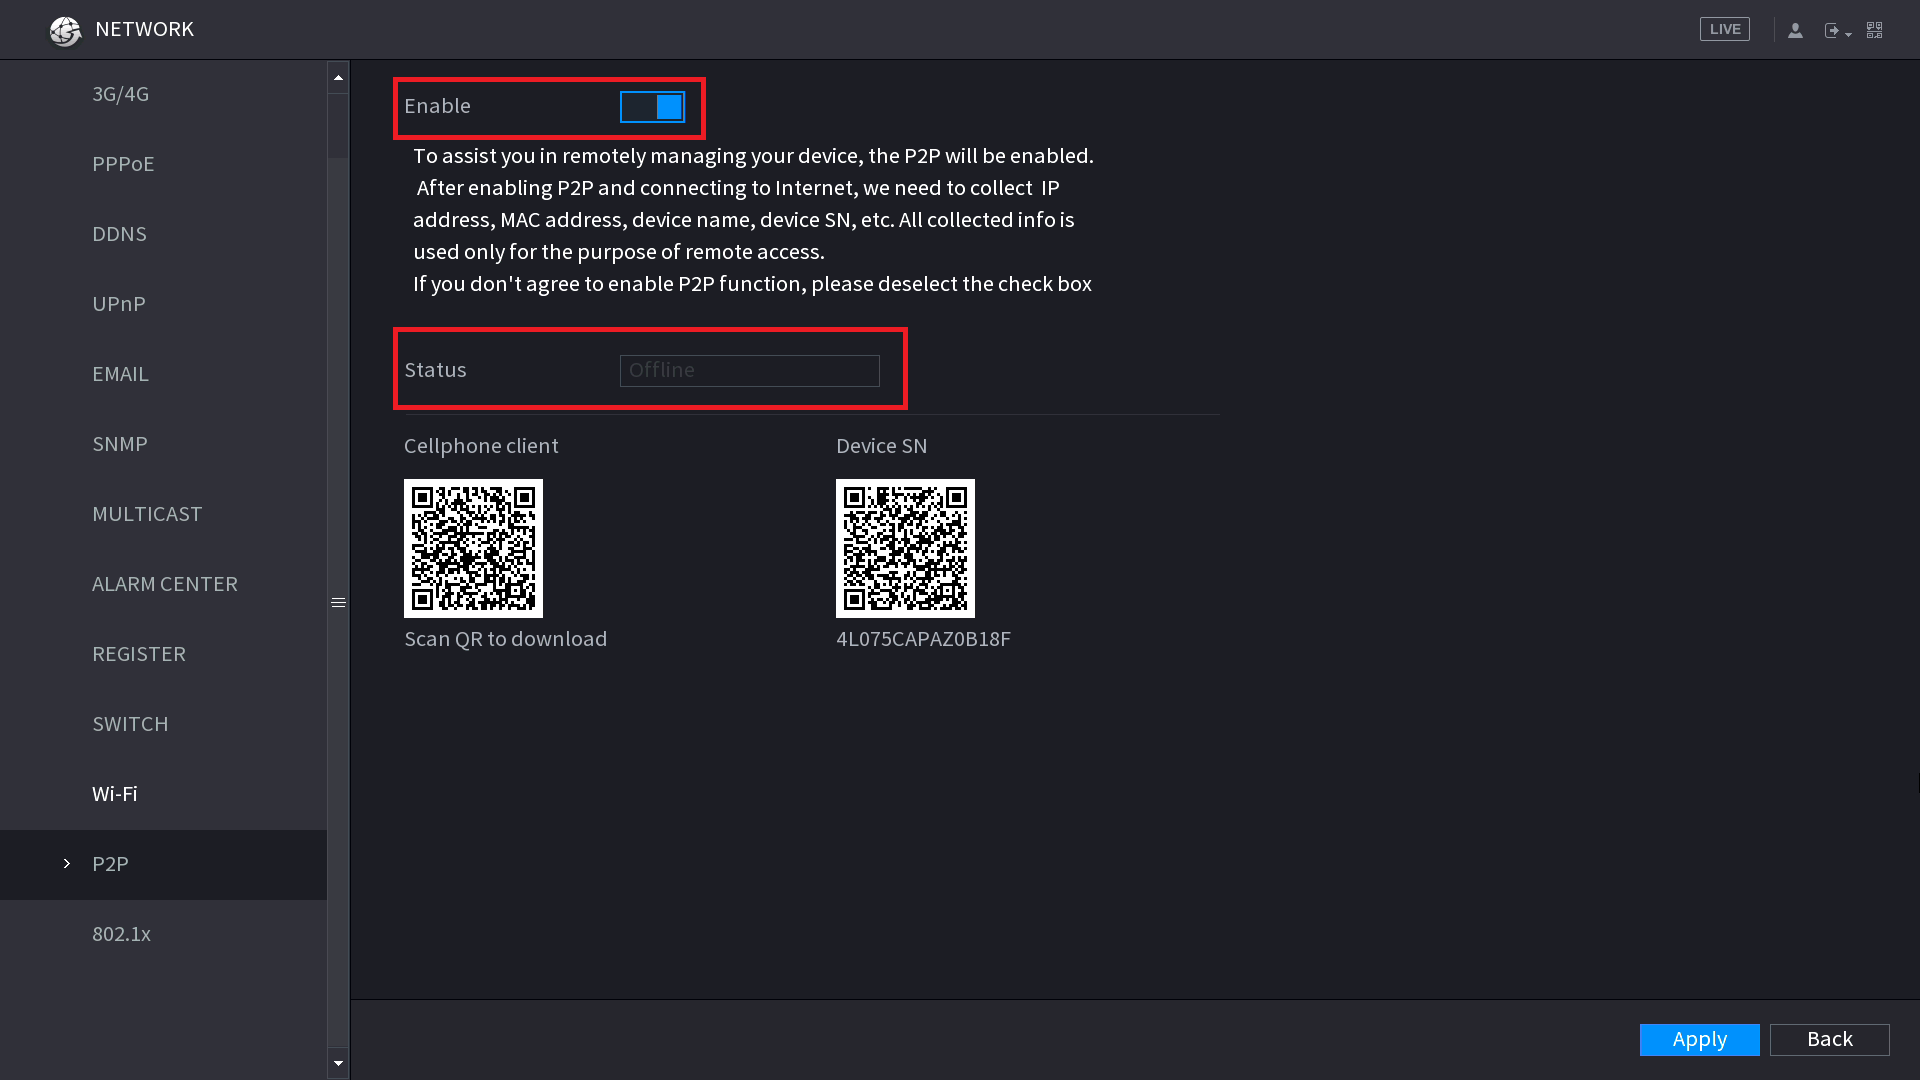
Blue Interface (Pre Oct 2020)
-
Status says Online or Connect Success
-
Status says Offline or Not Connected
- Add Button
Navigate to Network > TCP/IP
Black Interface (Post Oct 2019)
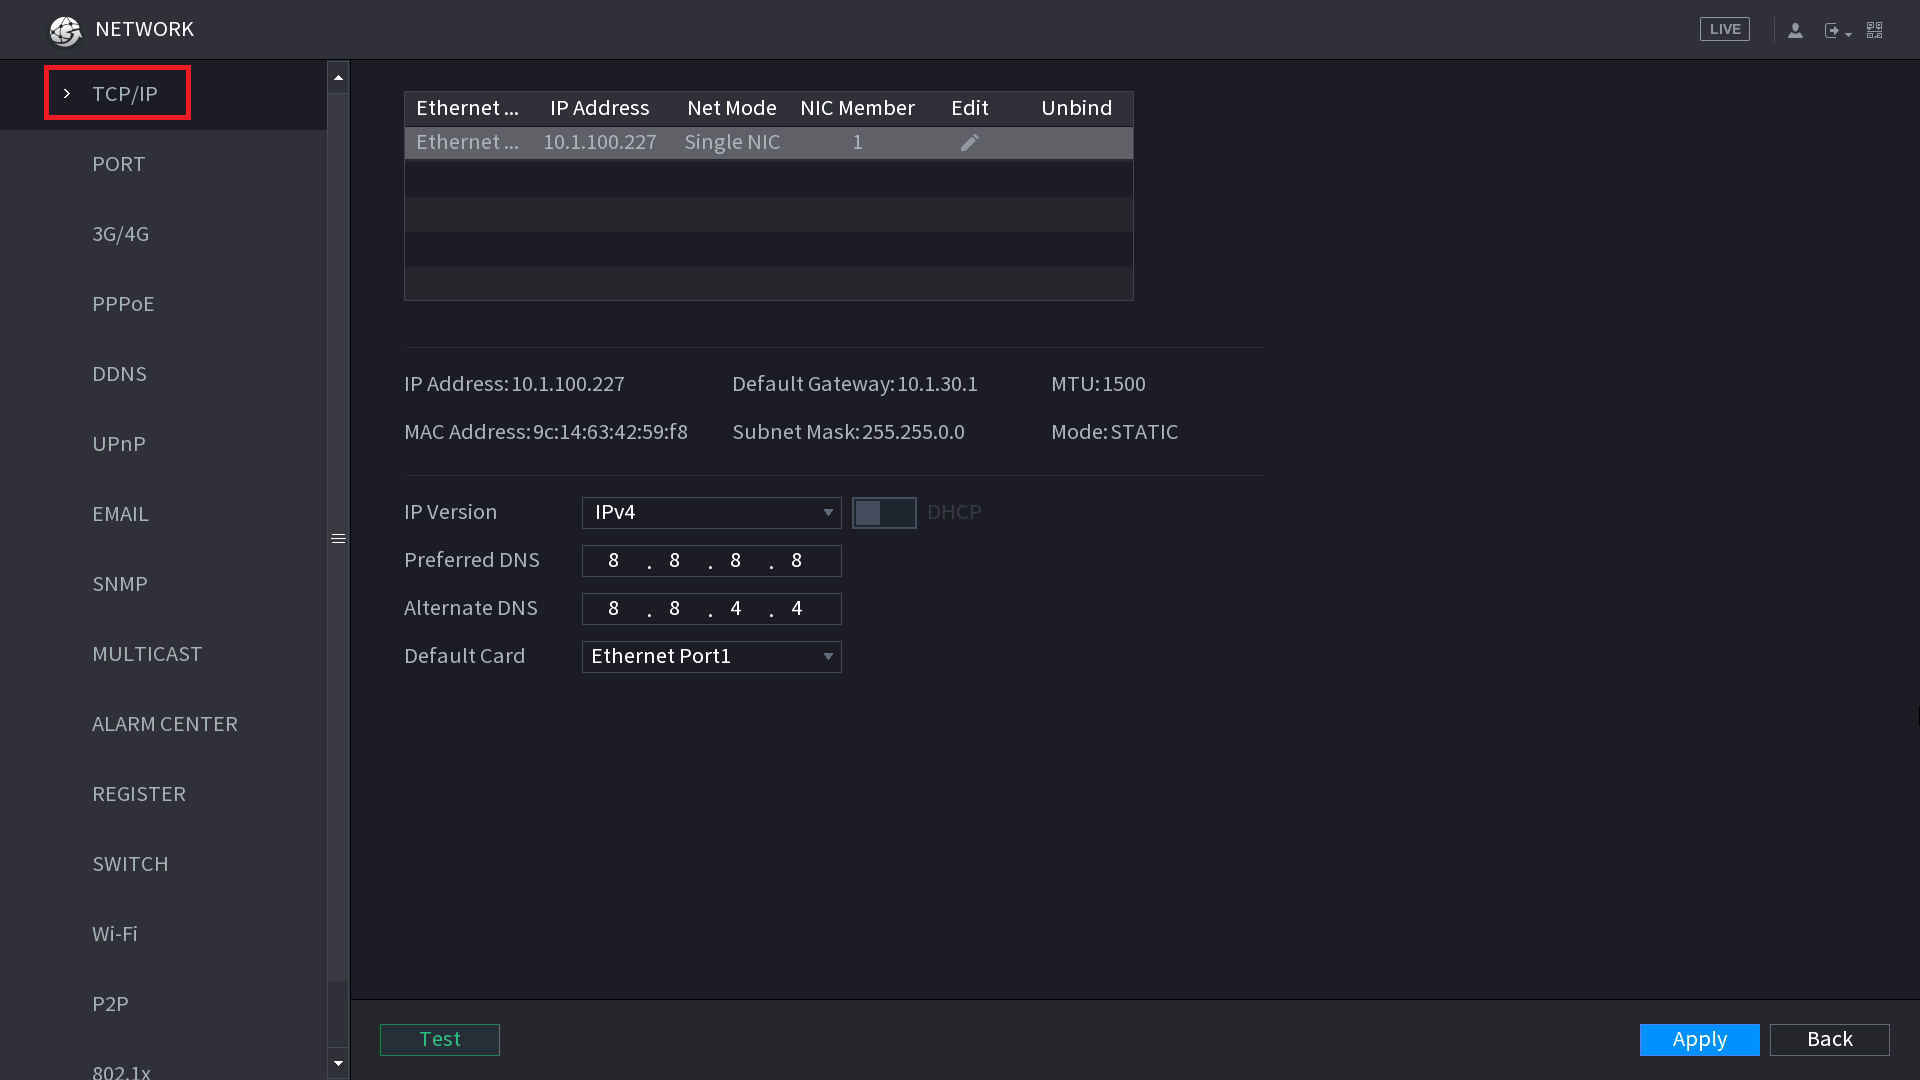 Click on TCP/IP
Blue Interface (Pre Oct 2019)
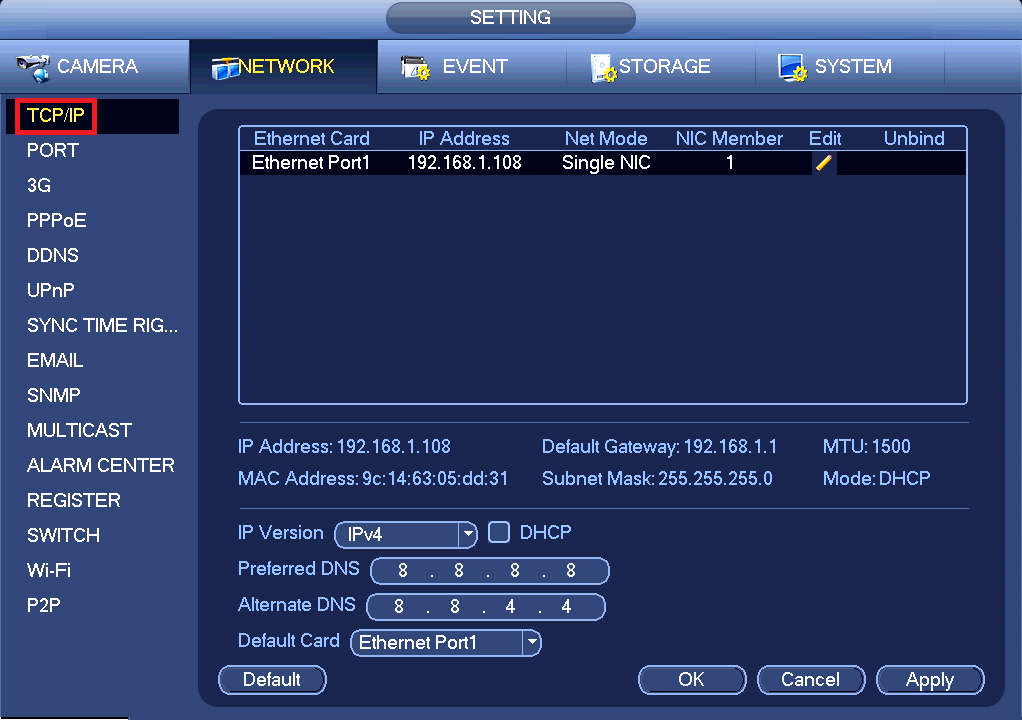 Click on TCP/IP
Click the Edit Pencil to bring up the page to modify the IP Settings
Black Interface (Post Oct 2019)
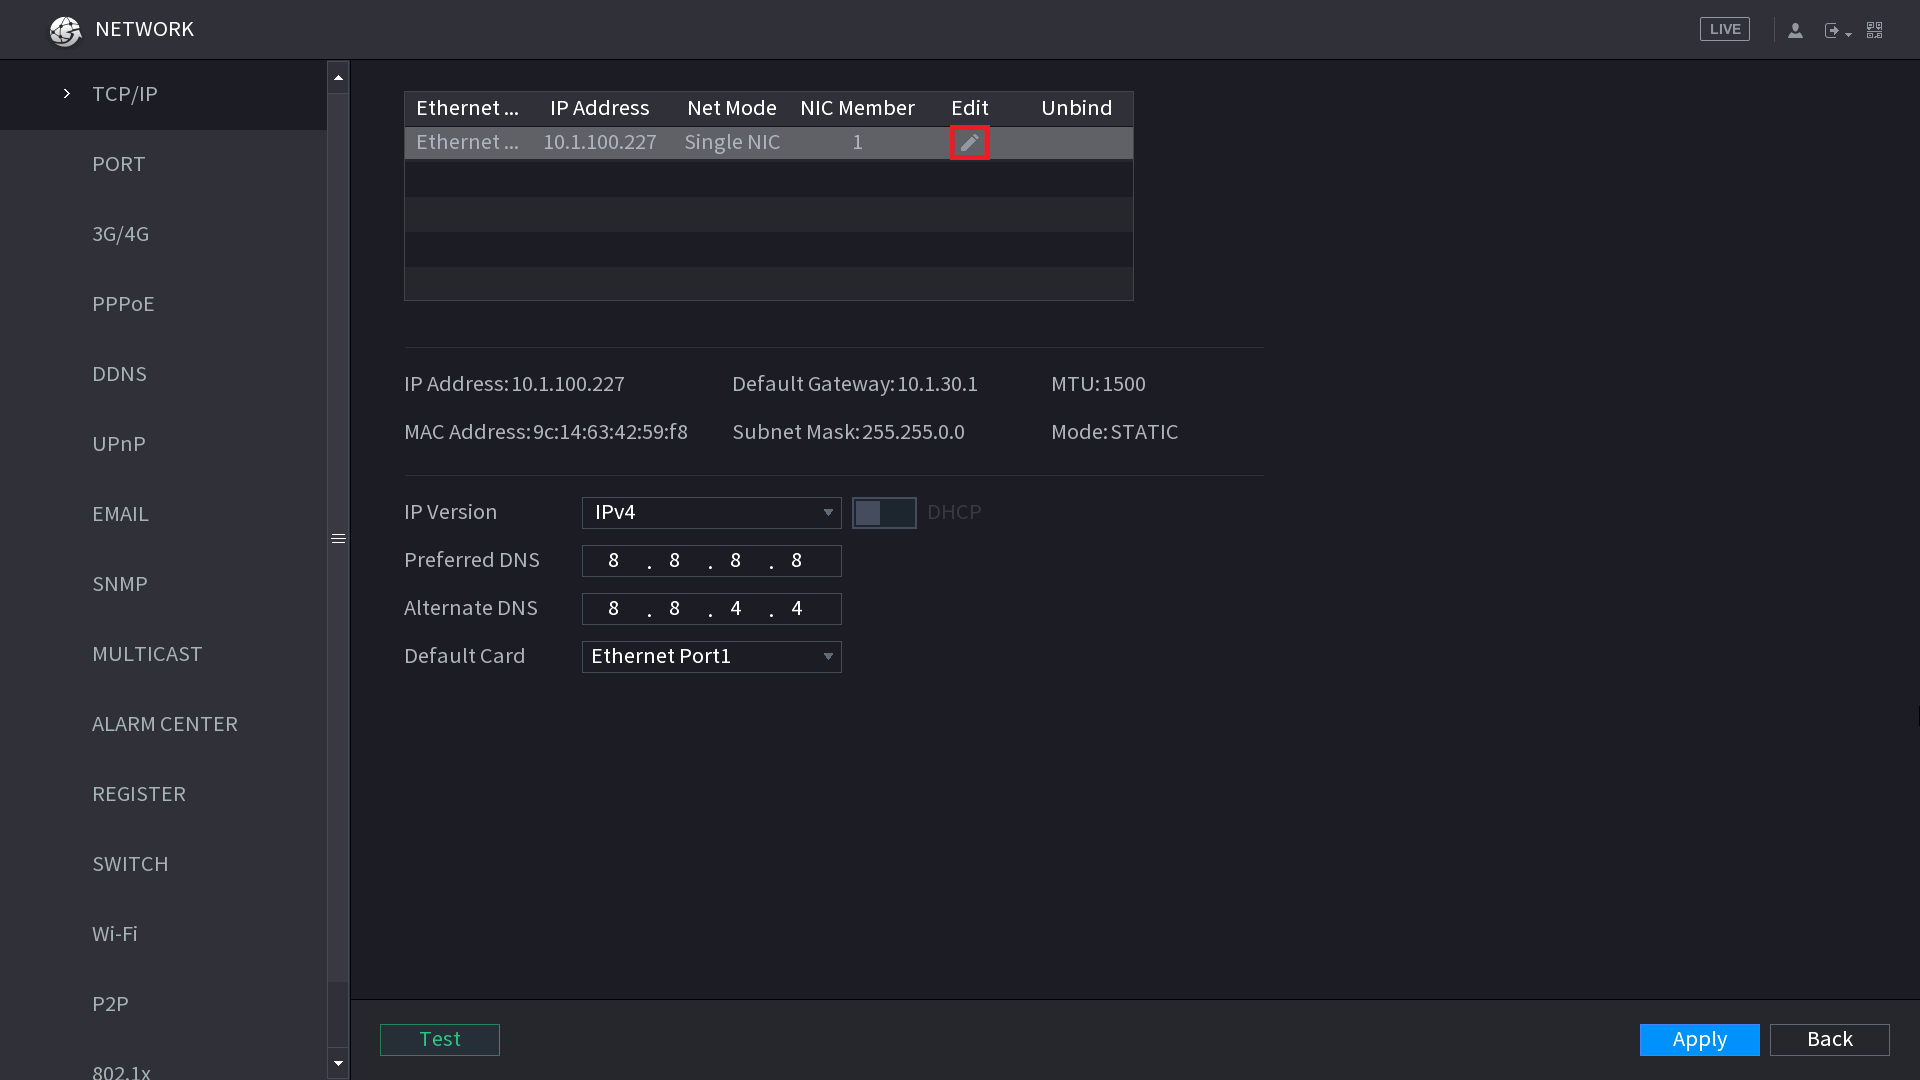
Blue Interface (Pre Oct 2019)
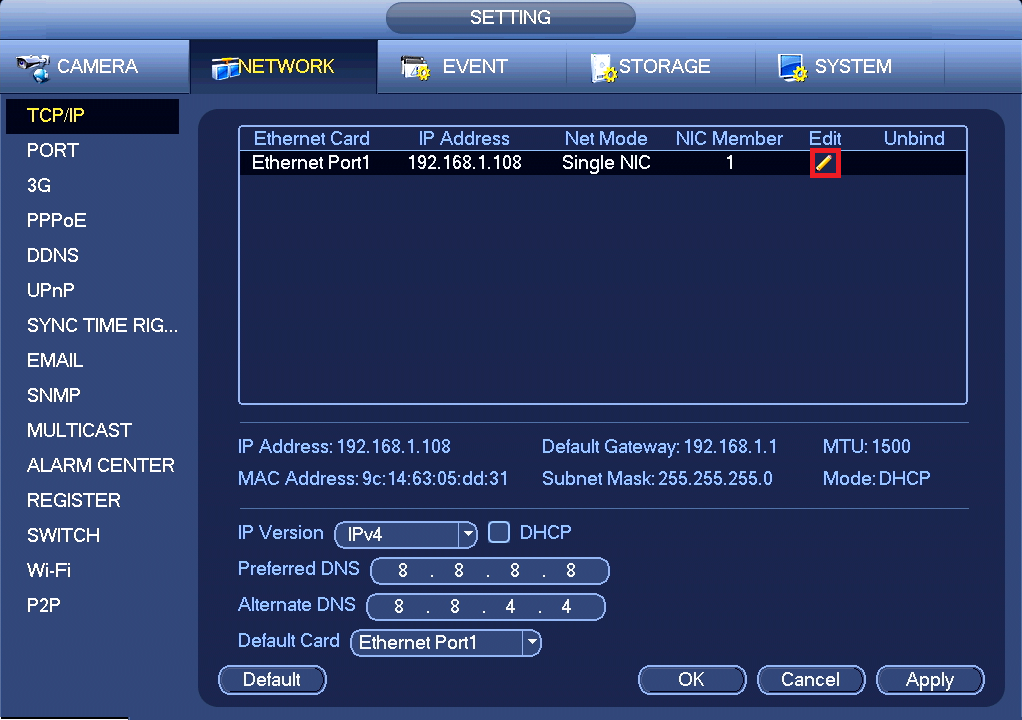
Turn DHCP on. The IP Address should change to 0.0.0.0. Apply your changes.
Black Interface (Post Oct 2019)
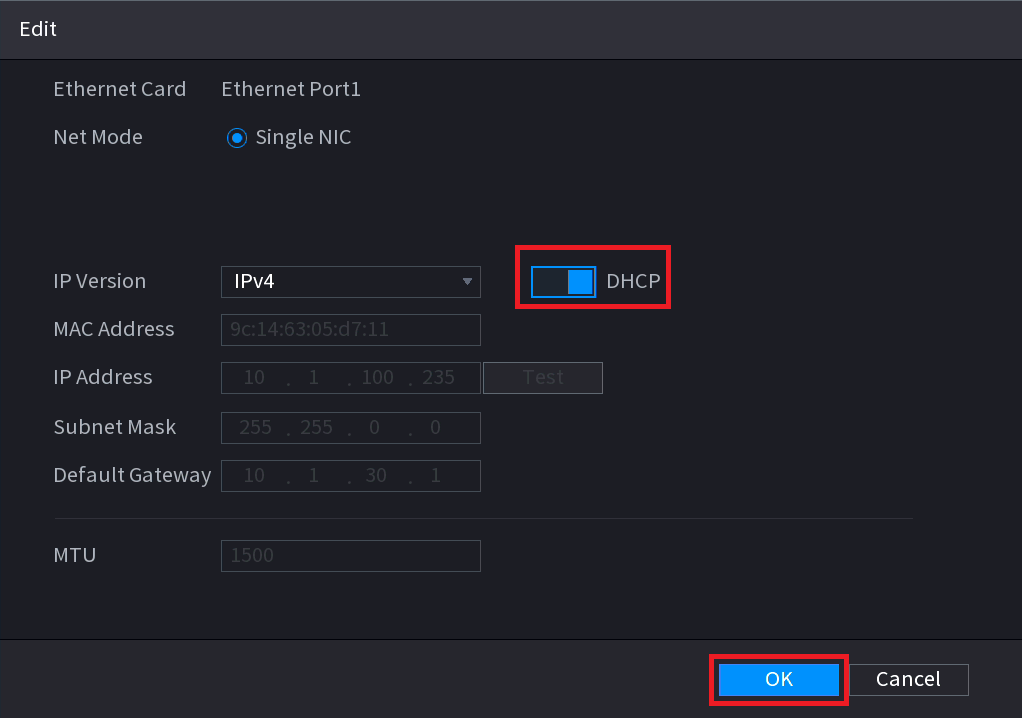
Enable DHCP then click OK
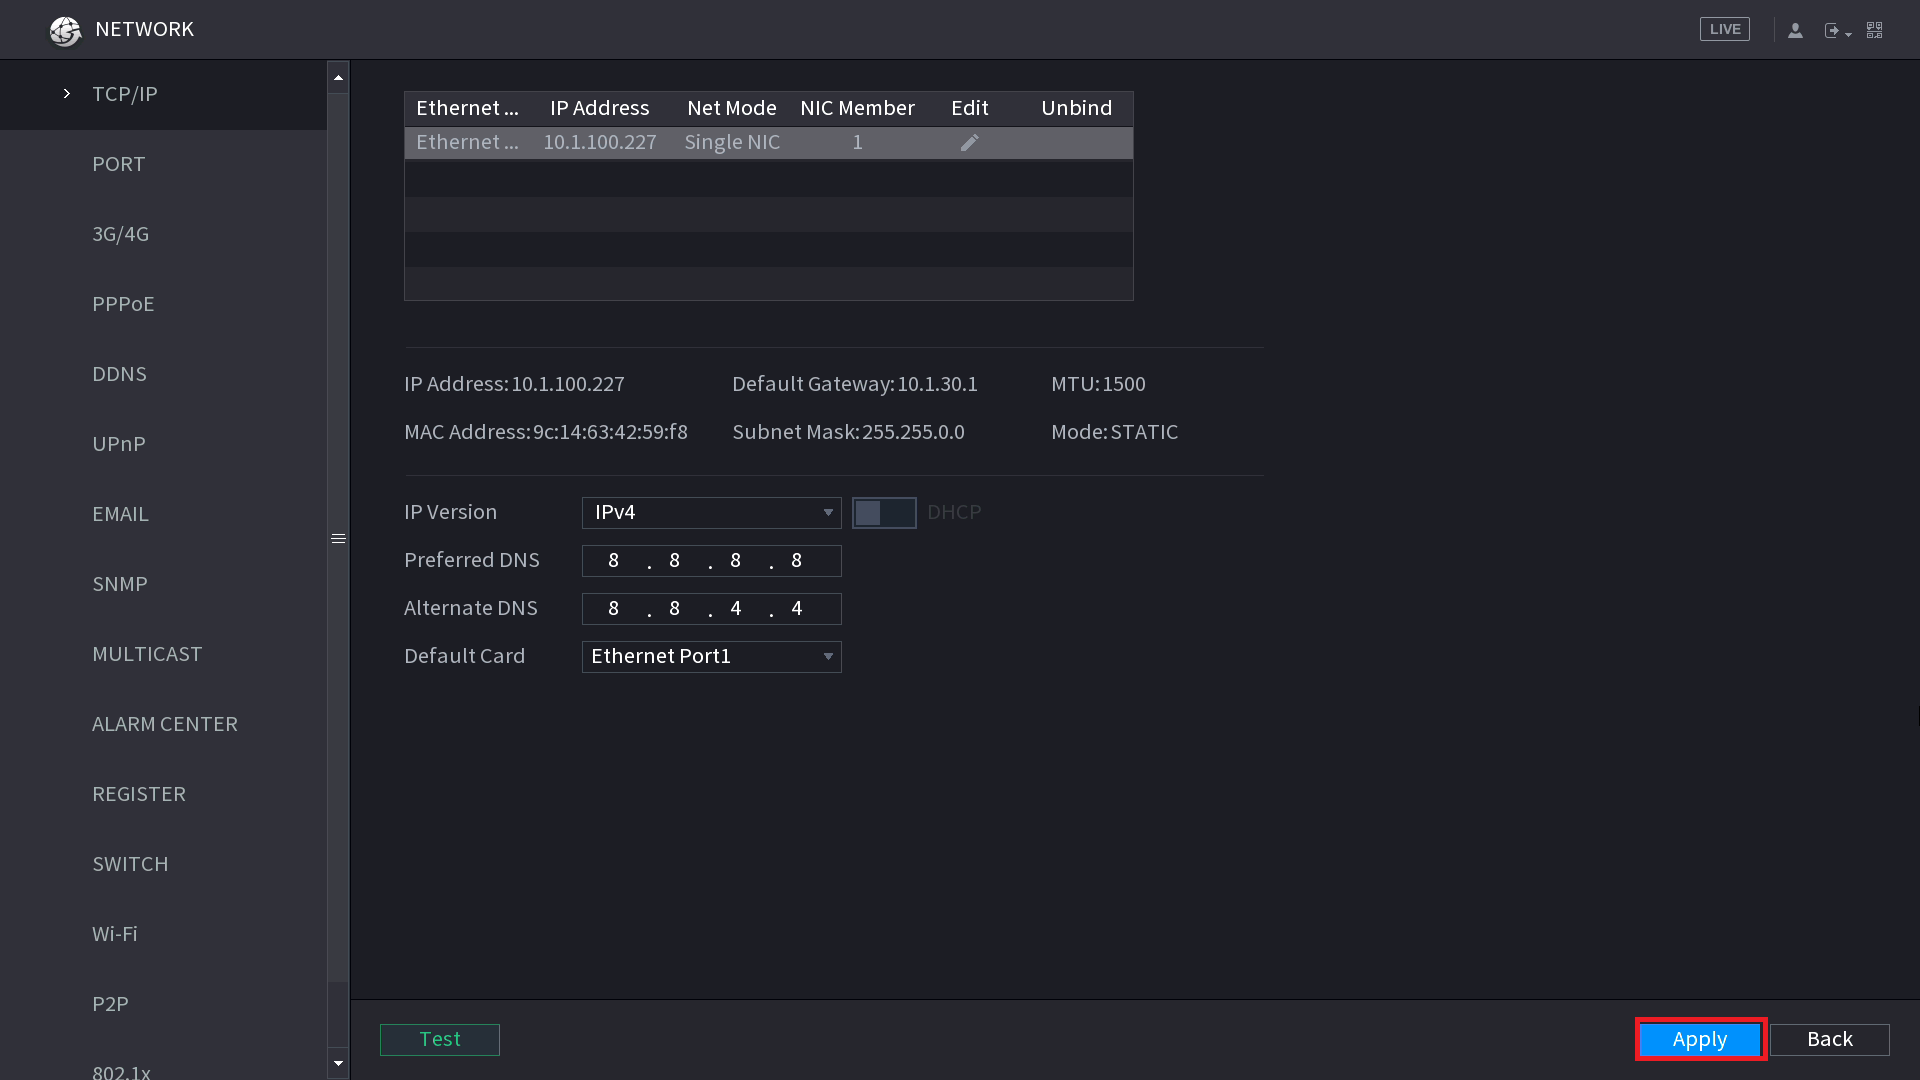
Click Apply to save your changes.
Blue Interface (Pre Oct 2019)
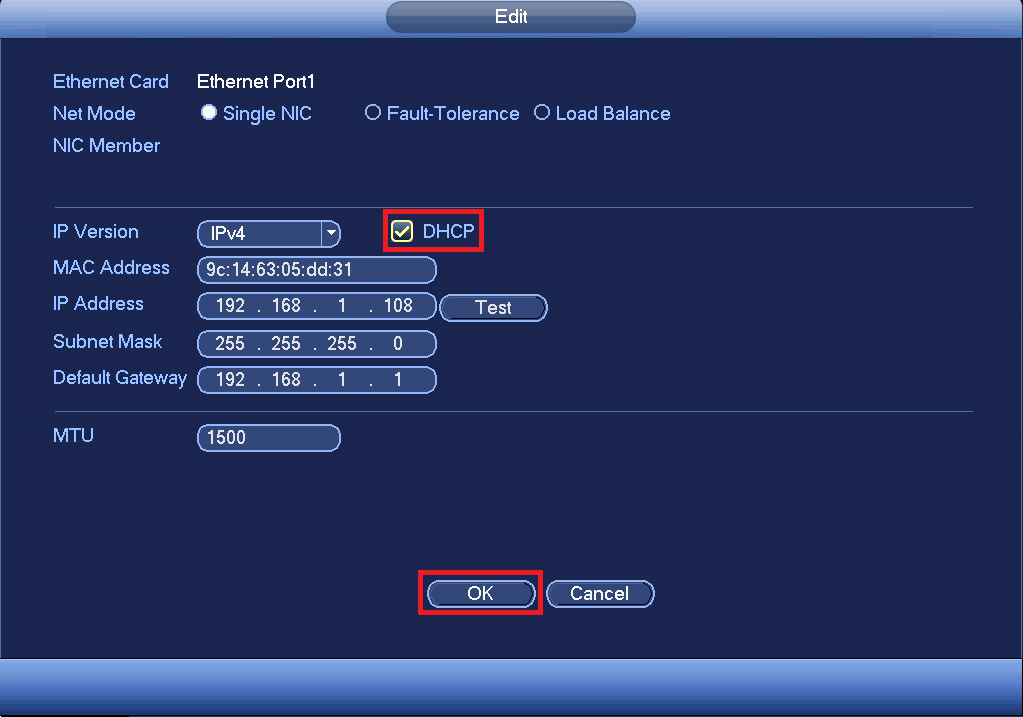
Enable DHCP then click OK
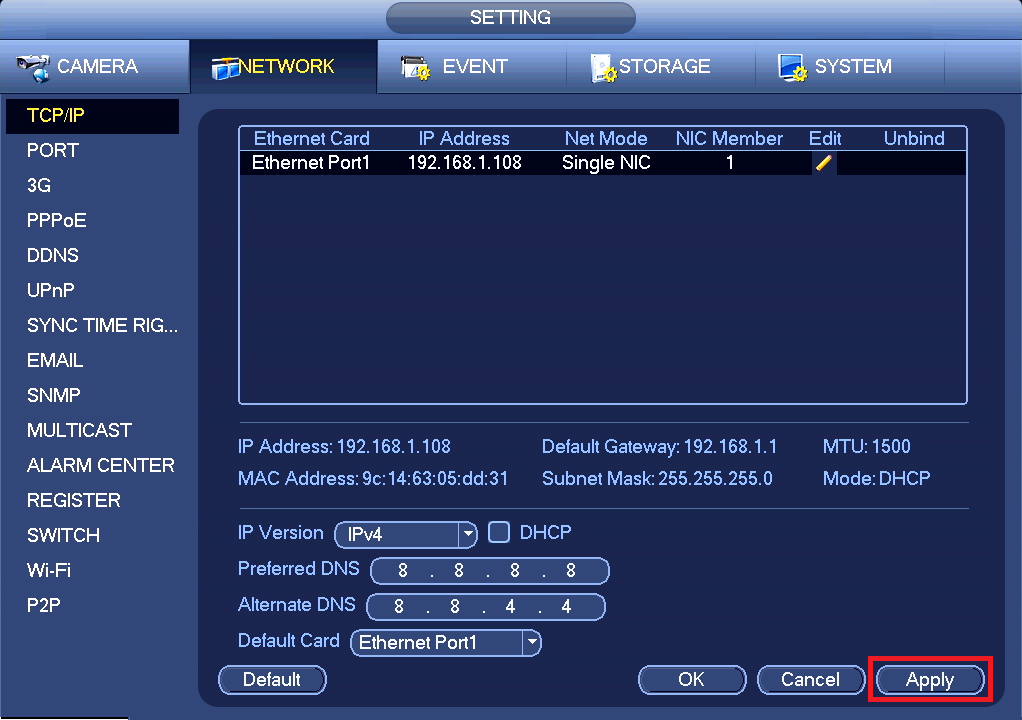
Click Apply to save your changes.
Wait 2 Minutes, then Check the P2P Status again
Black Interface (Post Oct 2019)
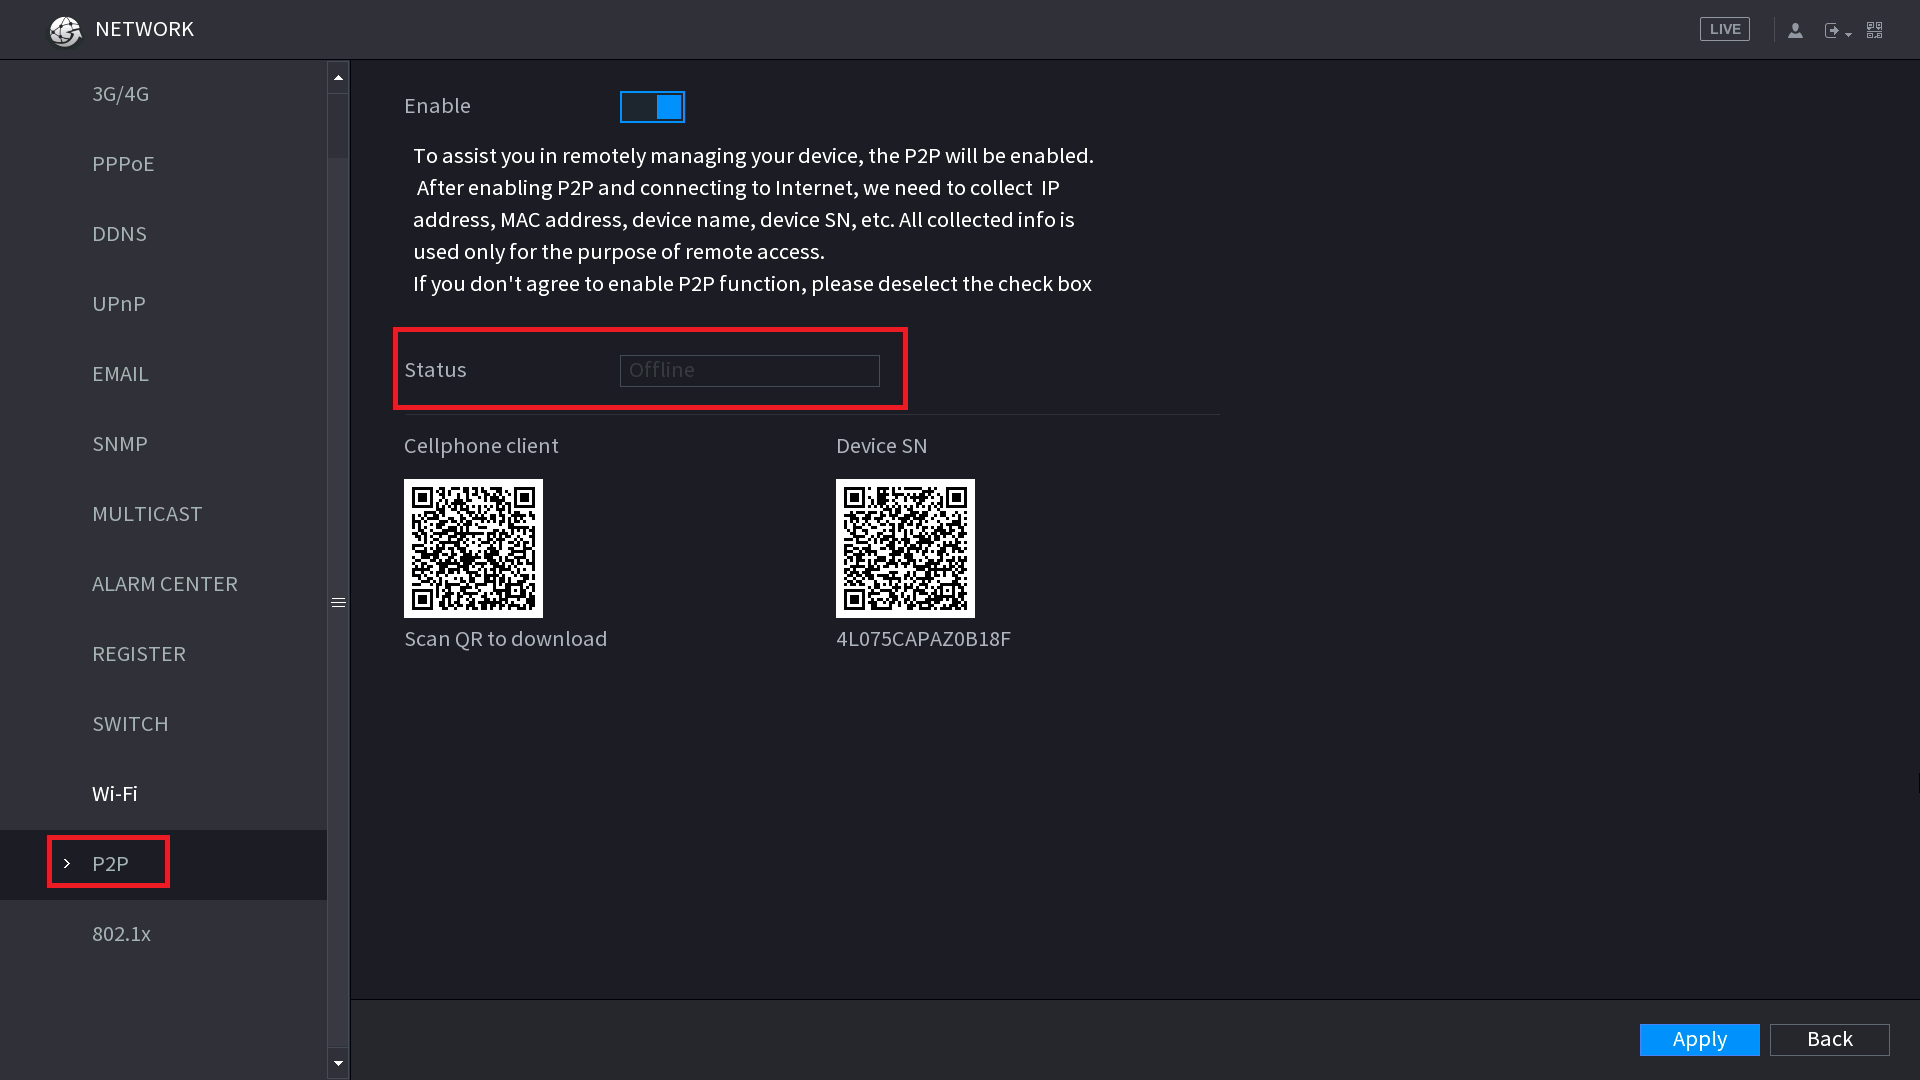
Blue Interface (Pre Oct 2019)
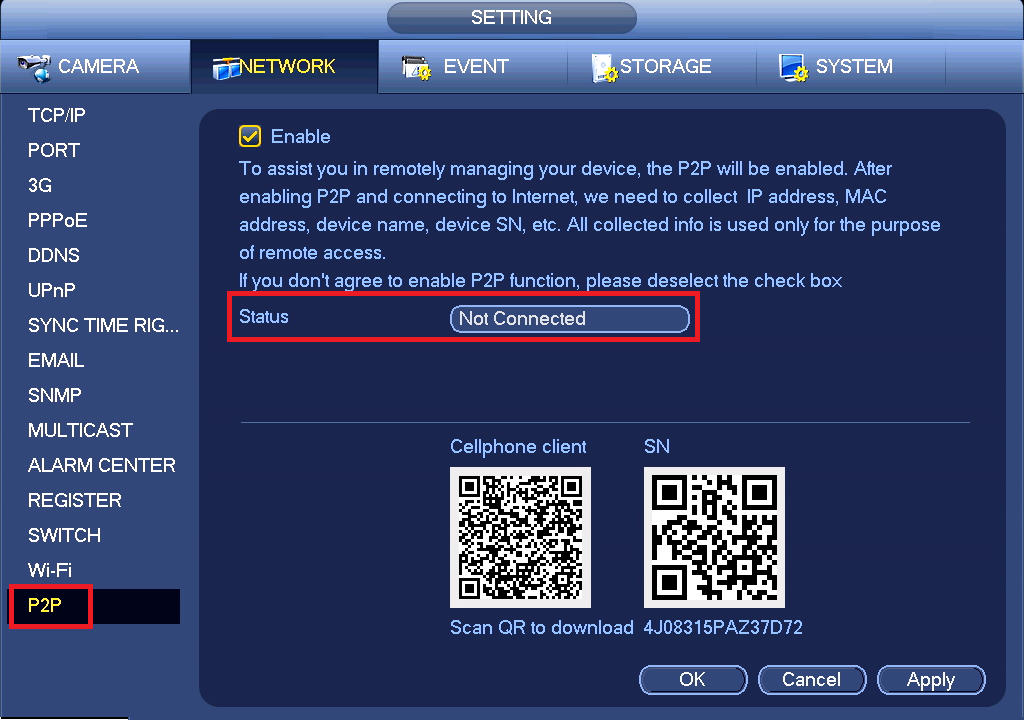
-
Status says Online or Connect Success
-
Status says Offline or Not Connected
- Add Button
If it says Online or Connect Success your recorder is now configured for remote access.
See this guide for how to add it to your phone or this video for SmartPSS.
Black Interface (Post Oct 2019)
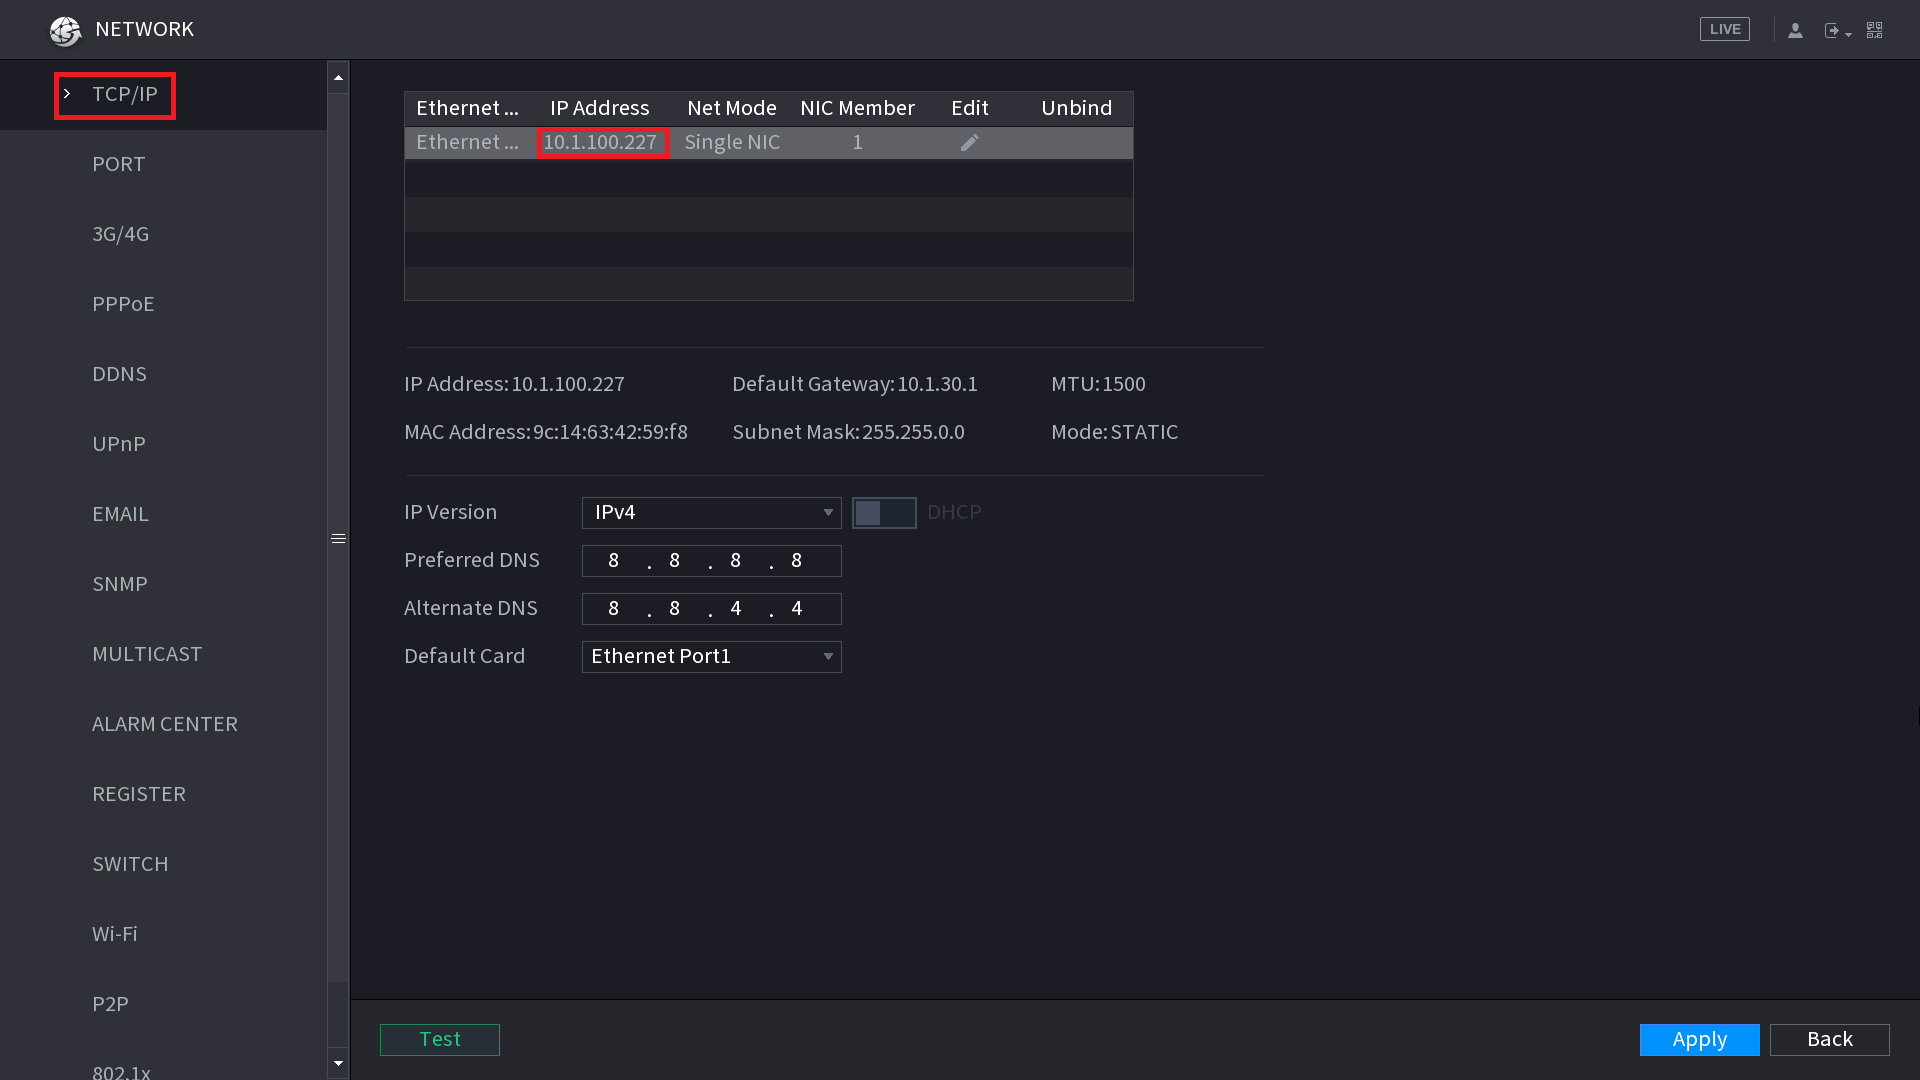
Blue Interface (Pre Oct 2019)
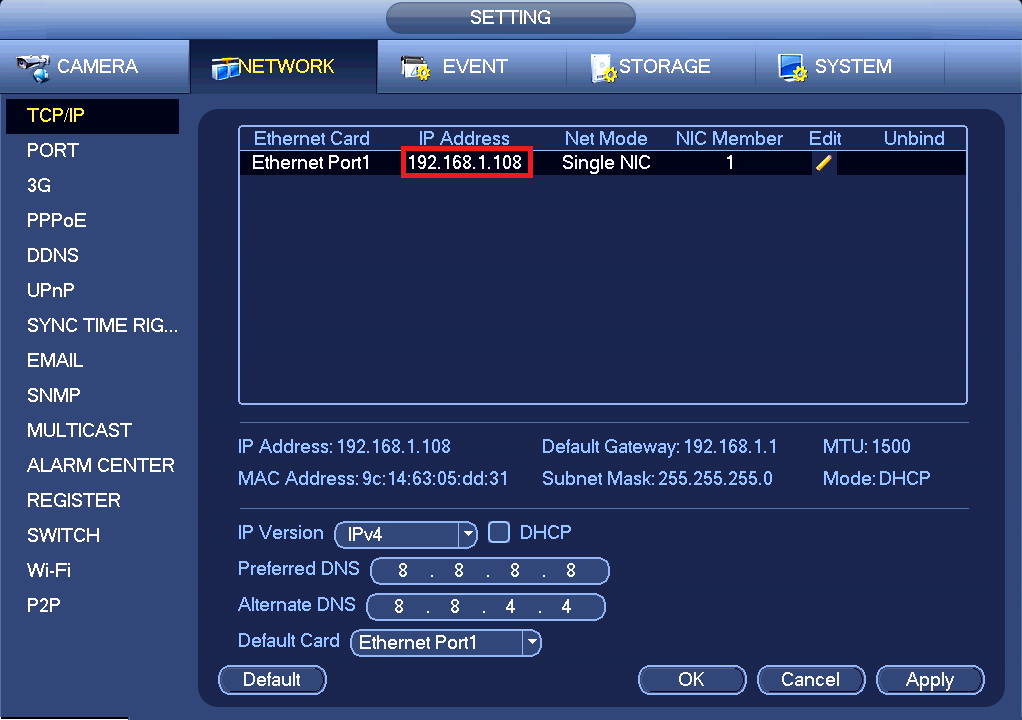
-
IP Address says 0.0.0.0
-
IP Address says something different
- Add Button
Default the TCP/IP Page and the Network Settings
Black Interface (Post Oct 2019)
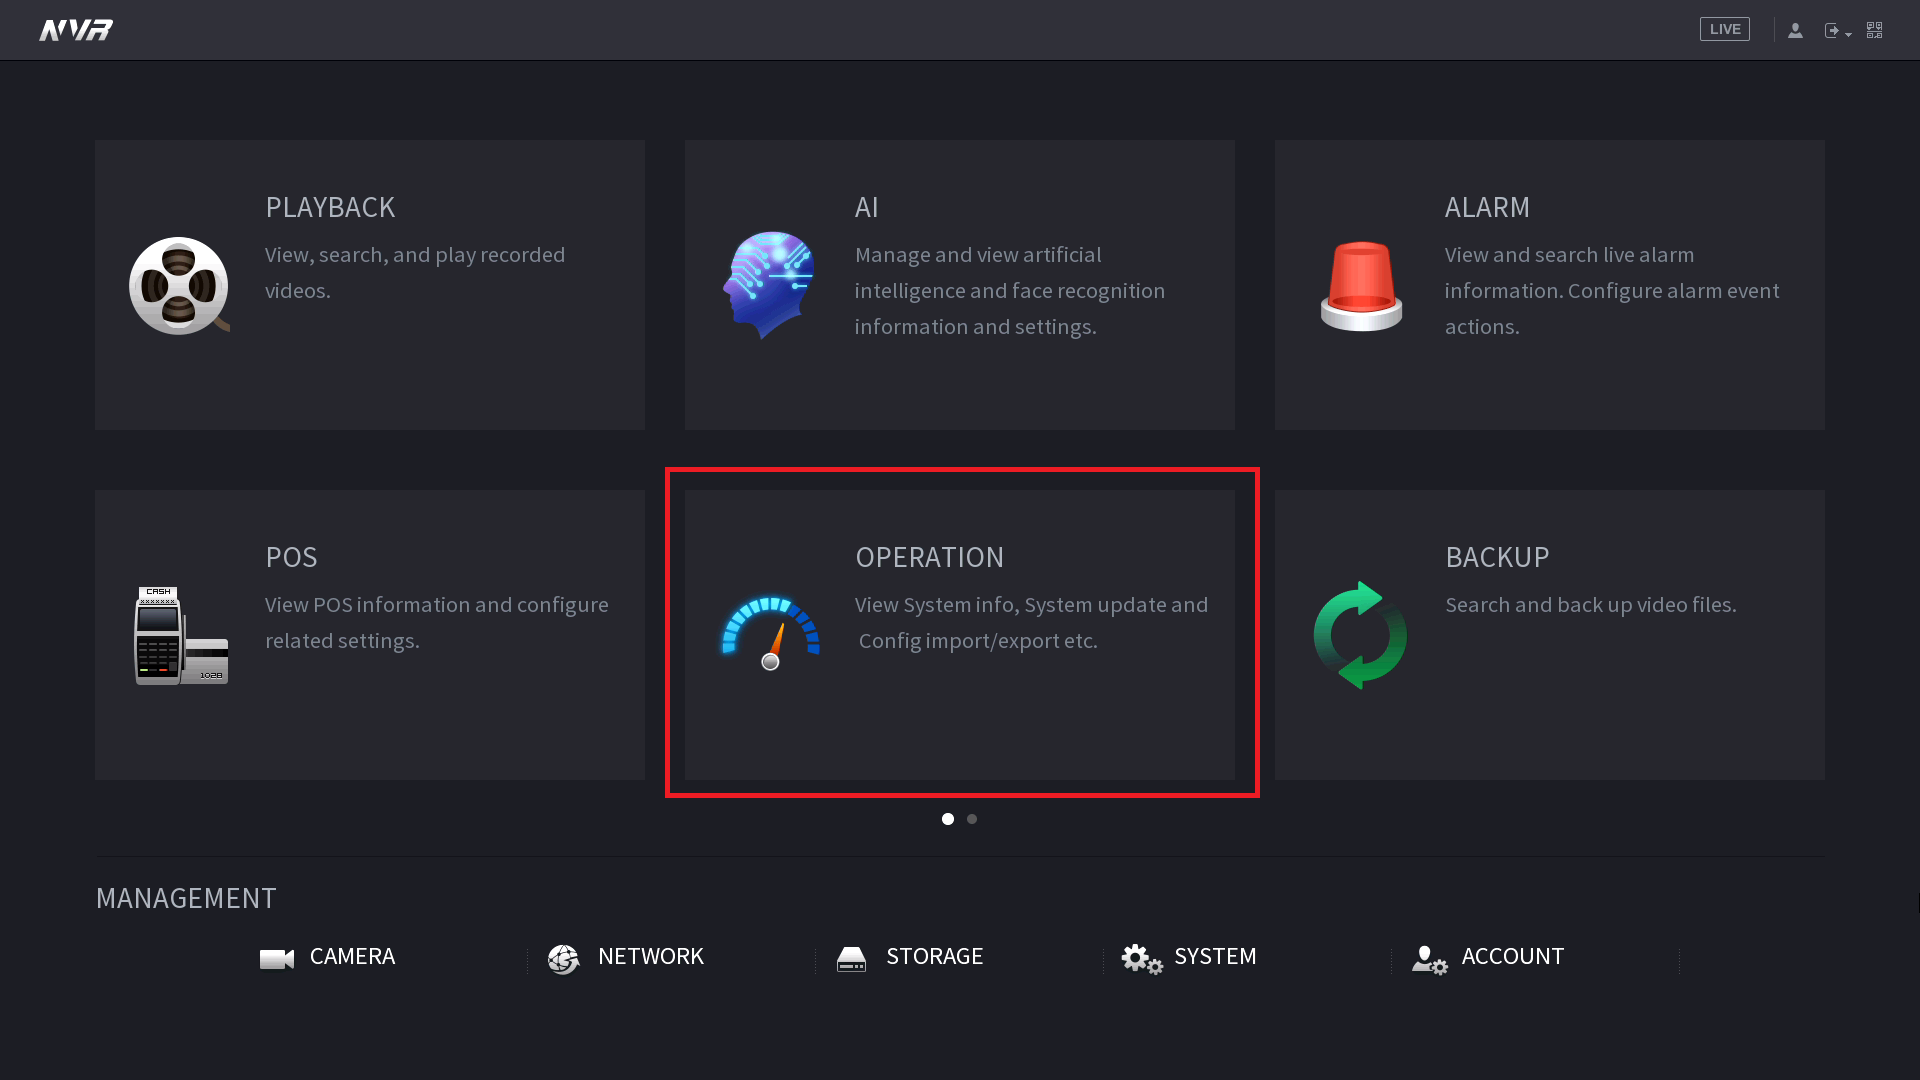
Click on Operation
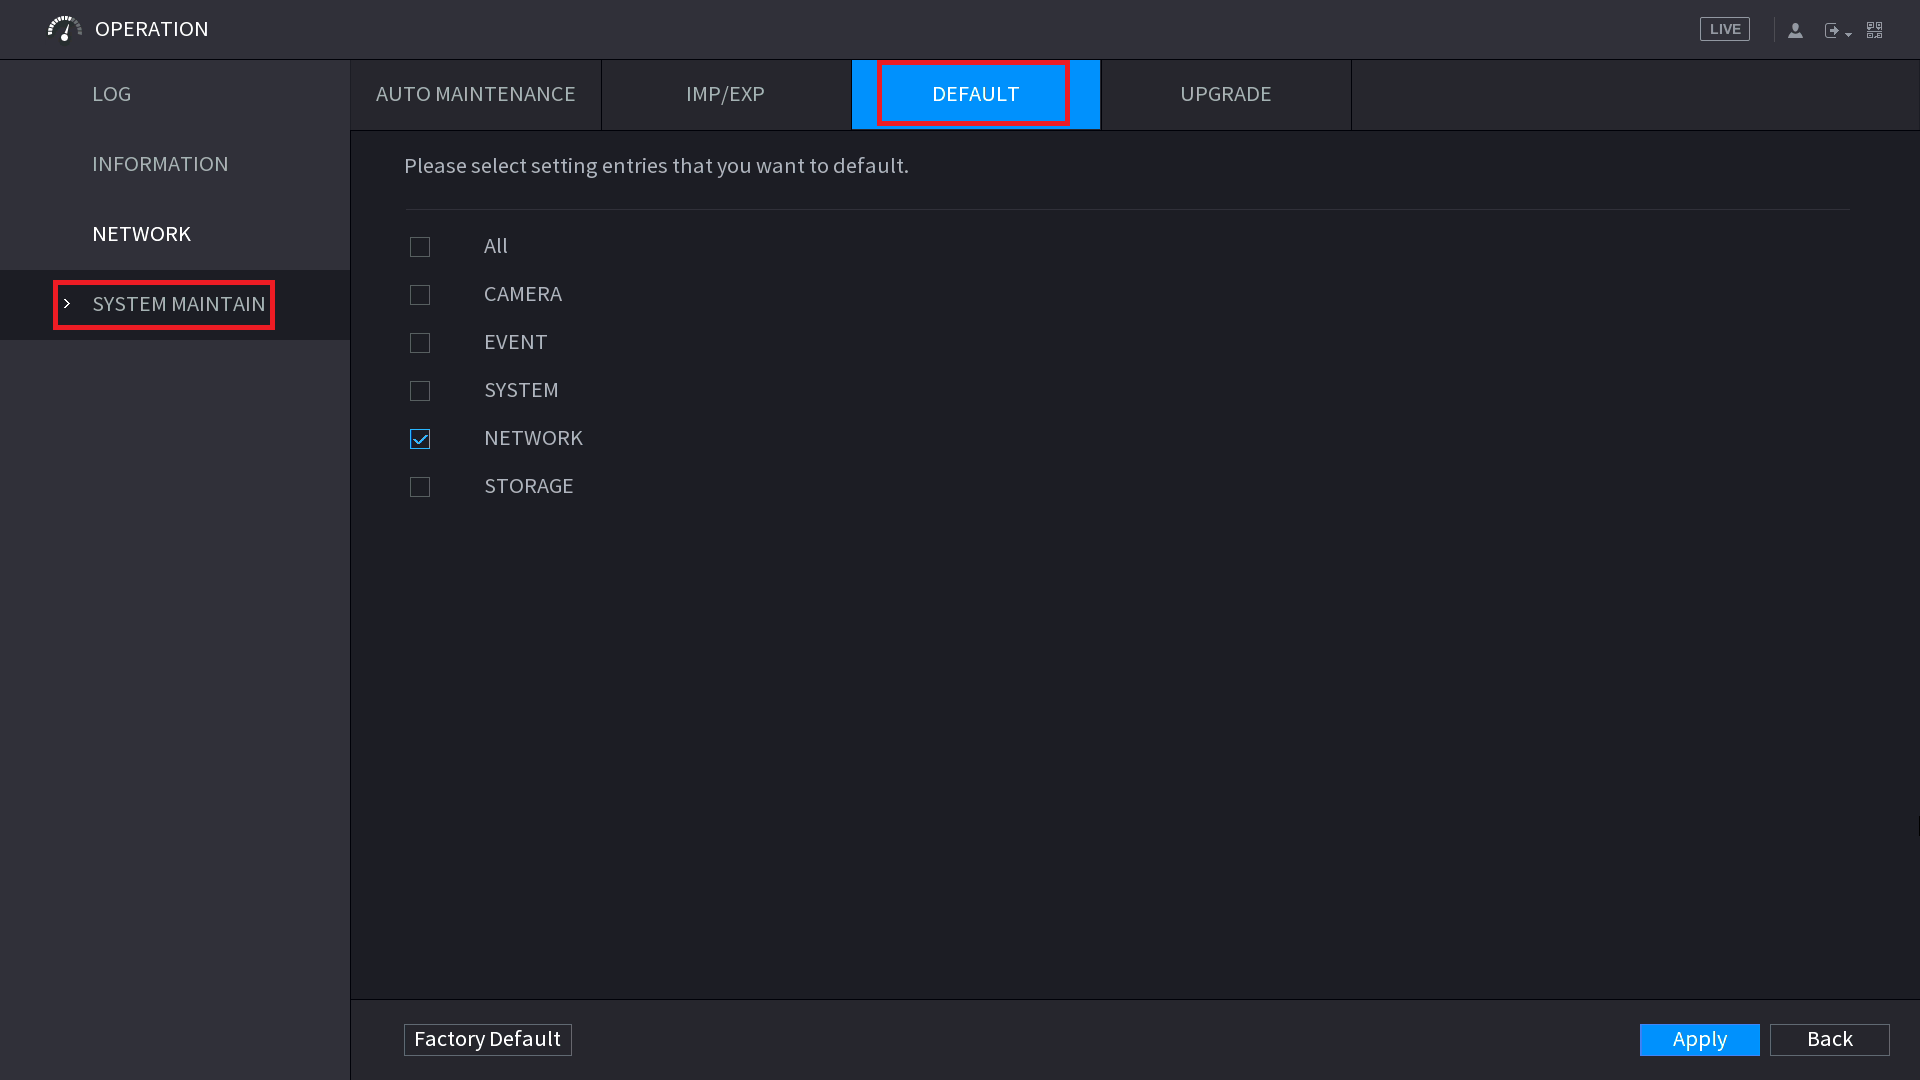
Click on System Maintain > Default
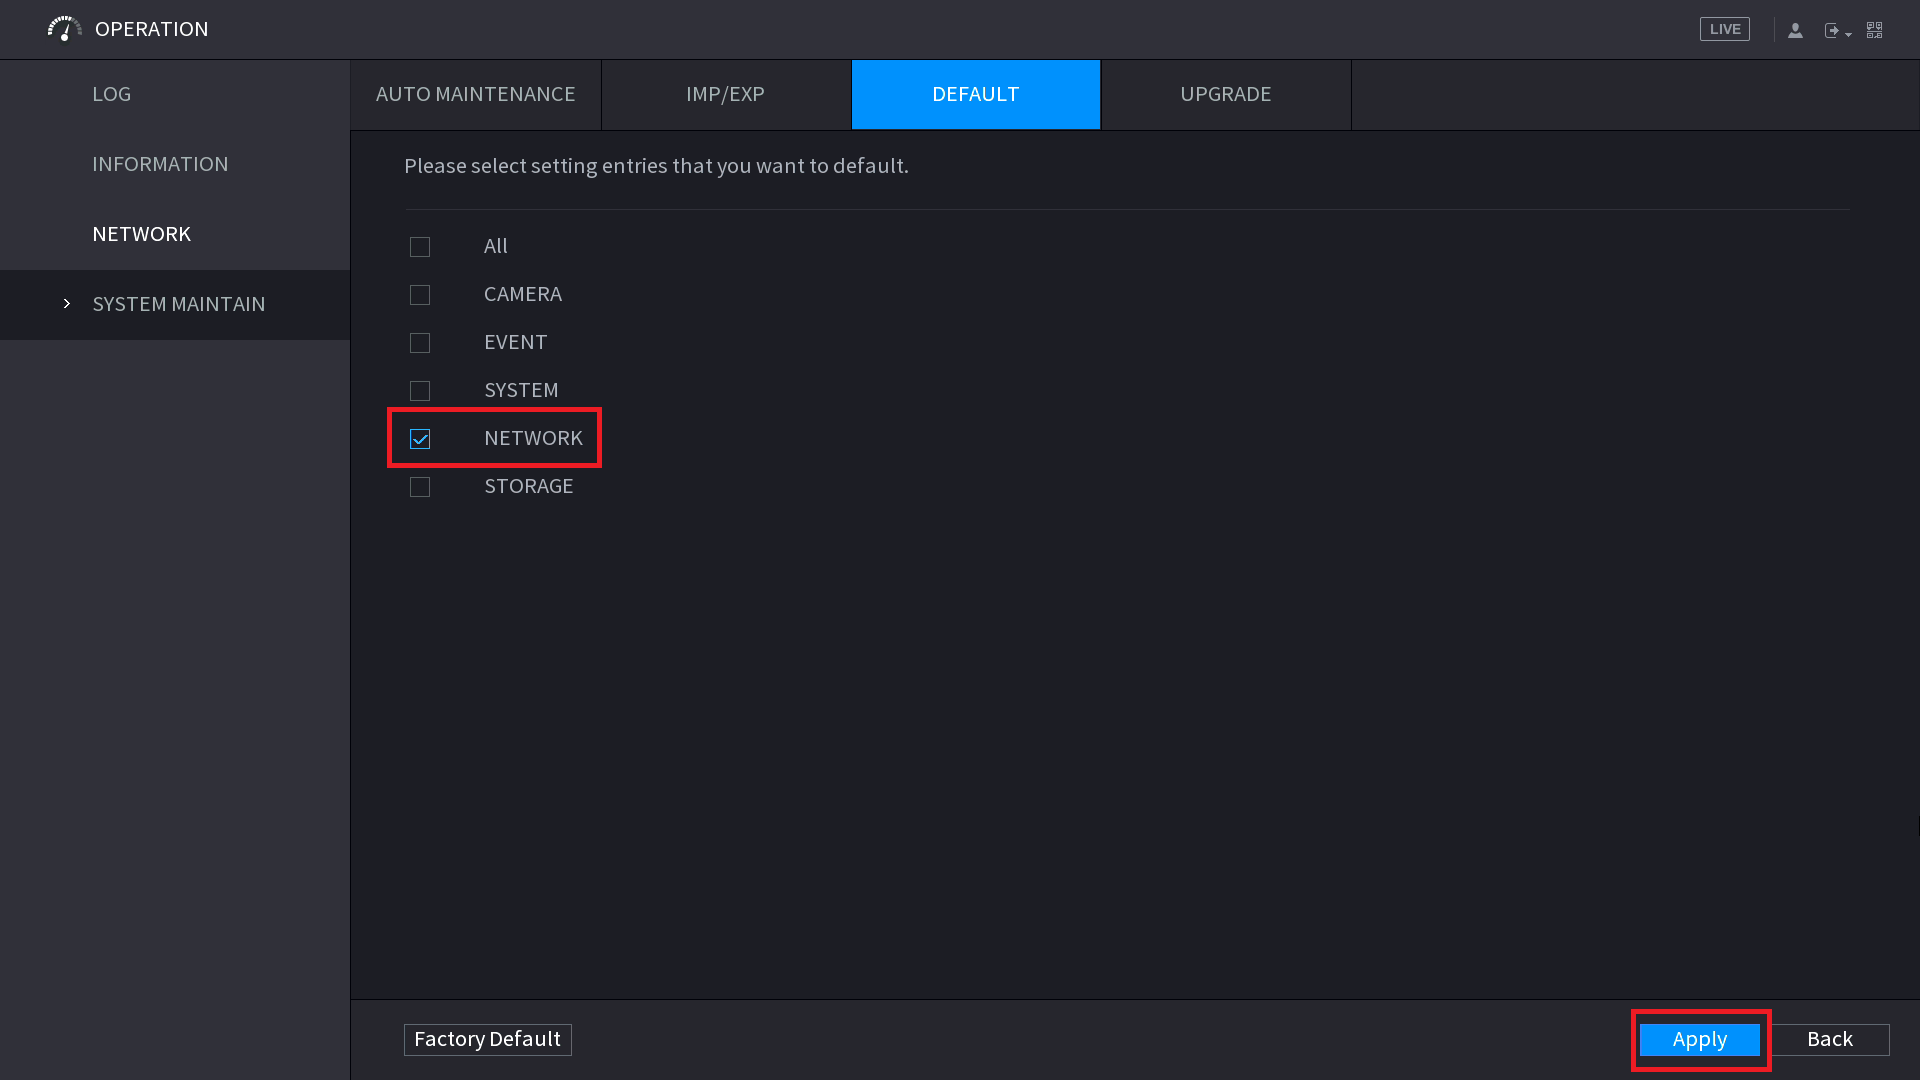
Untick everything except for Network, then click Apply
Blue Interface (Pre Oct 2019)
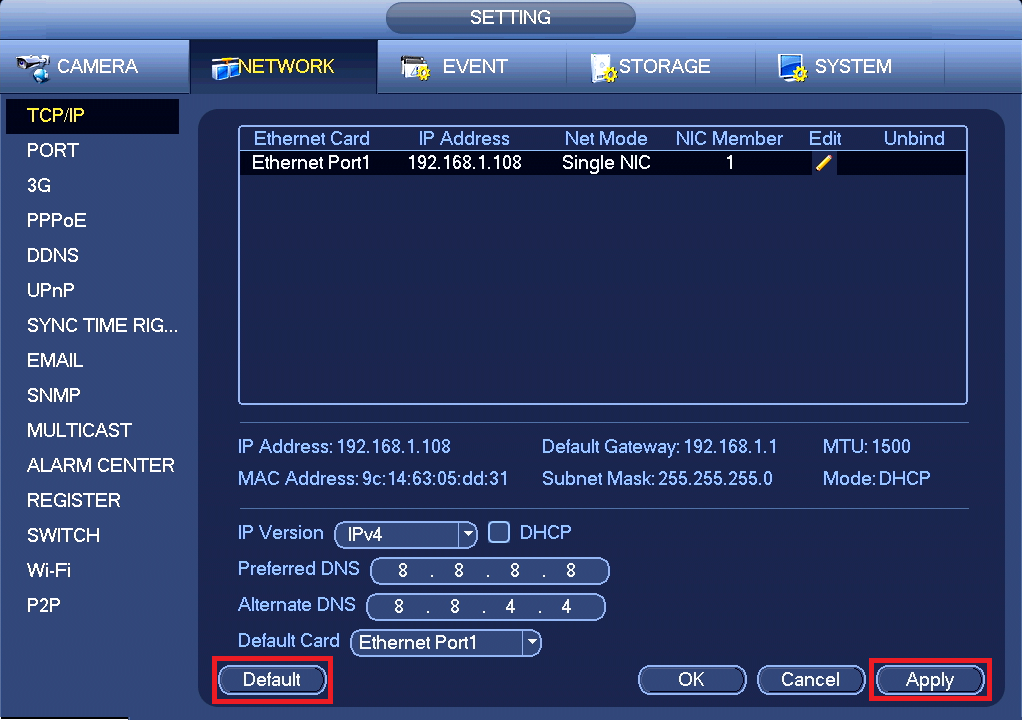
Click Default, then click Apply

Click on System

Click on Default

Untick everything except for Network, then click Apply
Turn DHCP on again
Black Interface (Post Oct 2019)
Navigate to Network > TCP/IP
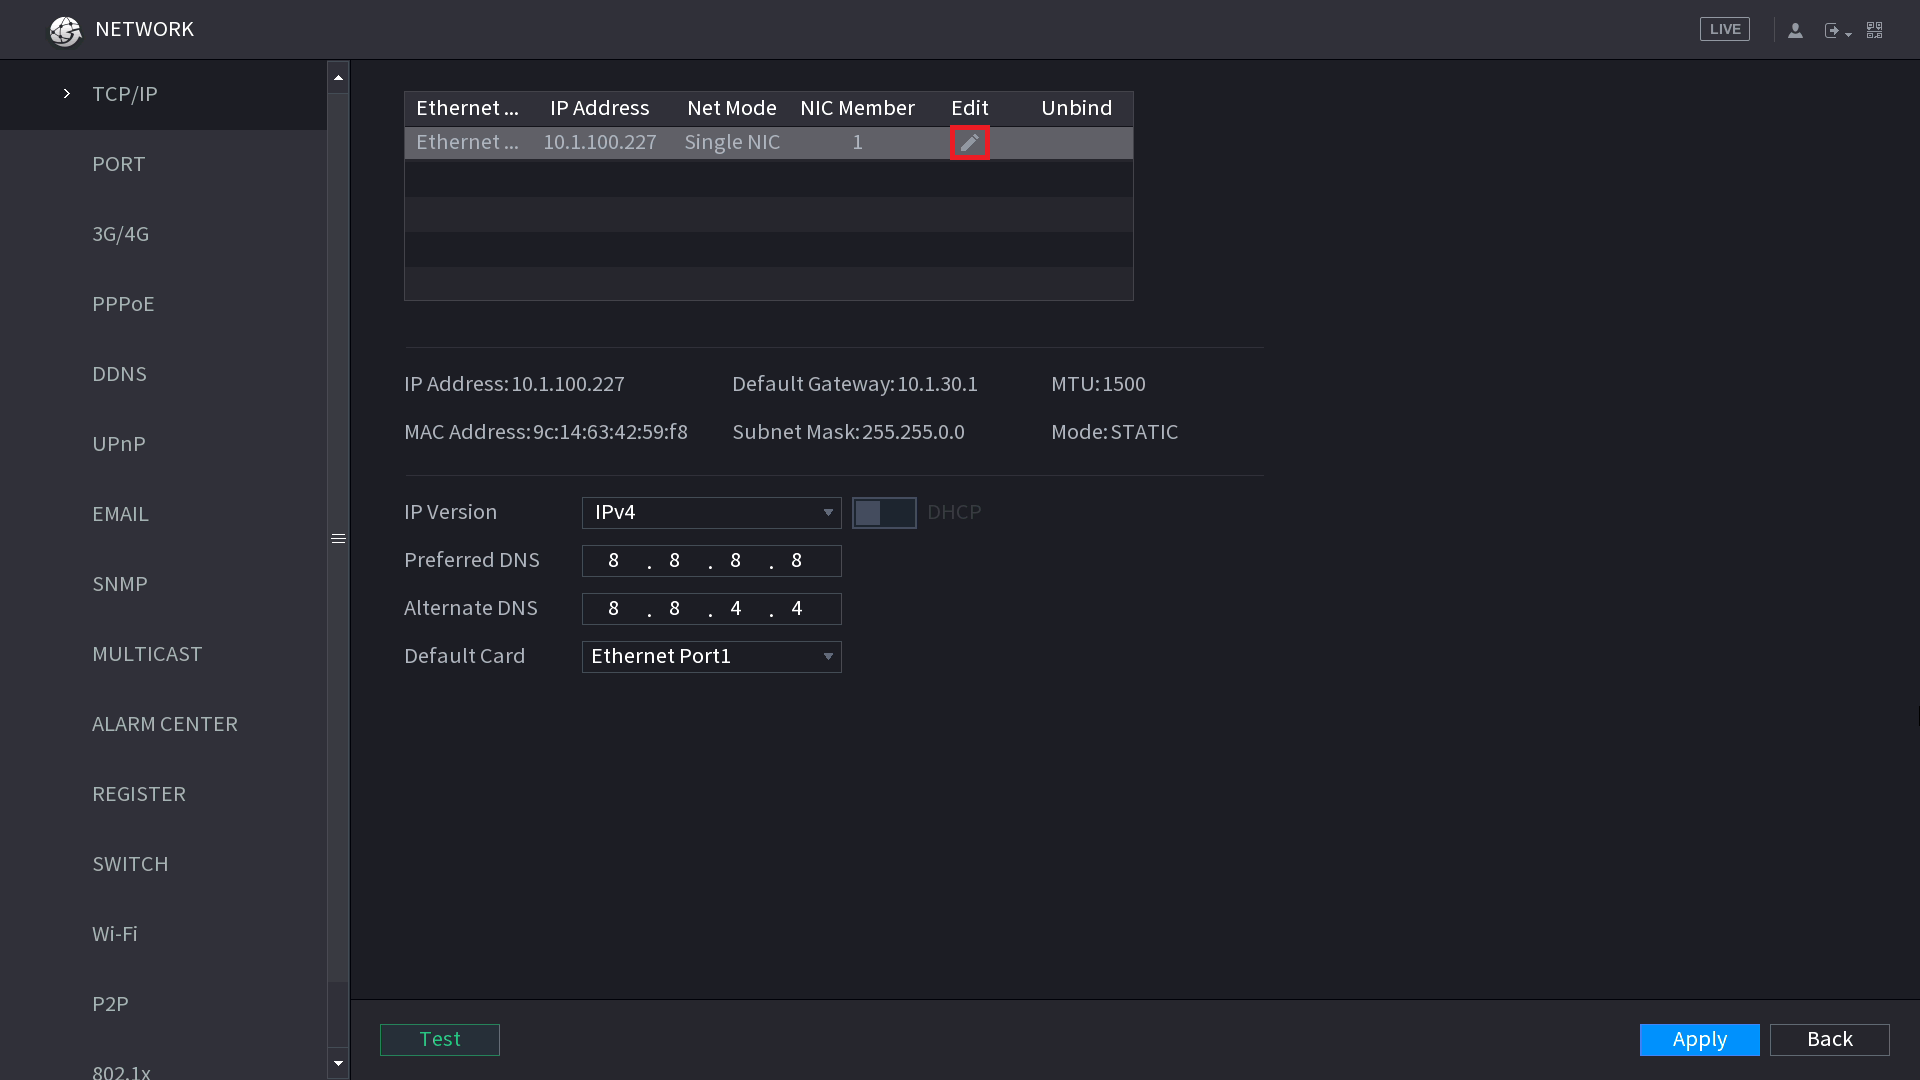
Click on the Edit Pencil.
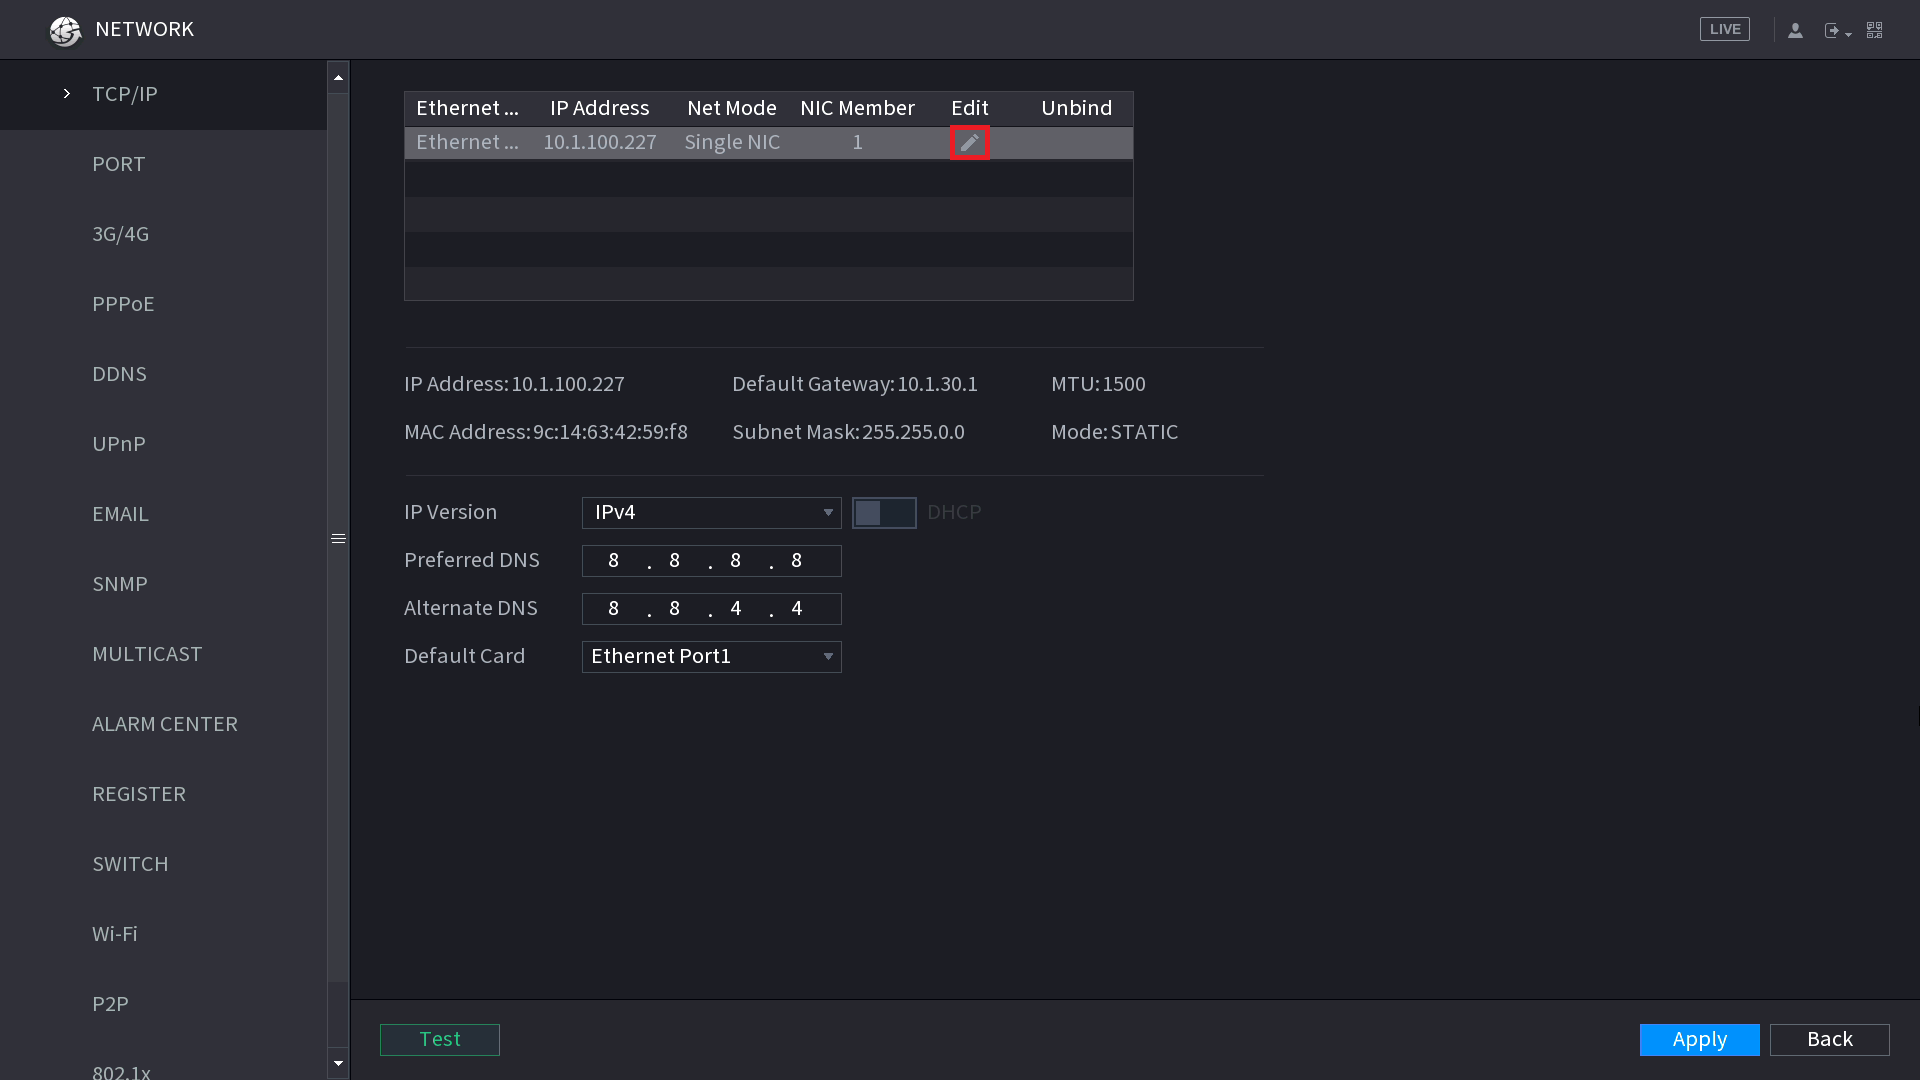
Turn DHCP On, then click OK
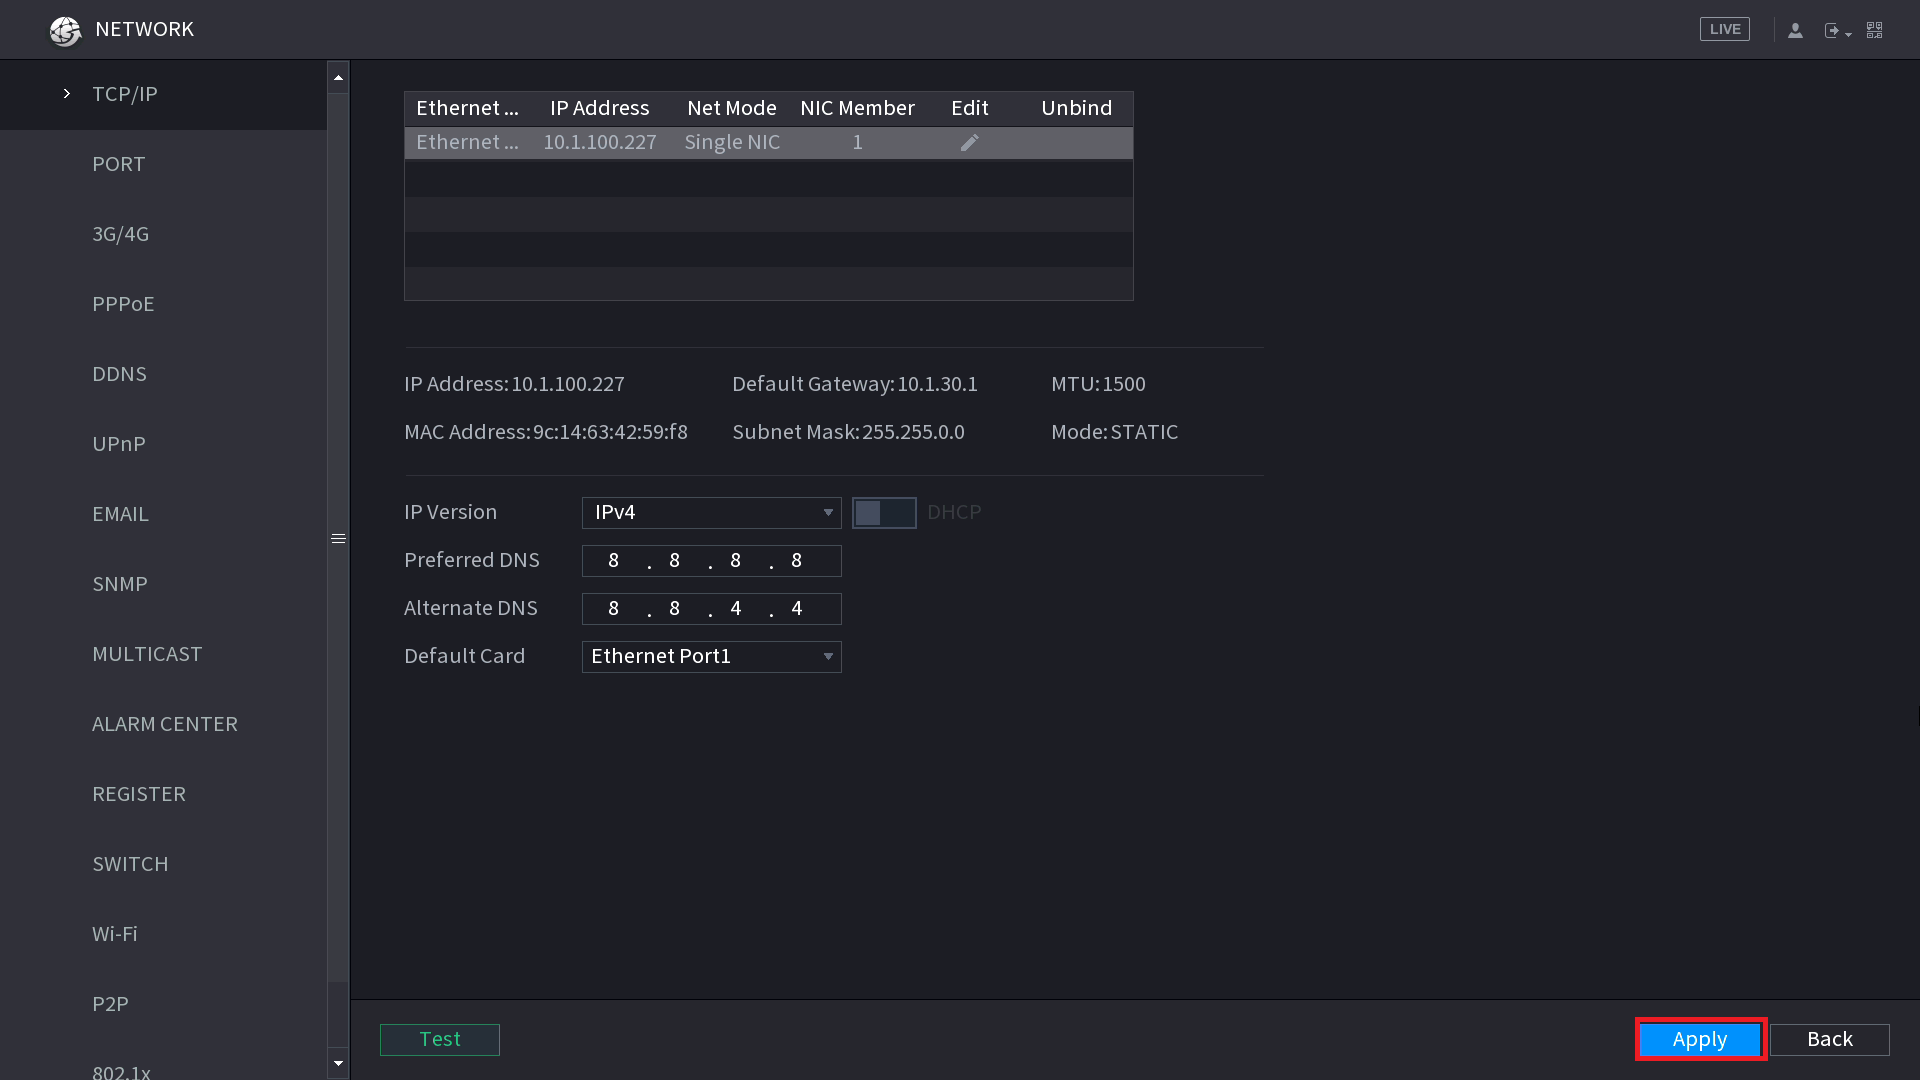
Click Apply
Blue Interface (Pre Oct 2019)
Navigate to Network > TCP/IP
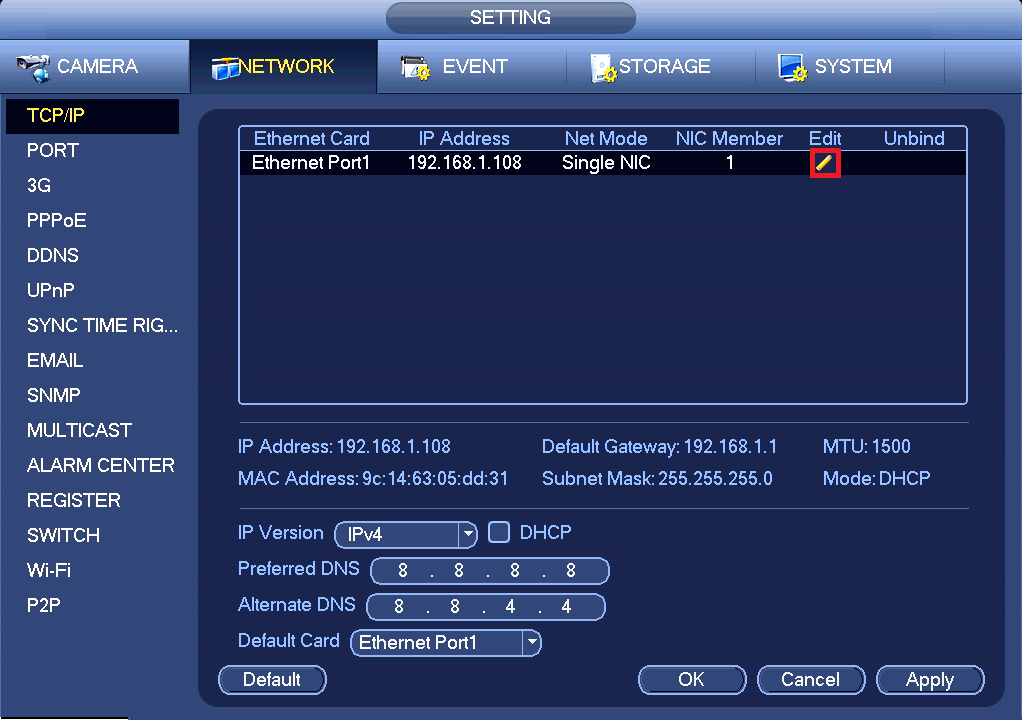
Click on the Edit Pencil.
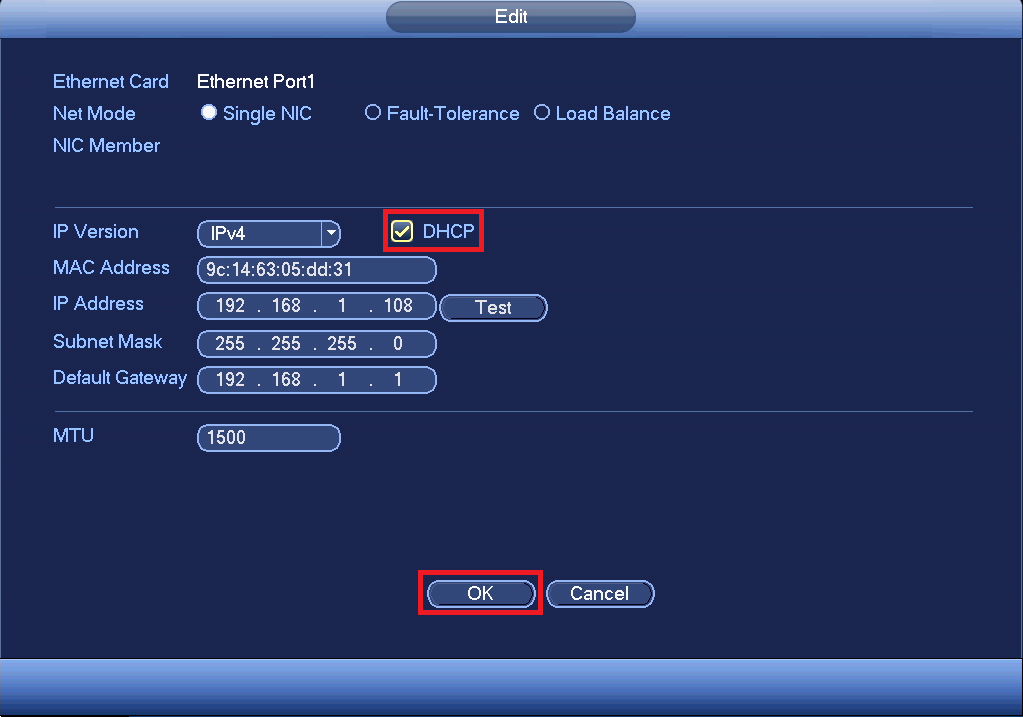
Turn DHCP On, then click OK
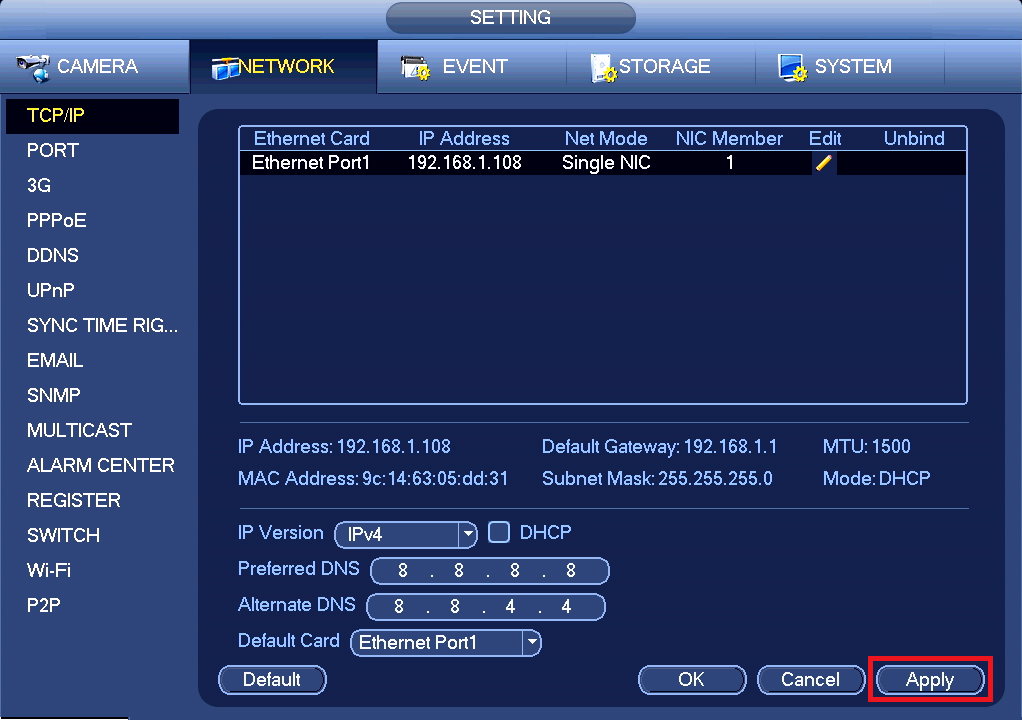
Click Apply
Then reboot the recorder and the Modem/Router
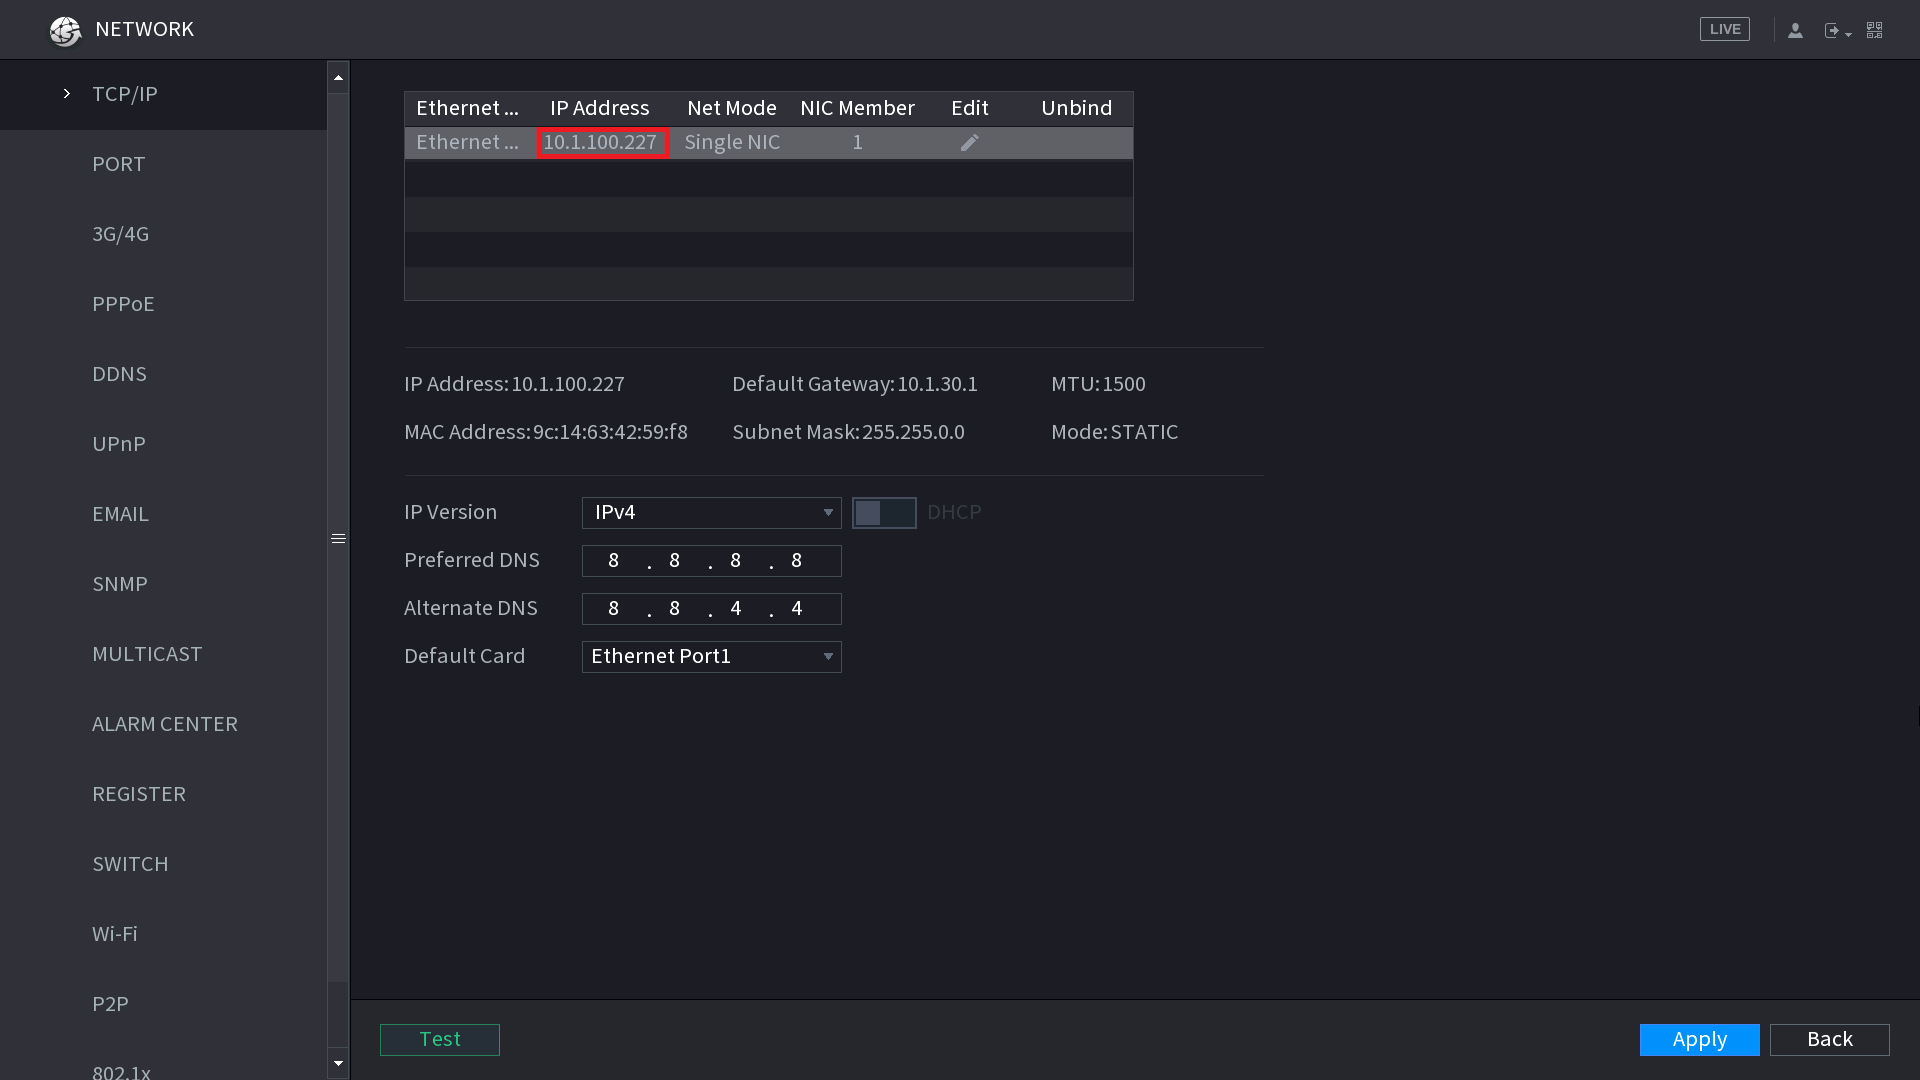
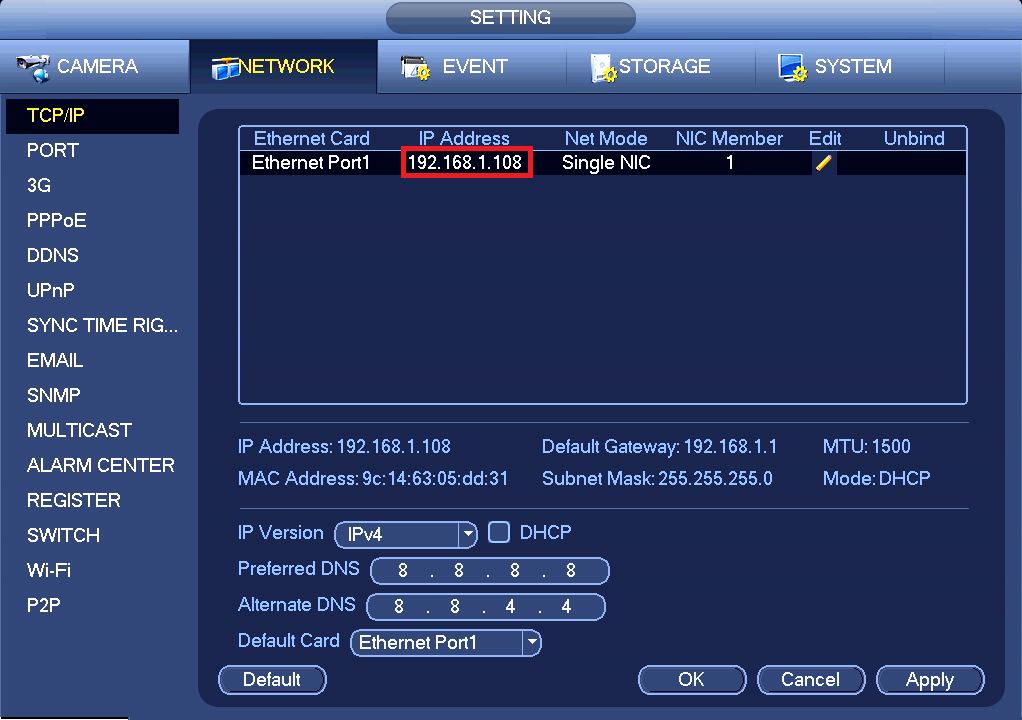
After the Recorder has rebooted, check the IP Address in Network > TCP/IP
Black Interface (Post Oct 2019)
Blue Interface (Pre Oct 2019)
-
IP Address says 0.0.0.0 or 192.168.1.108
-
IP Address is something different
- Add Button
Unplug the Ethernet cable from the back of the recorder and plug it into a laptop with Wifi turned off.
Try to load a webpage. For example http://www.youtube.com
-
I can load a Web Page
-
I can't load a Web Page
- Add Button
Factory Default the recorder and set it up again.
Black Interface (Post Oct 2019)
Navigate to Operation > System Maintain > Default
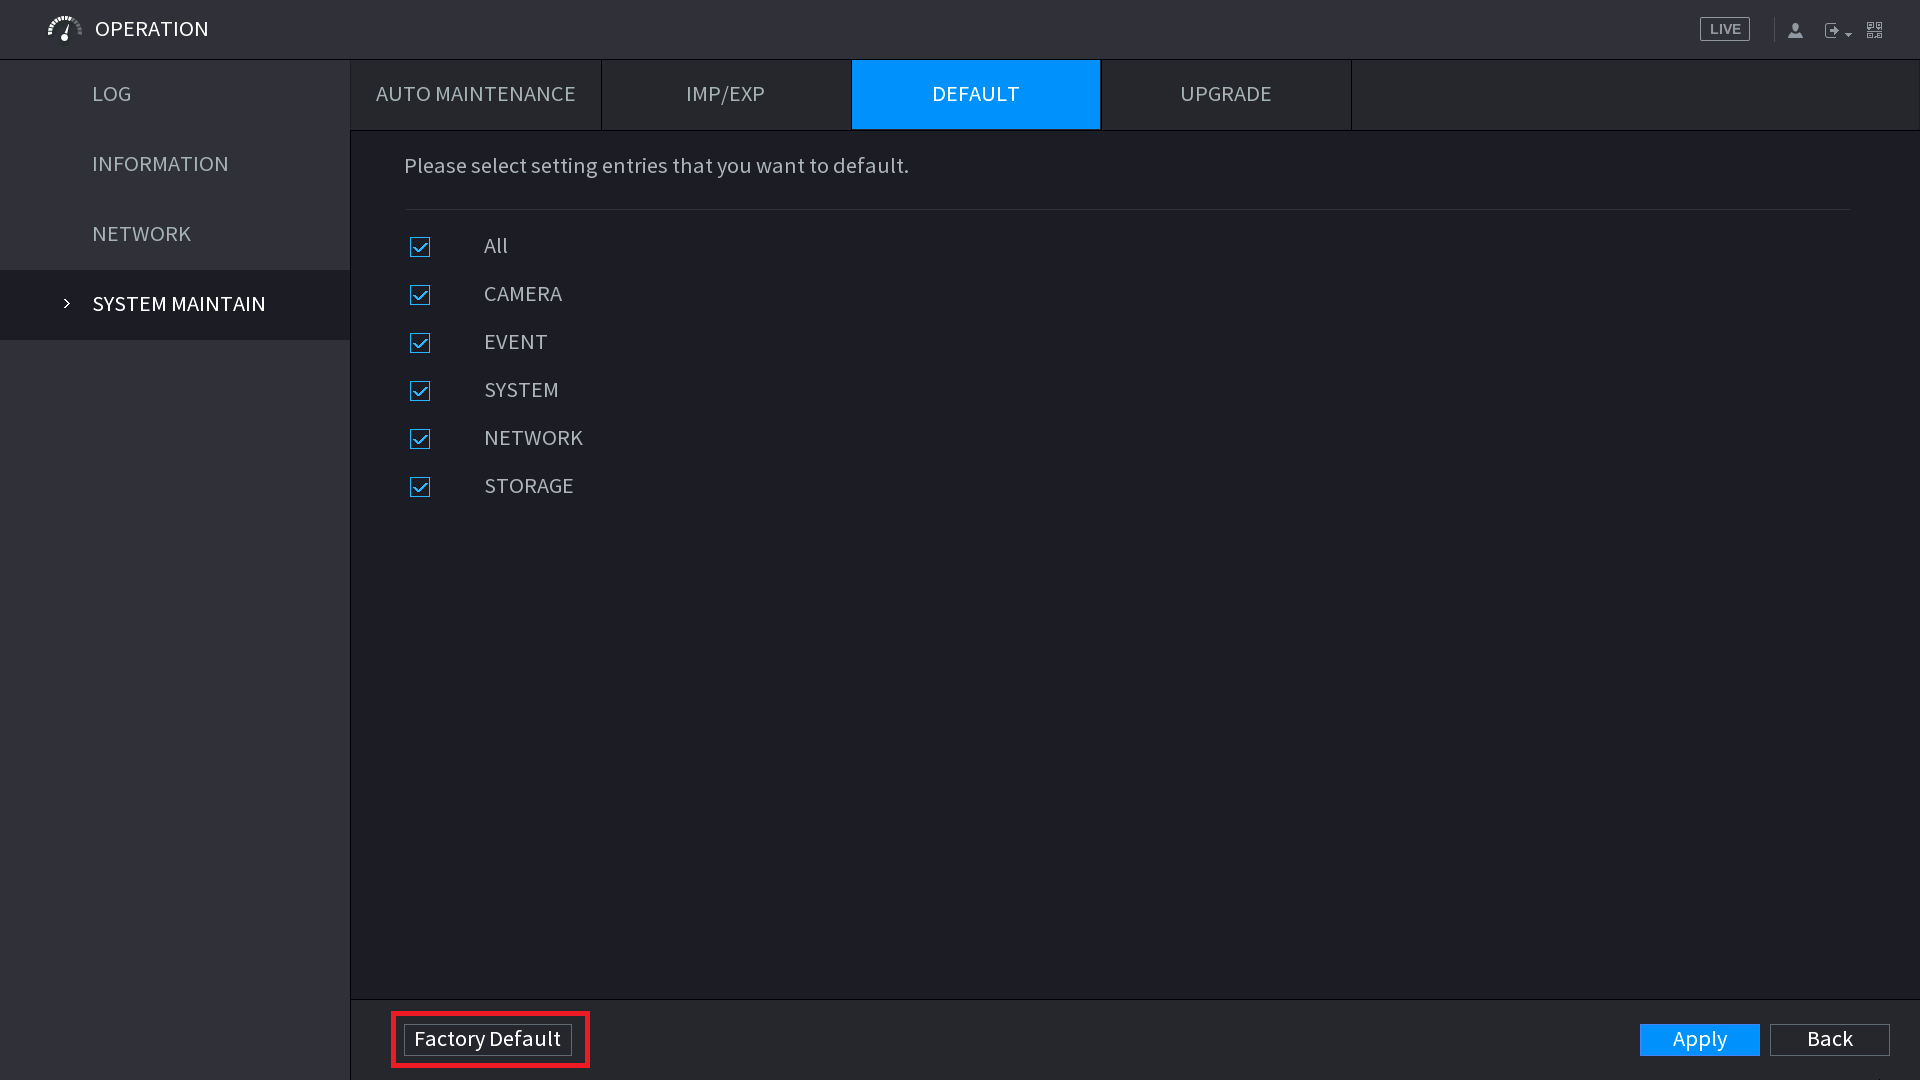
Click Factory Default
Blue Interface (Pre Oct 2019)
Navigate to System > Default
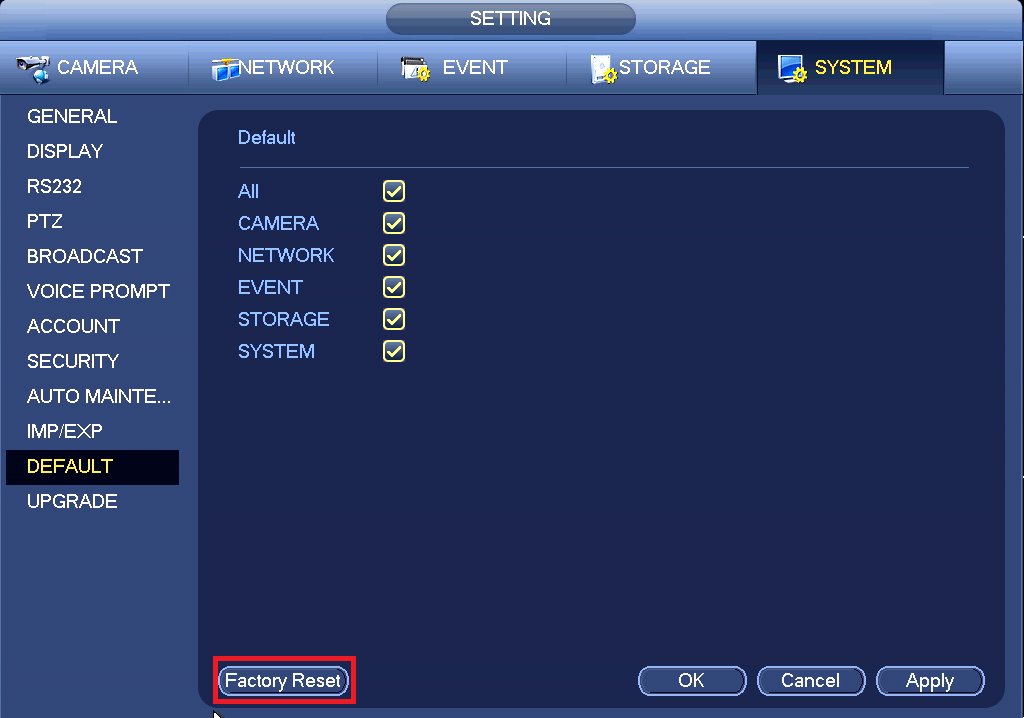
Click Factory Reset
If the issue remains, there may be a fault with the NVR's LAN port. Please contact your supplier to get it repaired.
There is an issue with either the Ethernet cable or the LAN port on the Modem/Router or the Modem/Router has no internet access.
Please try a different LAN port on the back of the modem/router and a different Ethernet cable.
Black Interface (Post Oct 2019)
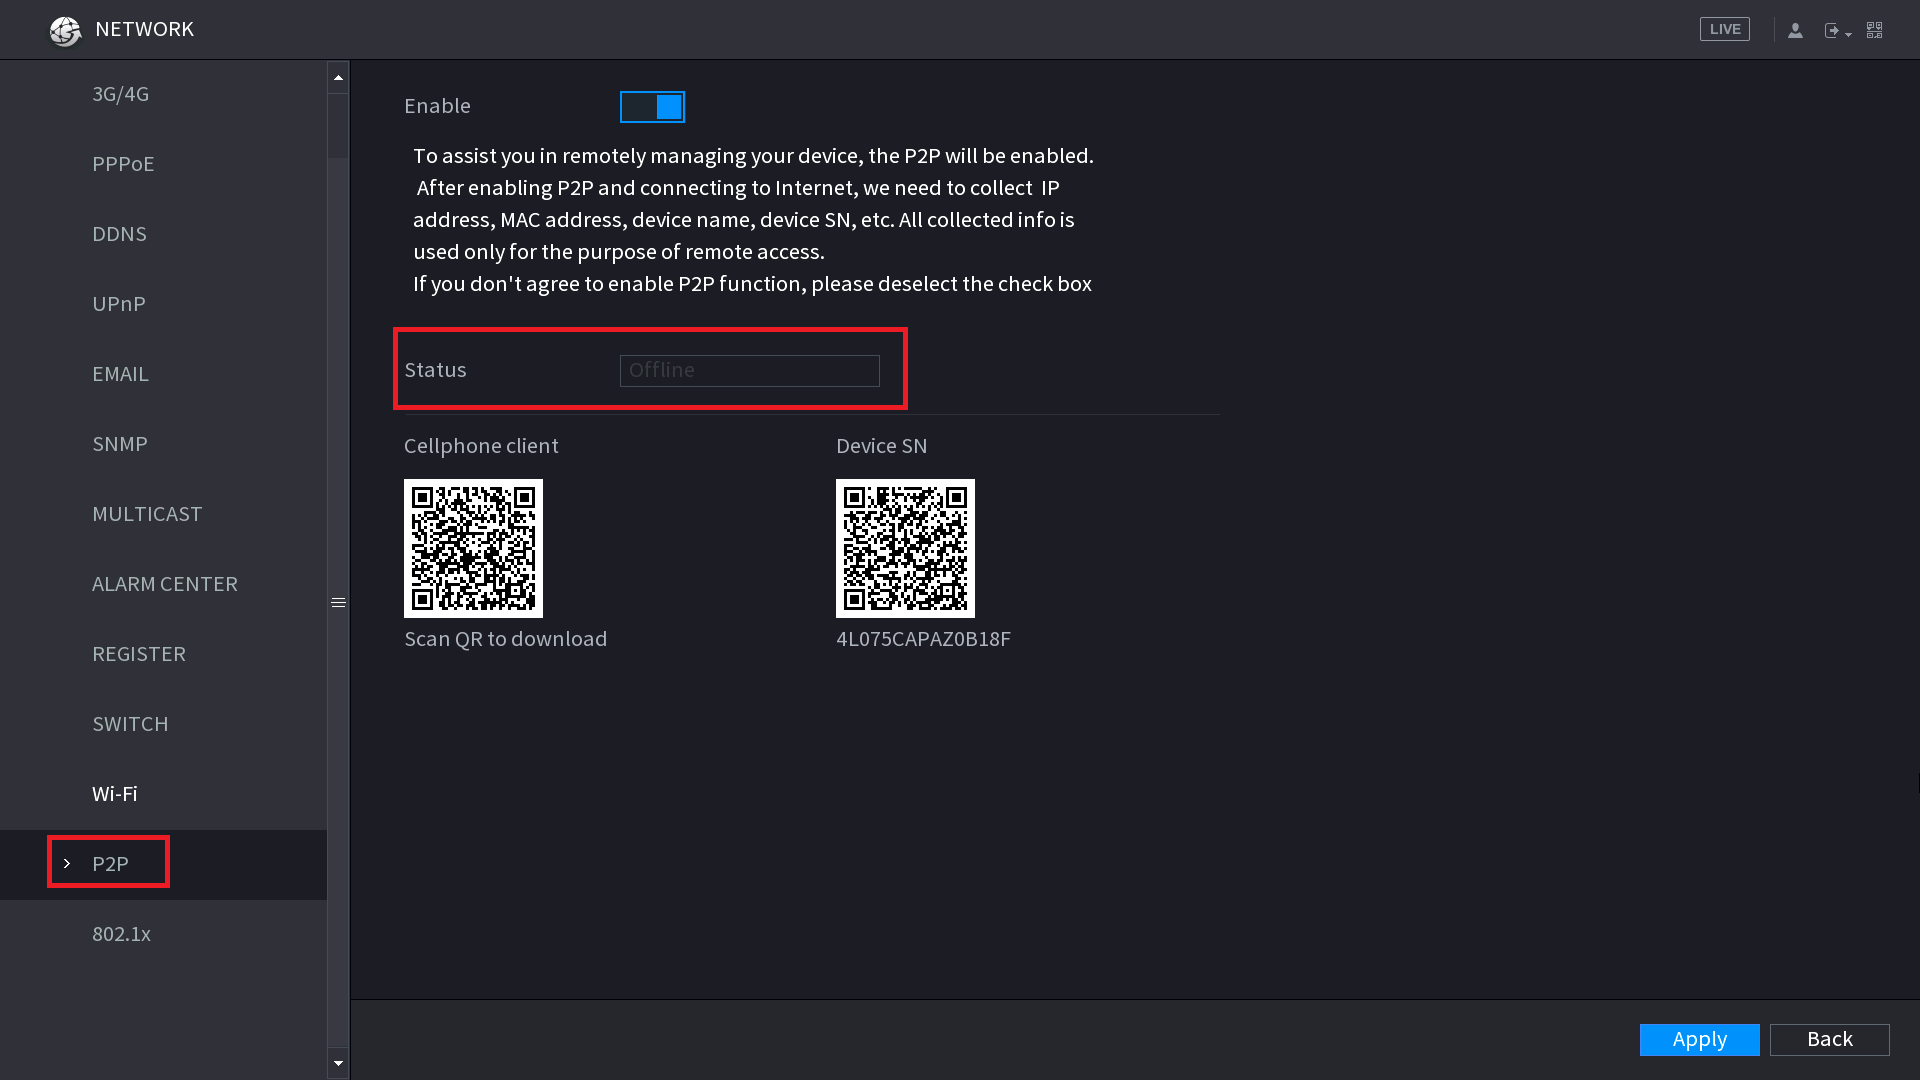
Blue Interface (Pre Oct 2019)
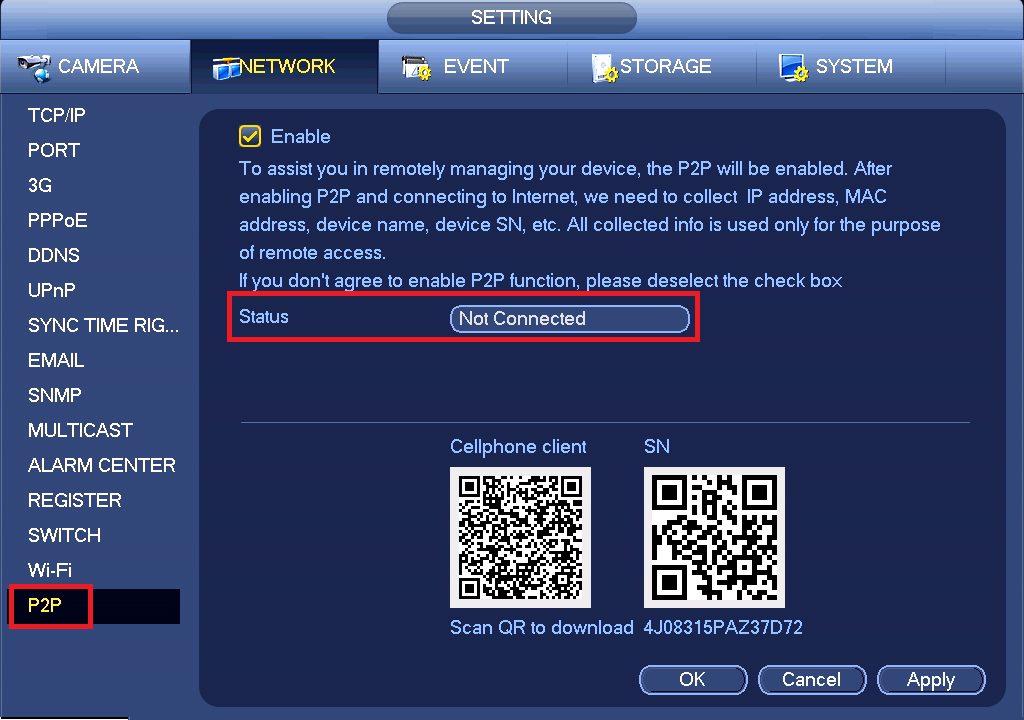
-
Status says Online or Connect Success
-
Status says Offline or Not Connected
- Add Button
If it says Online or Connect Success your recorder is now configured for remote access.
See this guide for how to add it to your phone or this video for SmartPSS.
Check that the Switch IP and the TCP/IP IPV4 are not in the same range.
Black Interface (Post Oct 2019)
In some installations you may find the Switch IP address and LAN port IP address are in the same IP address range.
This will create issues such as cameras not connecting, cameras dropping in and out, and no local network connection.
The reason this can happen, is if the recorder is set to DHCP and picks up an address in the same network range as the switch IP address. It is most commonly seen when replacing a modem/router.
The IP address for the In-built PoE switch usually does not matter, as long as it is different from the LAN IP Address.
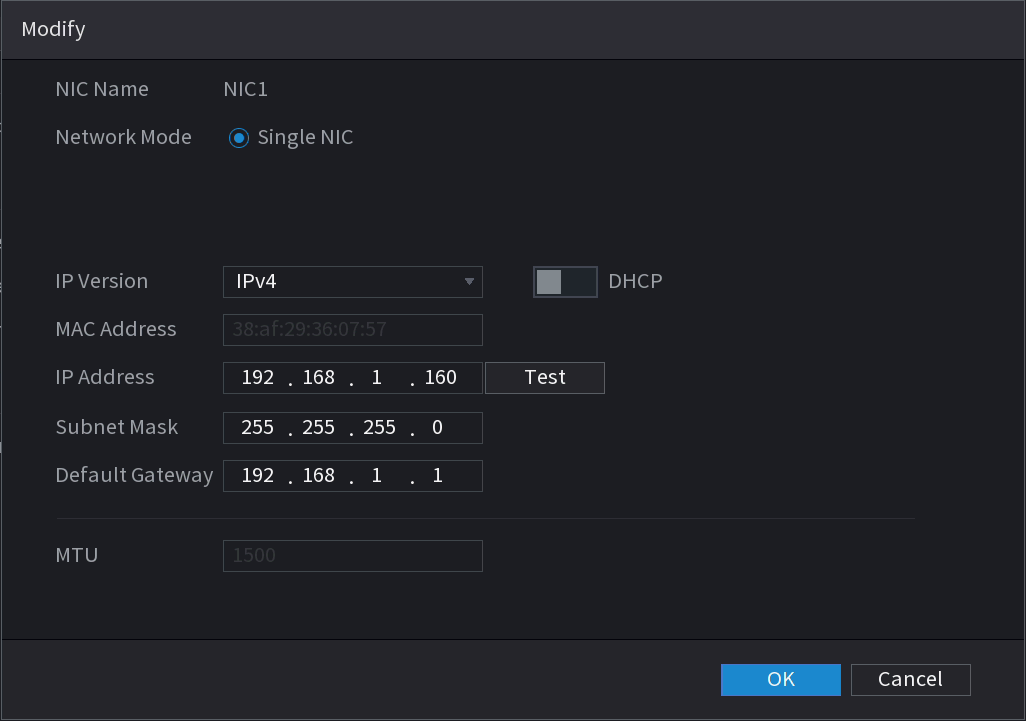
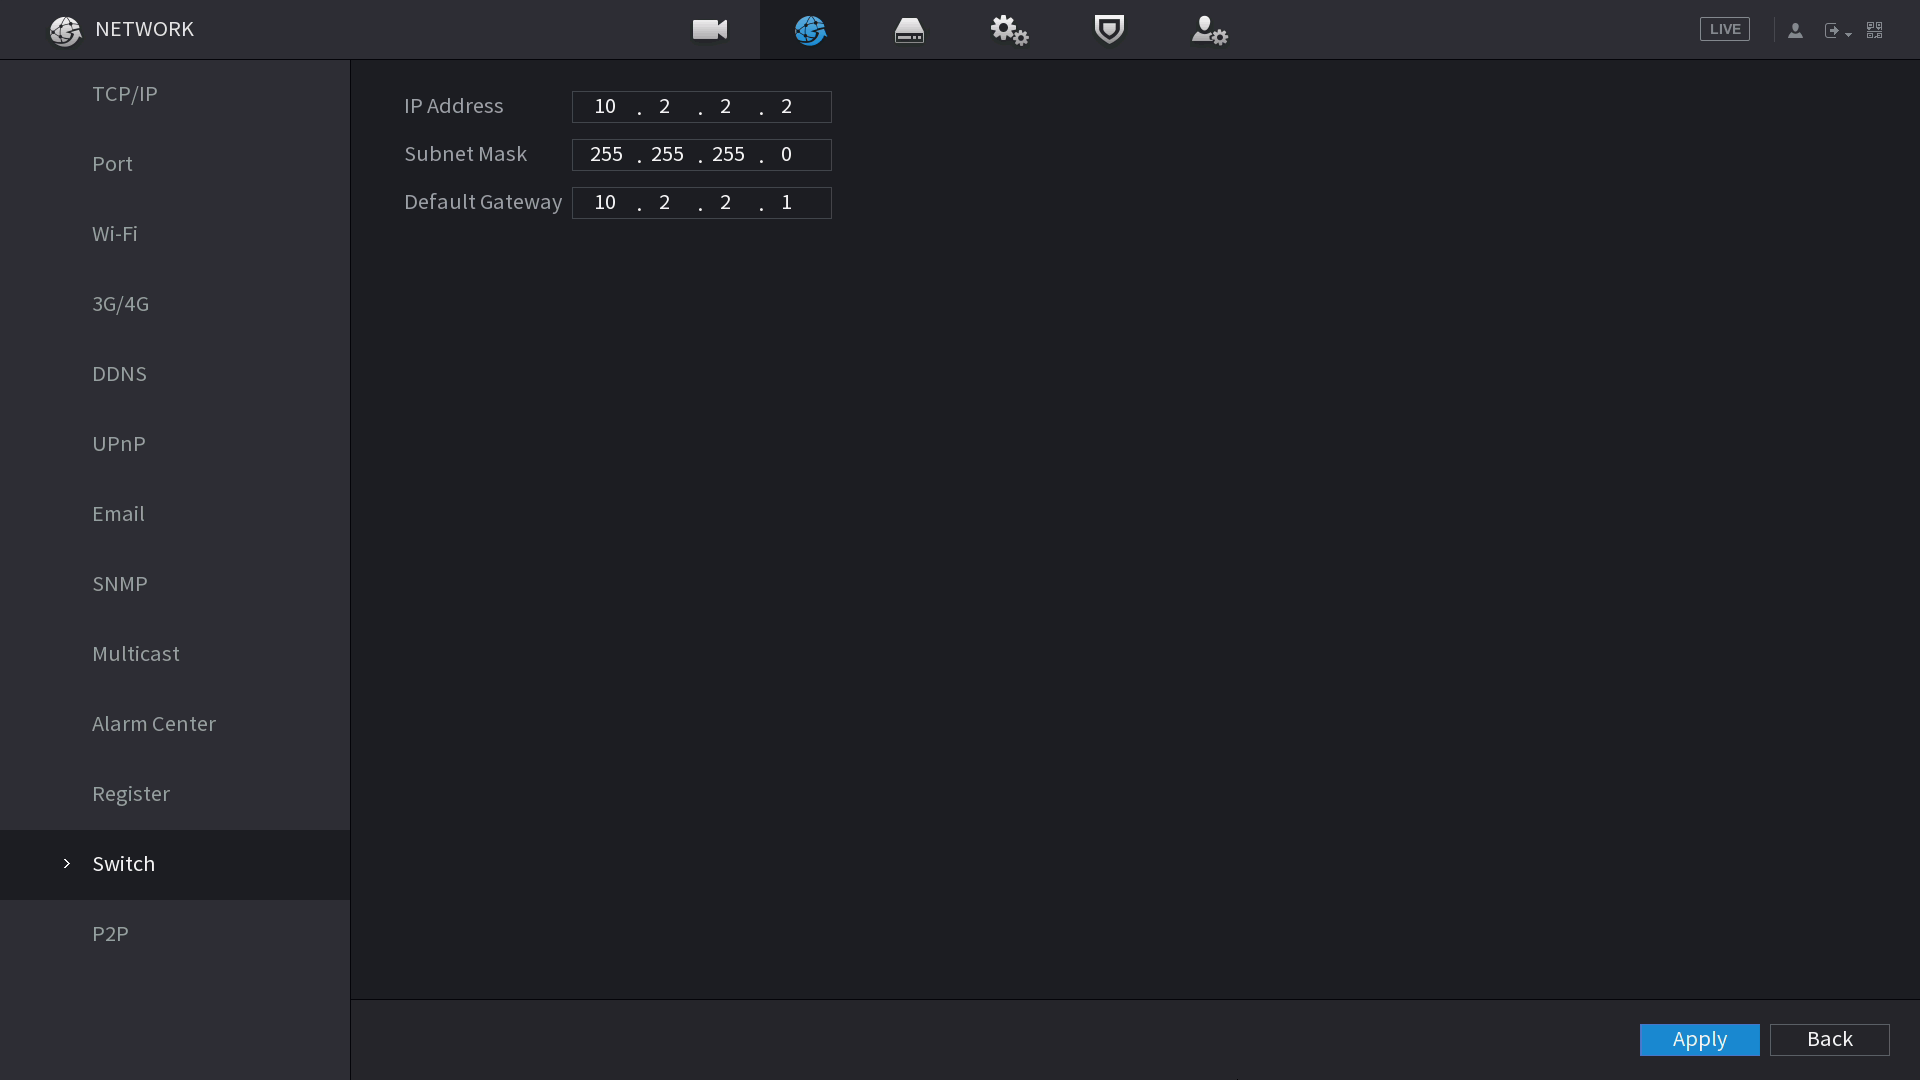
Below images show the Local IP address of the recorder set to 192.168.1.160, and the Switch IP address is 10.2.2.2. This is correctly configured.
If the switch IP address was 192.168.1.150, this would be incorrectly configured and create issues as both the local and switch IP address would be in the same range.
Your recorder cannot reach the P2P server, but is on your network.
At this point, we recommend setting up Port Forwarding, or lowering the firewall settings on the modem.
Portforward.com has instructions for how to Port Forward with most routers.
You'll want to forward port 37777 for TCP and 37778 for UDP.
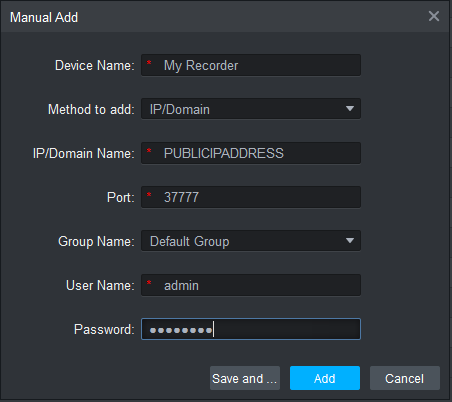
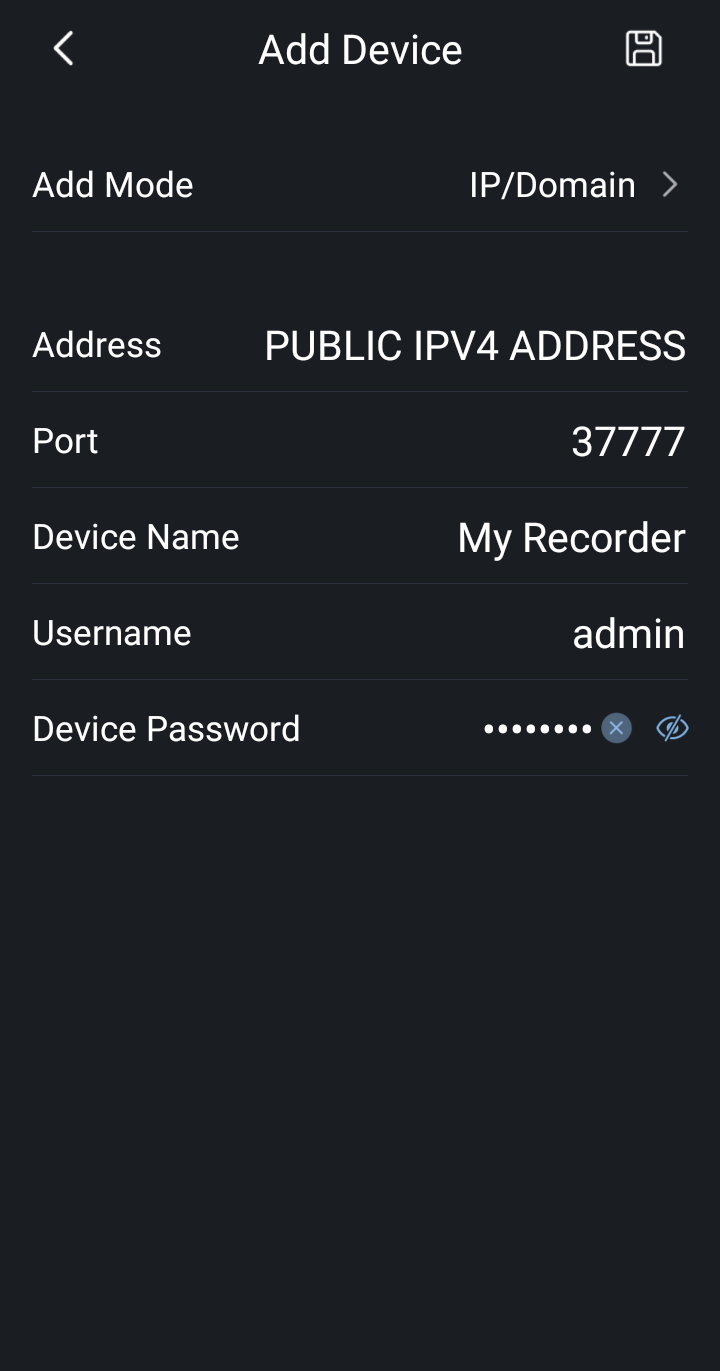
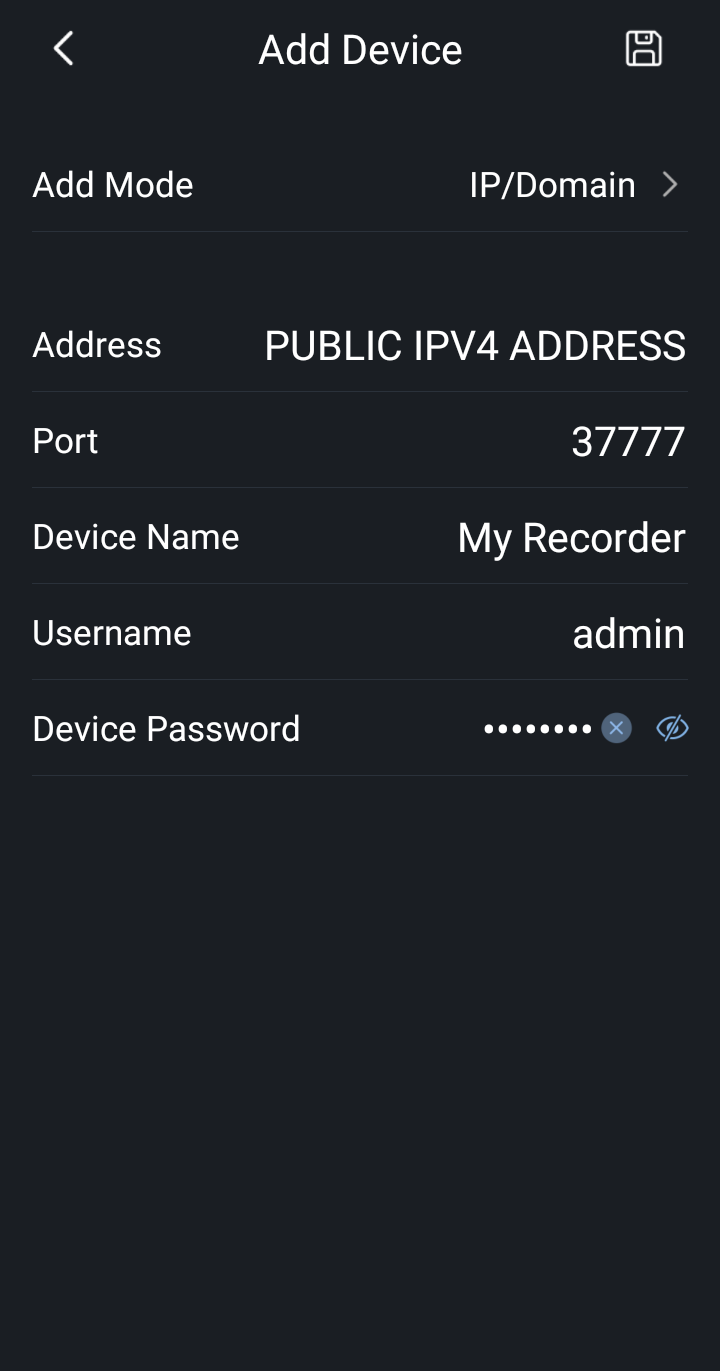
Then when adding your recorder remotely you need to add it via your public IPv4 Address through the IP/Domain add mode.
SmartPSS IP/Domain |
 |
iDMSS Plus / gDMSS Plus IP/Domain |
 |
Your Recorder has picked up an IP Address. Check the P2P Status again.
Black Interface (Post Oct 2019)
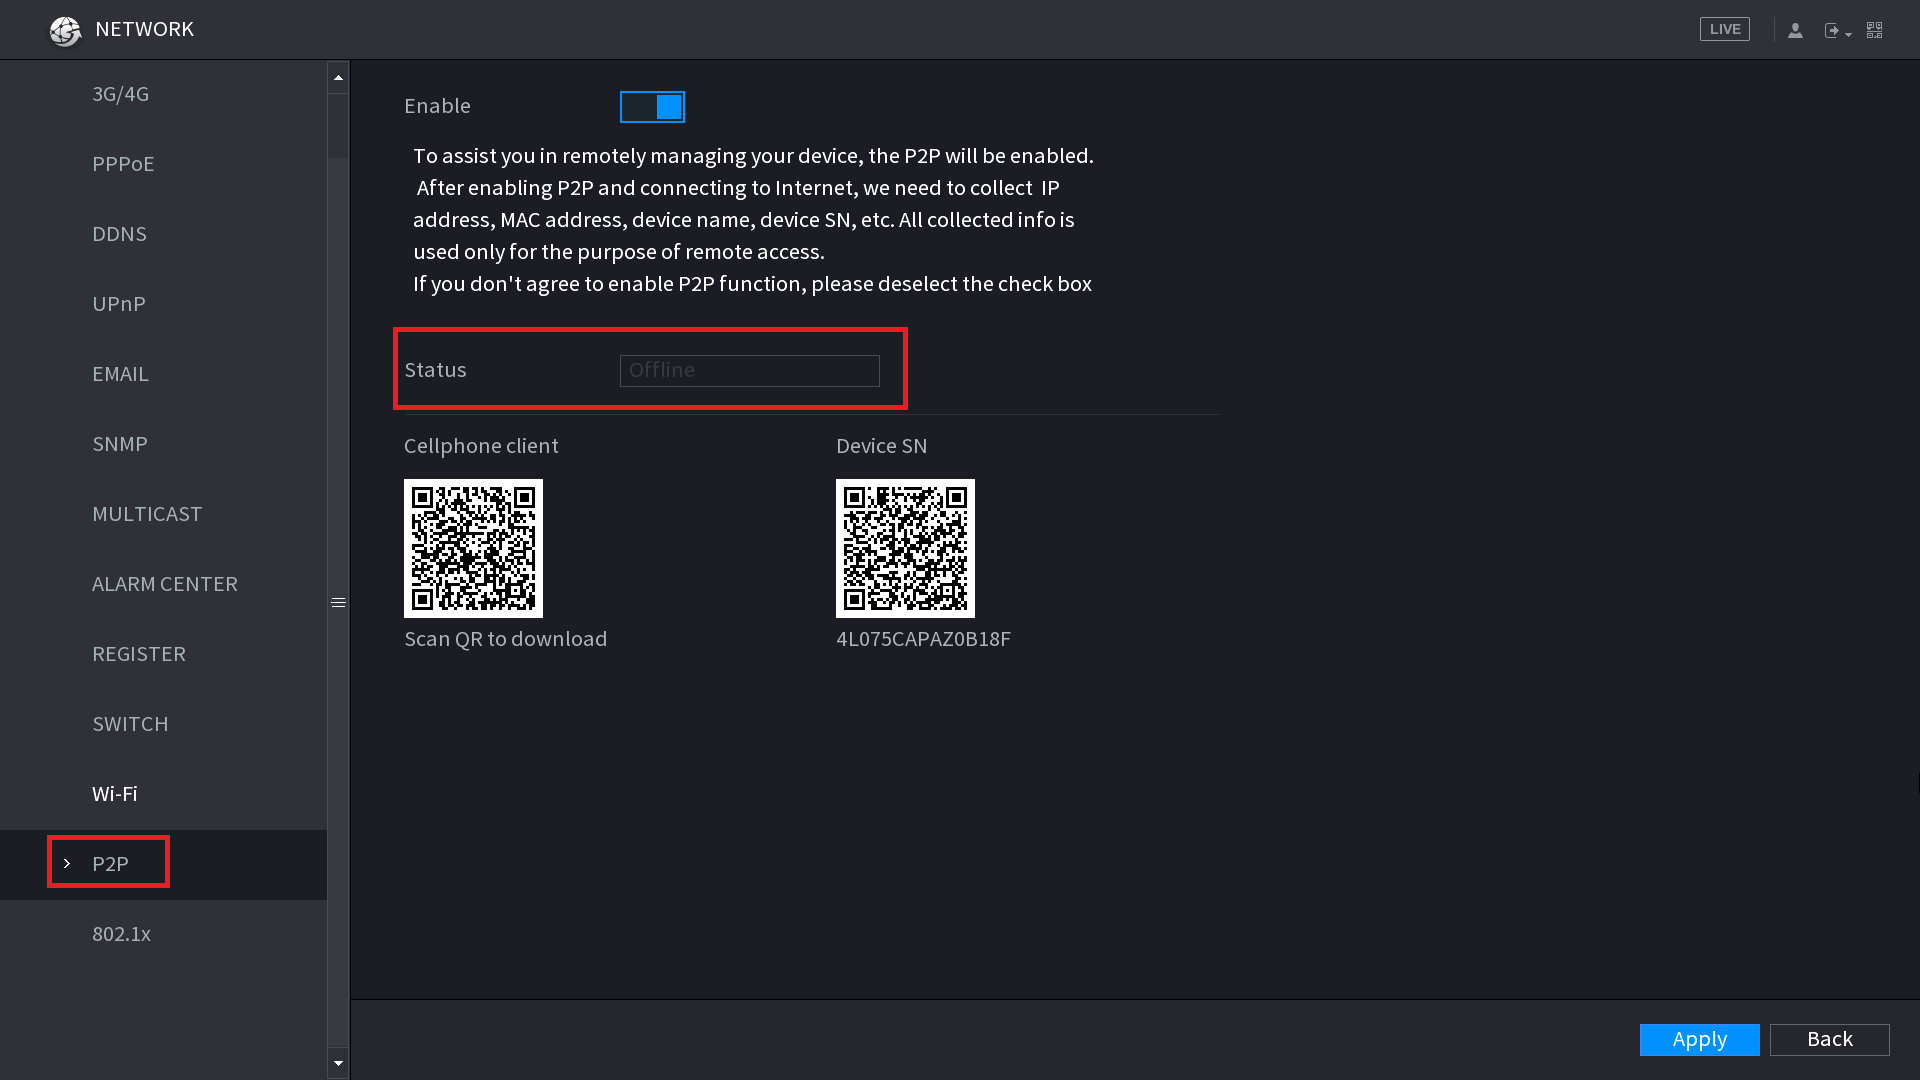
-
Status says Online or Connect Success
-
Status says Offline or Not Connected
- Add Button
Check that the Switch IP and the TCP/IP IPV4 are not in the same range.
Black Interface (Post OCT 2019)
In some installations you may find the Switch IP address and LAN port IP address are in the same IP address range.
This will create issues such as cameras not connecting, cameras dropping in and out, and no local network connection.
The reason this can happen, is if the recorder is set to DHCP and picks up an address in the same network range as the switch IP address. It is most commonly seen when replacing a modem/router.
The IP address for the In-built PoE switch usually does not matter, as long as it is different from the LAN IP Address.
Below images show the Local IP address of the recorder set to 192.168.1.160, and the Switch IP address is 10.2.2.2. This is correctly configured.
If the switch IP address was 192.168.1.150, this would be incorrectly configured and create issues as both the local and switch IP address would be in the same range.


Reboot the Recorder AND your Modem/Router.
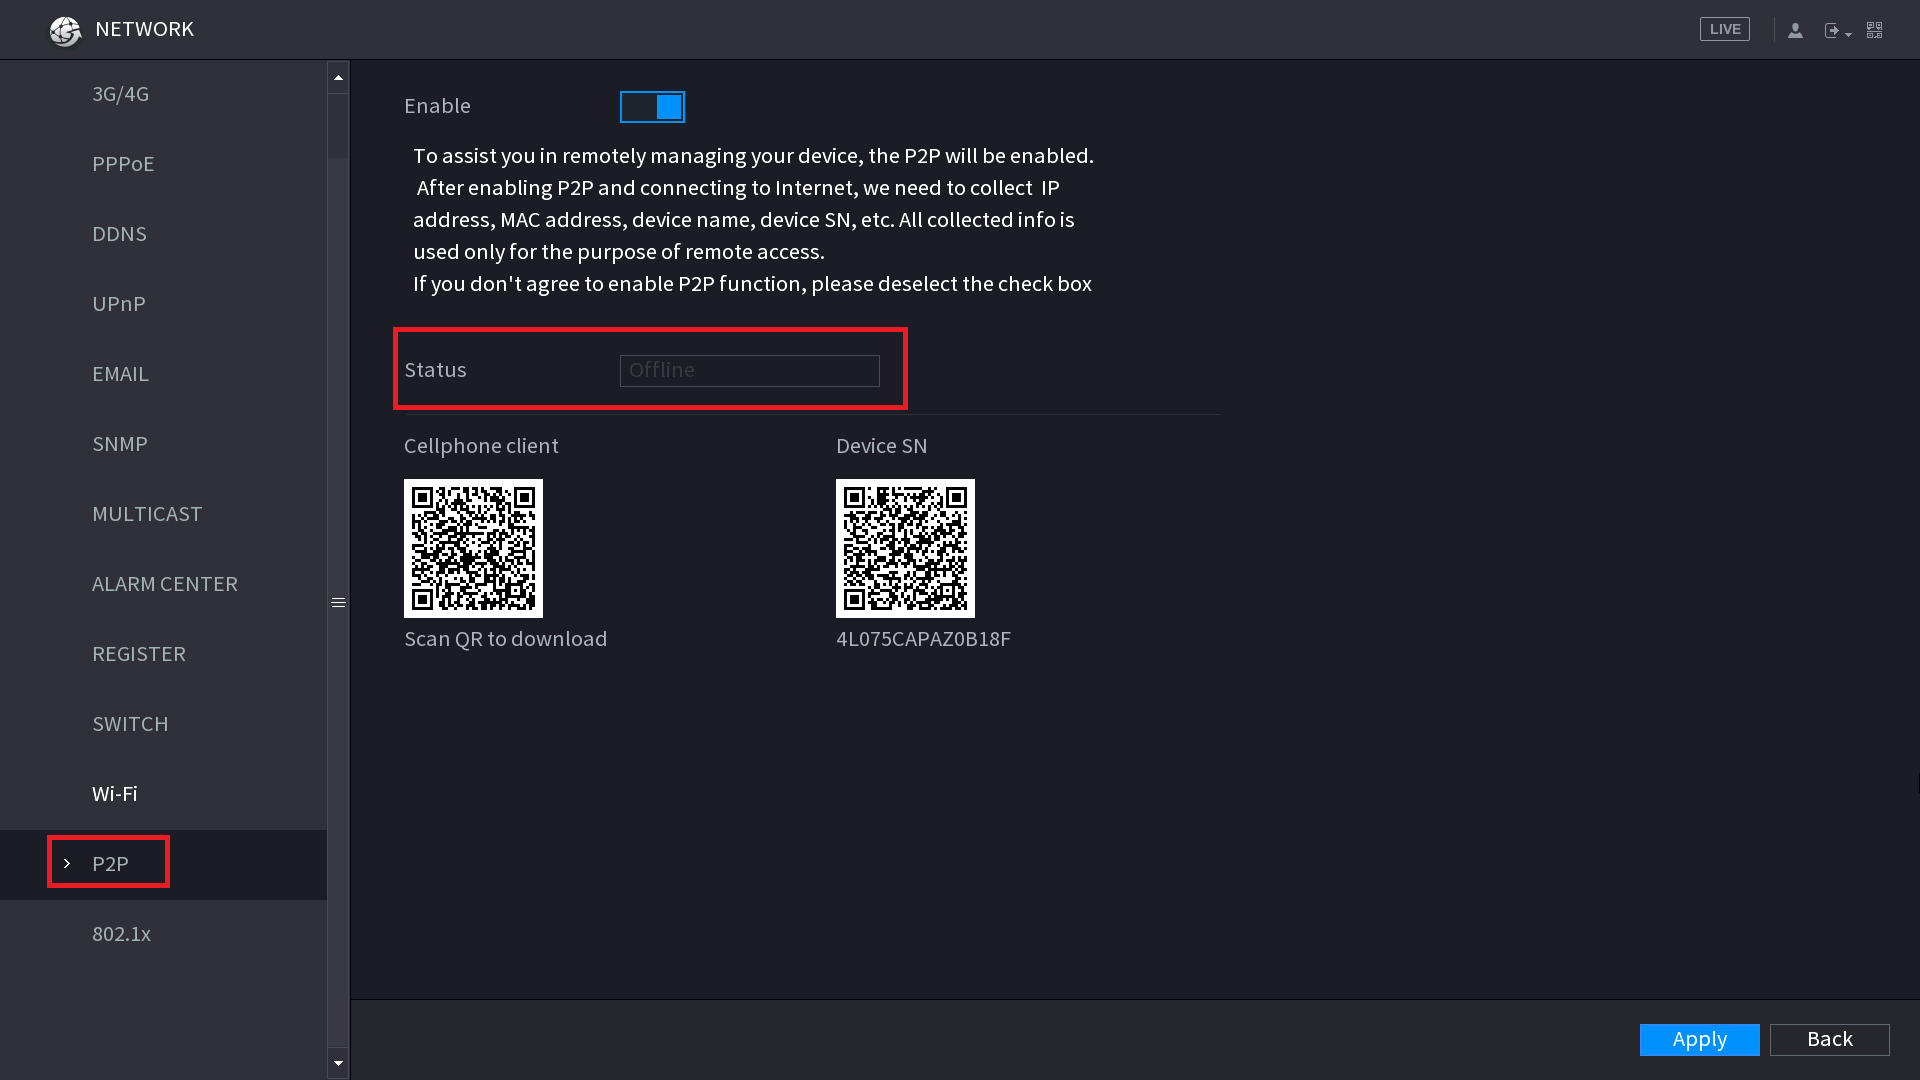
Wait 10 minutes for everything to come back online and check the P2P Status again
Black Interface (Post Oct 2019)
Blue Interface (Pre Oct 2019)
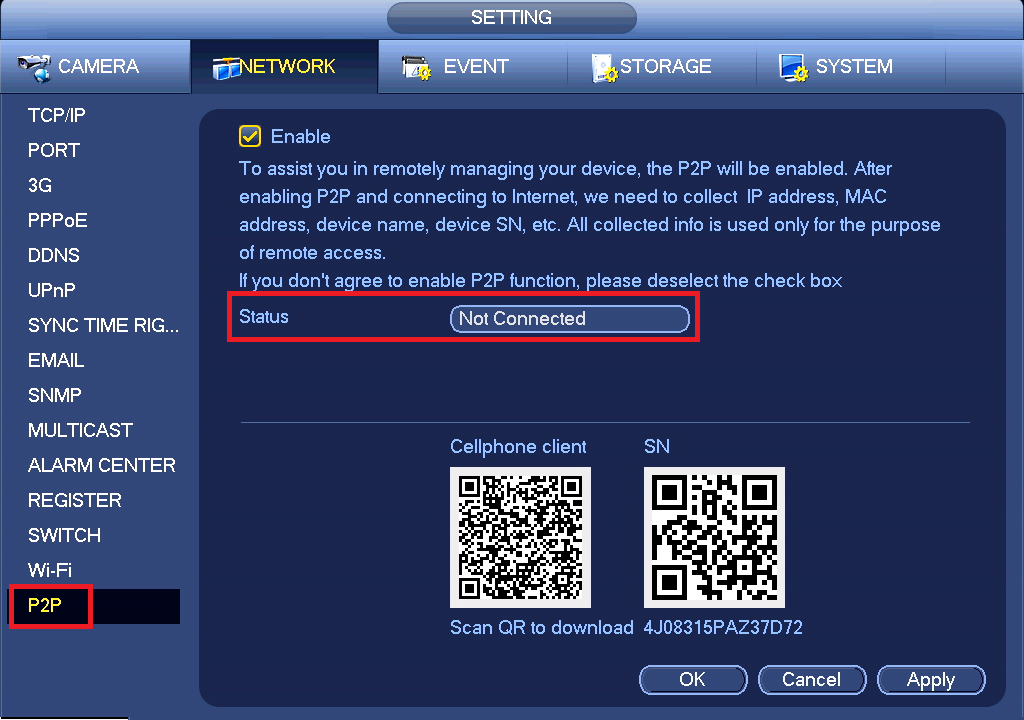
-
Status says Online orConnect Success
-
Status says Offline or Not Connected
- Add Button
Your recorder cannot reach the P2P server, but is on your network.
At this point, we recommend setting up Port Forwarding, or lowering the firewall settings on the modem.
Portforward.com has instructions for how to Port Forward with most routers.
You'll want to forward port 37777 for TCP and 37778 for UDP.
Then when adding your recorder remotely you need to add it via your public IPv4 Address through the IP/Domain add mode.
SmartPSS IP/Domain |
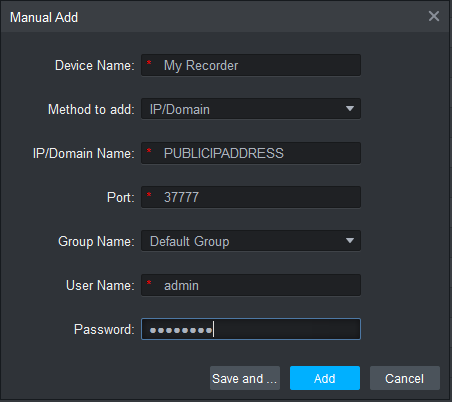 |
iDMSS Plus / gDMSS Plus IP/Domain |
 |