This method requires a computer to set up and is more involved than the One-key Config method. The advantage to this method is the ability to customize settings on the Door Station to suit your requirements, as you will be logged into the Door Station’s web interface.
Below are the example details that we will be using for this guide. If you intend on connecting the intercom to your network for remote access, you will need to obtain the local IP address details for your network. Replace the example IP addresses with IP addresses suitable for your network.
| Device | IP Addresses | Subnet Mask | Gateway | Password | Type | Main/Sub | Room No. |
| Door Station | 192.168.1.108 | 255.255.255.0 | 192.168.1.1 | admin123 | VTO | Main | N/A |
| Indoor Monitor 2 | 192.168.1.111 | 255.255.255.0 | 192.168.1.1 | 888888 | VTH | Main | 1 |
| Indoor Monitor 2 | 192.168.1.112 | 255.255.255.0 | 192.168.1.1 | 888888 | VTH | Main | 2 |
Choosing a suitable IP address
To find the IP range on a network, or to find available IP addresses, follow the steps below.
Windows
Finding the IP Range of a Network
This is useful if you are unsure what the network details are, or if you have requested pre-programming. When pre-programming devices, we require these details.
1. Connect a Windows PC / Laptop, open the start menu and type cmd.
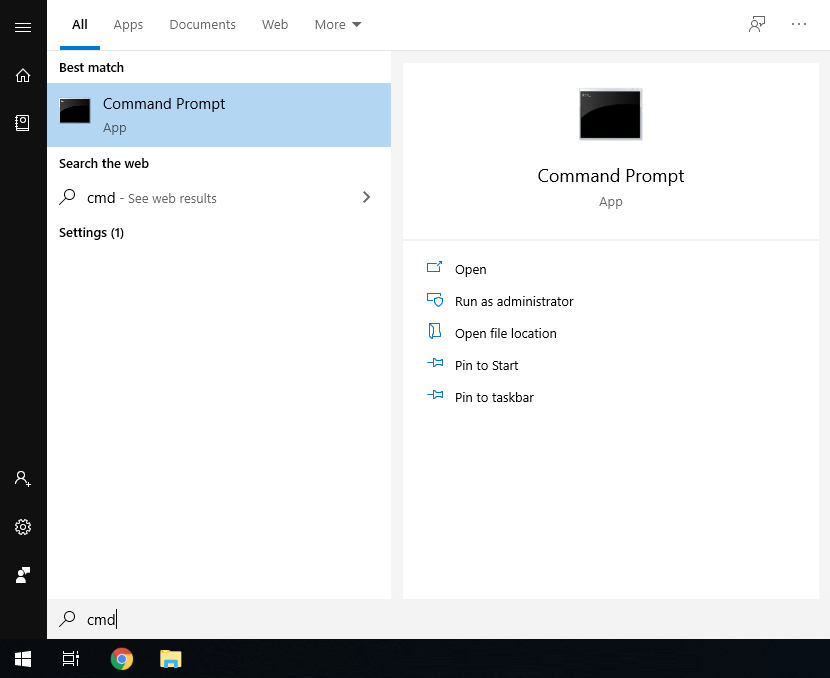
2. Launch the Command Prompt program.
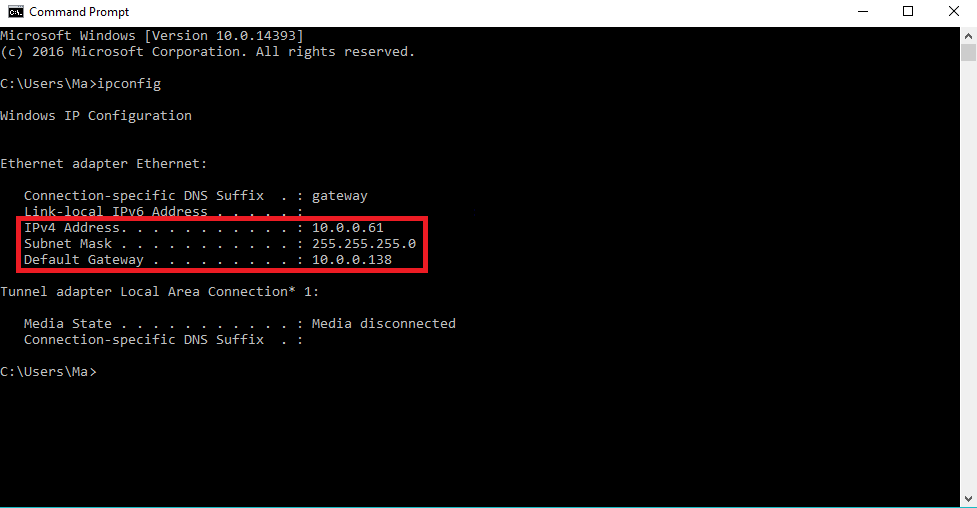
3. Once it opens, enter the command ipconfig and take a screenshot or copy the information as below. We require the IP address, Subnet Mask and Default Gateway.
4. A screenshot can be taken by pressing the Windows + Shift + S keys simultaneously, then paste it into a document/email with Ctrl + V
Finding Available IP Addresses
If you wish to connect devices to the network for remote access, you must give each device an IP address, within your network range. In this example, we will be using a Windows computer which is connected to a modem to find the IP address of the computer, and available IP addresses to use for the devices. If the devices are being installed on a business or managed network, contact an IT representative for assistance.
1. Connect a Windows PC / Laptop, open the start menu and type cmd.
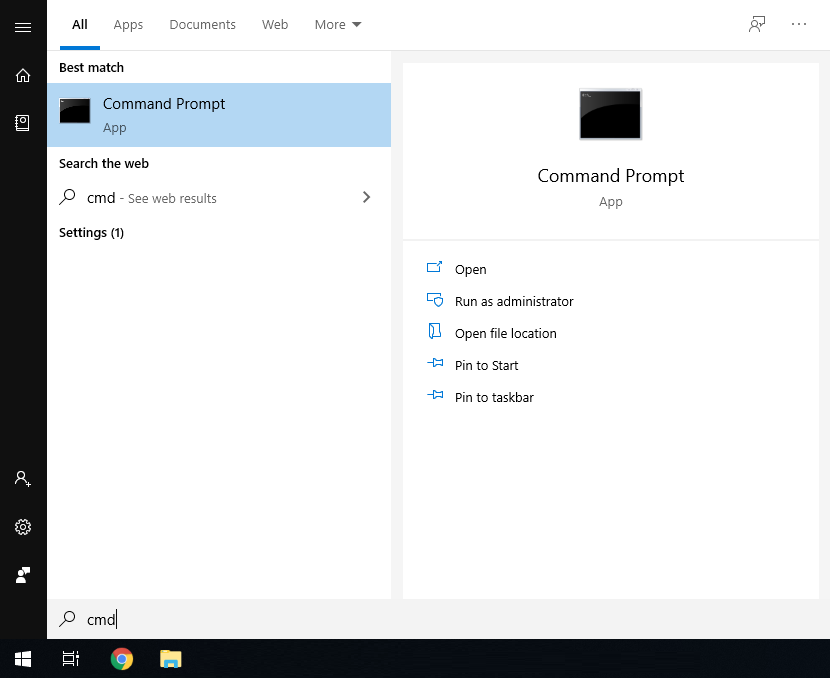
2. Launch the Command Prompt program.
3. Once it opens, enter the command ipconfig and take a screenshot or copy the information as below. Note down the IP Address, Subnet Mask and Default Gateway.
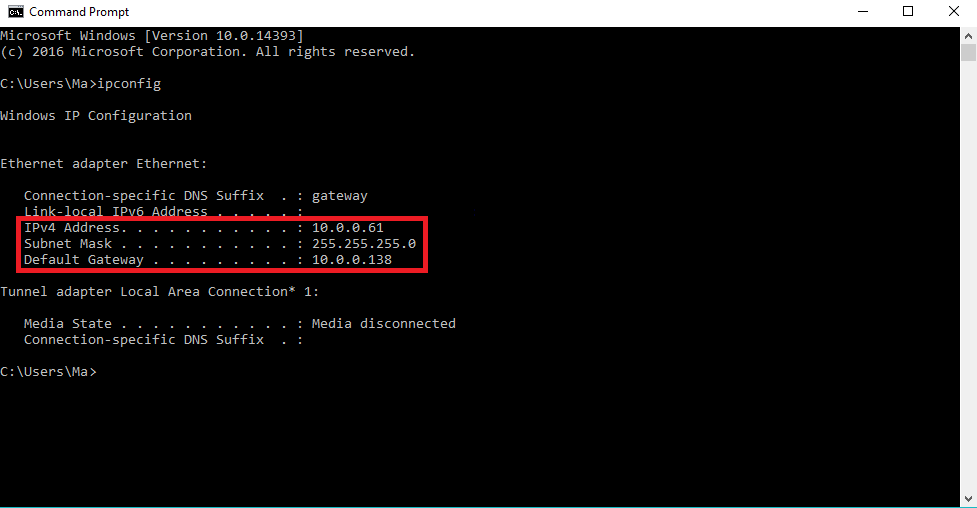
4. In our example, the IP address is 10.0.0.61. To check what IP address is available, type ping 10.0.0.XXX, where XXX is any number between 2 and 254. If Destination host unreachable or Request timed out is show on screen, there is no device using that IP address. Repeat the process to find multiple IP addresses that are available for use. Every devices requires one IP address. 10.0.0.XXX is used as an example, you the IP Address range will vary depending on the network.

5. When configuring the devices, use the IP addresses that you have found that are available, making sure each device has a unique IP address. The Subnet Mask and Default Gateway, will be set the same on each device.
MAC OSX
Finding the IP Range of a Network
This is useful if you are unsure what the network details are, or if you have requested pre-programming. When pre-programming devices, we require these details.
1. Open the Apple Menu ( ) and select System Preferences.
2. Select the Network option.
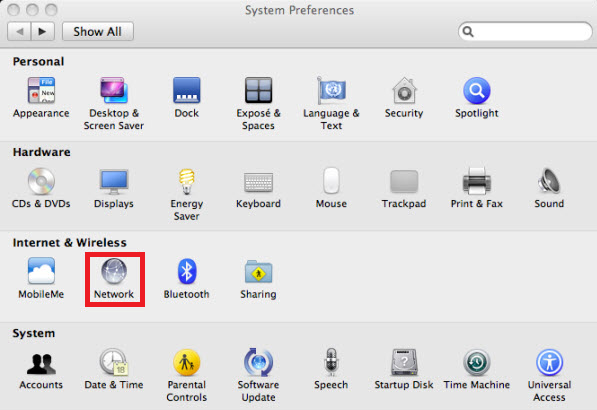
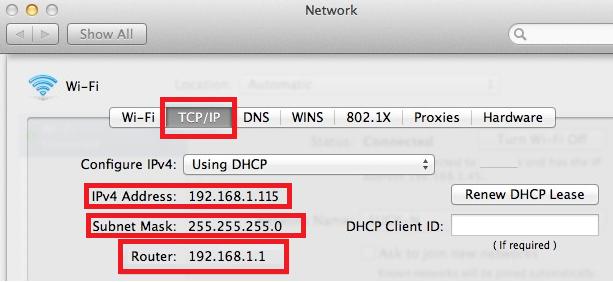
3. Select either Ethernet (for wired connections) or Wi-Fi (for wireless connections), then select advanced.
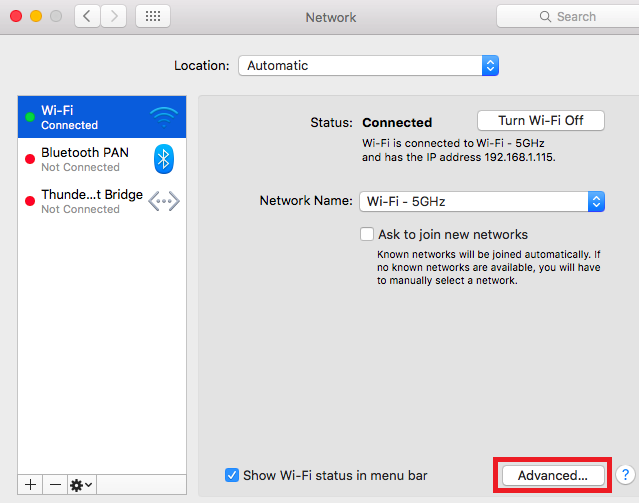
4. Select TCP/IP. The details in red are the network details.
5. A screenshot can be taken by pressing the Command + Shift + 3 keys simultaneously. The screenshot will be saved to the desktop
Finding Available IP Addresses
If you wish to connect devices to the network for remote access, you must give each device an IP address, within your network range. In this example, we will be using a Apple Mac which is connected to a modem to find the IP address of the computer, and available IP addresses to use for the devices. If the devices are being installed on a business or managed network, contact an IT representative for assistance.
1. Follow the steps for Finding the IP Range of a Network - Mac OSX.
2. Press Command + Space bar keys to bring up spotlight.
3. Type Terminal, and double click on the search result.
4. To check what IP address is available, type ping 192.168.1.XXX, where XXX is any number between 2 and 254. If Request timeout is show on screen, there is no device using that IP address. Repeat the process to find multiple IP addresses that are available for use. Every devices requires one IP address. 192.168.1.XXX is used as an example, you the IP Address range will vary depending on the network.
5. When configuring the devices, use the IP addresses that you have found that are available, making sure each device has a unique IP address. The Subnet Mask and Default Gateway, will be set the same on each device.
Manual Apartment Intercom Setup Steps
Step 1 - Connect the Intercom Equipment
No Network Connectivity (No Phone App)
Using 12VDC and direct connection between the devices with a CAT5 cable. (No network connection)

Network Connectivity (Use with Phone App)
Using a PoE Switch connected to a router OR using 12VDC and an Ethernet switch connected to a modem.
Devices connected to a PoE Switch, then to a modem
 Devices connected to a modem/Ethernet switch, and powered with 12VDC
Step 2 - Configure the Door Station
1. Connect your windows computer to the network switch/modem with a CAT5 cable.
2. Configure your computer to be in the same IP address range as the Door Station.
How to change the IP Address of your computer
Windows 10
- Open Settings.
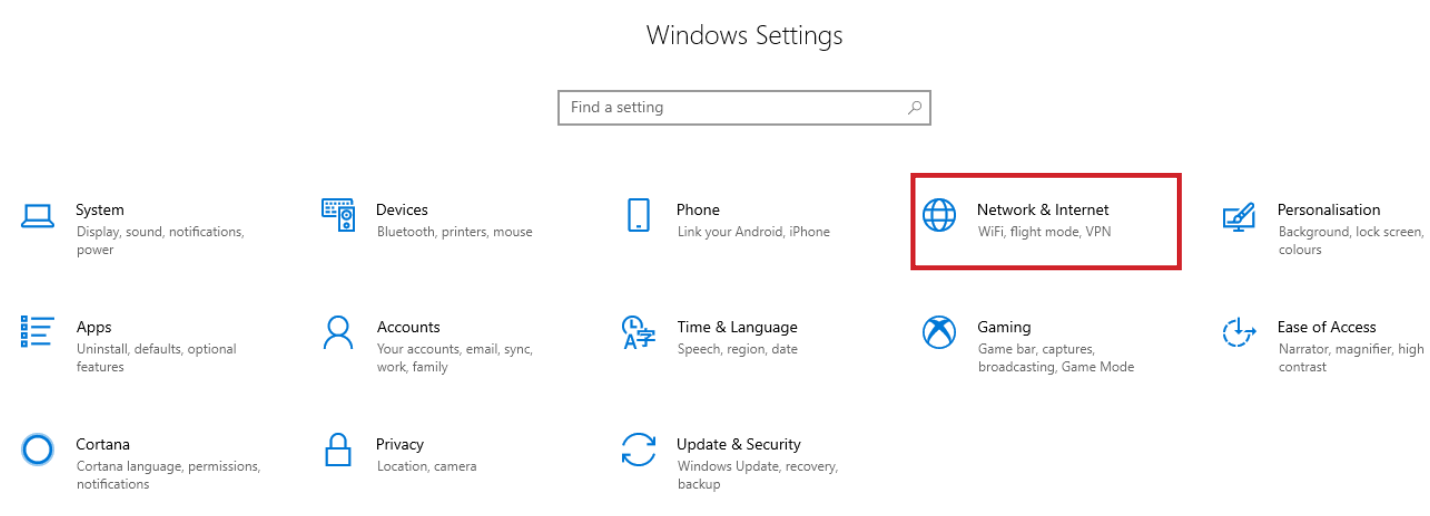
- Select Network & Internet.
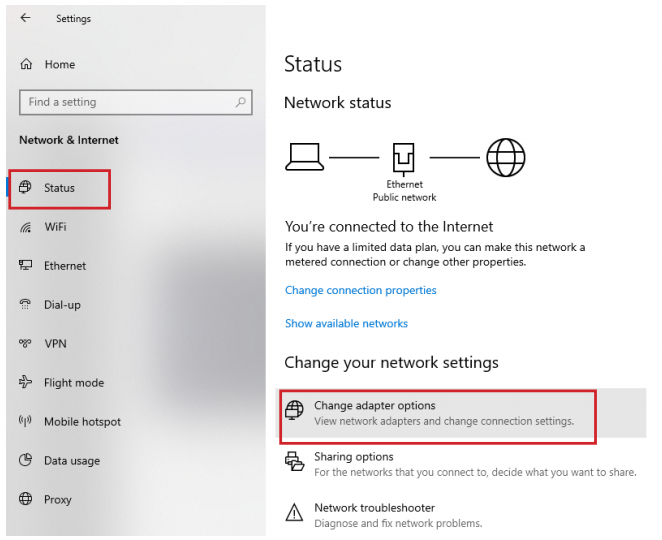
- Select Status, then Change Adapter Options.
-
Right-click the network adapter you want to change the IP address for, and select Properties.

-
Double-click the Internet Protocol Version 4 (TCP/IPv4) item.
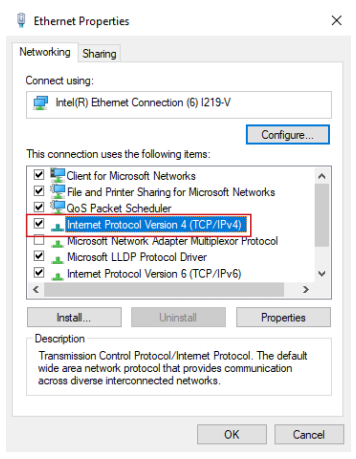
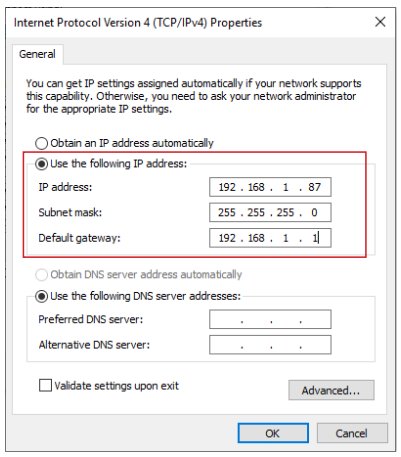
- Click Use the following IP address and enter an IP address in the same range as the device you are trying to access. (E.g when trying to access 192.168.1.108 use a IP address in the 192.168.1.x range.) Note: This cannot be the same as the device you are trying to connect to or any other device on the same network. Save your changes on both windows.
- Type the IP address of the device you are trying to access into the address bar of your web browser.
- Once finished configuring the device, change the adapter settings back to normal by following steps 1-5 and clicking Obtain an IP address automatically.
Windows 11
1. In the Windows search bar at the bottom of the page, type Control Panel and press enter.
2. Select Network and Internet.

3. Select Network and Sharing Centre.

4. Select the link for Connections in the network that you want to change the IP address for.

5. Select Properties.

6. Double-click the Internet Protocol Version 4 (TCP/IPv4) item.

7. Click Use the following IP address and enter an IP address in the same range as the device you are trying to access. (E.g when trying to access 192.168.1.108 use a IP address in the 192.168.1.x range.) Note: This cannot be the same as the device you are trying to connect to or any other device on the same network. Save your changes on both windows.

8. Type the IP address of the device you are trying to access into the address bar of your web browser.
9. Once finished configuring the device, change the adapter settings back to normal by following steps 1-6 and clicking Obtain an IP address automatically.
See the video below for a visual guide of the steps above:
Shortcut
1. In the Windows search bar at the bottom of the page, type Ncpa.cpl and press enter.
2. Right-click the network adapter you want to change the IP address for, and select Properties.
3. Select the Internet Protocol Version 4 (TCP/IPv4) item.

4. Click Use the following IP address and enter an IP address in the same range as the device you are trying to access. (E.g when trying to access 192.168.1.108 use a IP address in the 192.168.1.x range.) Note: This cannot be the same as the device you are trying to connect to or any other device on the same network. Save your changes on both windows.

5. Type the IP address of the device you are trying to access into the address bar of your web browser.
6. Once finished configuring the device, change the adapter settings back to normal by following steps 1-3 and clicking Obtain an IP address automatically.
See the video below for a visual guide of the steps above:
3. Open a web browser (Internet Explorer is recommended) and enter the default IP address of the Door Station (192.168.1.108) into the address bar.
4. You will be prompted to set a password (admin123). Select Next.
5. Tick the check box and enter an email address - this will be used to reset the password if it is ever forgotten. Select Next.
6. Log in to the Door Station. The username is admin and the password is the one set in Step 4.
7. Select Local Setting, then System. Click Sync PC to set the time & date to that of your computer. Enable and set DST if you are in a location that has daylight savings.
NOTE: Ensure the time & date is set correctly, otherwise you may be unable to add the device to the phone app.
8. Select Network Setting.
9. Set the IP Address, Subnet Mask and Gateway to suit your network. If no remote connection is required, use the example in the table above. Select Save. The Door Station will reboot.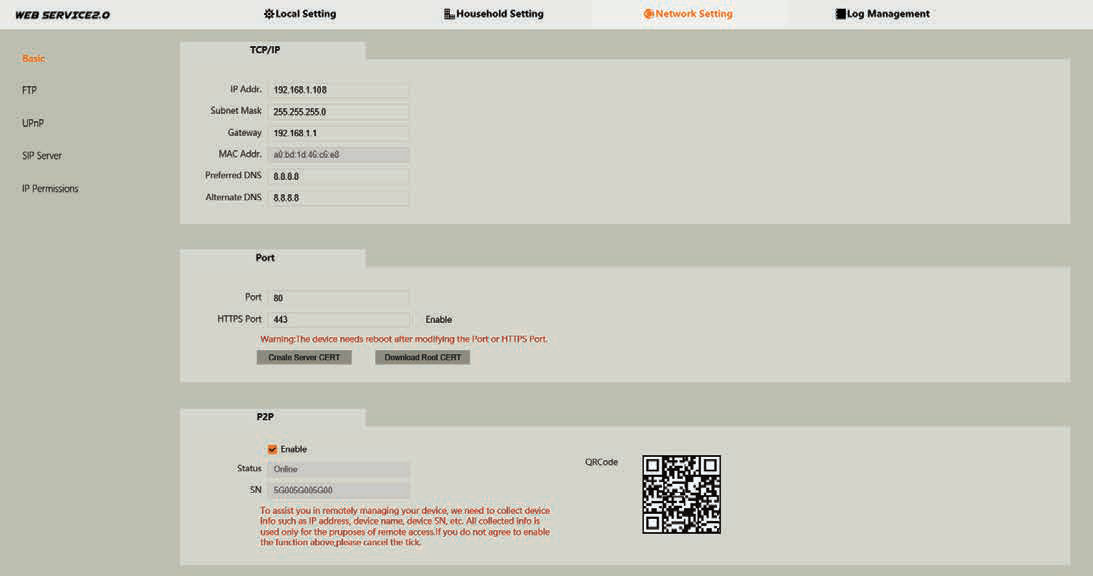
10. Open a web browser and log back into the Door Station and select Household Setting, then Room Number Management. Delete any existing rooms.
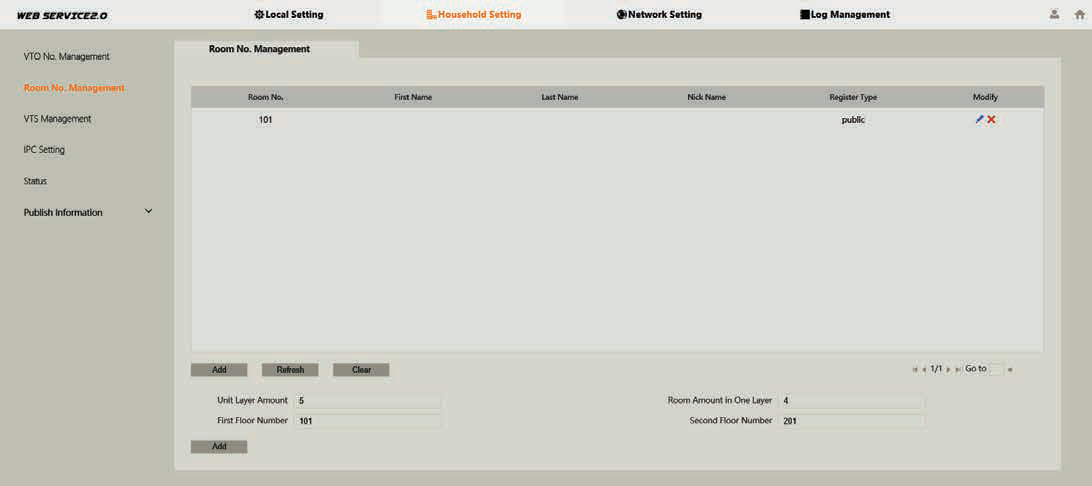
11. In this example we are adding two Indoor Monitors, with Room numbers 1 & 2. Select the Add button and set Room No. to 1. Select Save. Repeat this step for the second monitor with Room No. 2. You should now have both monitors added to the list.

Step 3 - Configure the Monitor
- If prompted to choose Apartment or Villa, select Villa, then select OK. Press Quit to exit One-key configuration. If not prompted, proceed to the next step.
- Initialise the Indoor Monitor, by entering a 6 digit password (888888) and email. Select OK.
- If prompted with Do you want to do quick configuration?, Select Cancel. You will then be on the Main Menu.

- Press and hold down the Settings button - after 6 seconds, a prompt will appear. Enter your password (888888), then select OK.
- Select Network and set the IP Address, Subnet Mask and Gateway to suit your network, or, if no remote connection is required, use the example in the table above.

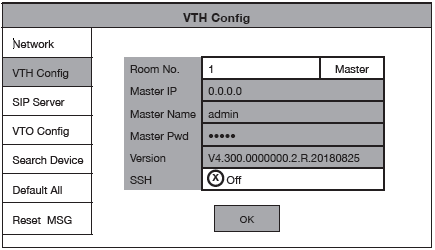
- Select VTH Config and set the Room No. to 1. Ensure Master is selected. Select OK.
- Select SIP Server and set the Server IP, User Name and Login Pwd. These will be the IP Address, username and password of the Door Station (192.168.1.108, admin, admin123). Do not modify the register password (123456 by default). Select OK.

- Select VTO Config. Set the Main_VTO Name to an easily identified name for the door (e.g Gate or Doorbell). Set the VTO IP Address, User Name and Password. These will be the IP Address, Username and Password of the Door Station (192.168.1.108, admin, admin123). Turn the EnableStatus button OFF then ON to save the settings. Ensure it is left in the ON position.

- Allow up to 10 minutes for the Indoor Monitor to connect to the Door Station. Once the “
 ” icon disappears, you can press the call button on the Door Station to test the connection.
Step 4 - Add Additional Monitor(s)
Repeat the below steps for each additional monitor. These steps will allow the additional Monitor(s) to ring when the first Indoor Monitor does.
- If prompted to choose Apartment or Villa, select Villa, then select OK. Press Quit to exit One-key configuration. If not prompted, proceed to the next step.
- Initialise the Indoor Monitor, by entering a 6 digit password (888888) and email. Select OK.
- If prompted with Do you want to do quick configuration?, Select Cancel. You will then be on the Main Menu.

- Press and hold down the Settings button - after 6 seconds, a prompt will appear. Enter your password (888888), then select OK.
- Select Network and set the IP Address, Subnet Mask and Gateway to suit your network, or, if no remote connection is required, use the example in the table above.

- Select VTH Config and set the Room No. to 2. Ensure Master is selected. Select OK.
- Select SIP Server and set the Server IP, User Name and Login Pwd. Select OK.

- Select VTO Config. Set the Main_VTO Name to an easily identified name for the door (e.g Gate or Doorbell). Set the VTO IP Address, User Name and Password. These will be the IP Address, Username and Password of the Door Station (192.168.1.108, admin, admin123). Turn the Enable Status button OFF then ON to save the settings. Ensure it is left in the ON position.

- Allow up to 10 minutes for the Indoor Monitor to connect to the Door Station. Once the “
 ” icon disappears, you can press the call button on the Door Station to test the connection.
Step 5 - Add Additional Door Station(s)
- Configure your computer to be in the same IP address range as the Door Station.
- To avoid IP conflicts, disconnect any existing Door Stations from the network.
- Open a web browser (Internet Explorer is recommended) and enter the default IP address of the Door Station (192.168.1.108) into the address bar.
- You will be prompted to set a password (admin123). Select Next.

- Tick the check box and enter an email address - this will be used to reset the password if it is ever forgotten. Select Next.
- Log in to the Door Station. The username is admin and the password is the one you set for the original Door Station.
- Select Network Settings
- Set the IP Address, Subnet Mask and Gateway. This device will need to be in the same IP address range as the other intercom devices. Press Save. The Door Station will reboot.

- Once it has rebooted, open a web browser and log into the Door Station using the new IP address set in the previous step.
- Select Network Setting, then select SIP Server. Uncheck the Enable box and enter the IP Address, SIP Server
Username and SIP Server Password. This will be the IP address, username and password of the existing Master
Door Station. Do not modify the password field (123456 by default). Select the Save button. The Door Station will
now reboot.
- Once it has rebooted, log back into the Door Station and select Local Settings. Change the VTO No. to one number higher than the existing Door Station, (e.g. 8002). Select the Confirm button to save changes.
- Reconnect the Door Station that was disconnected earlier in Step 2
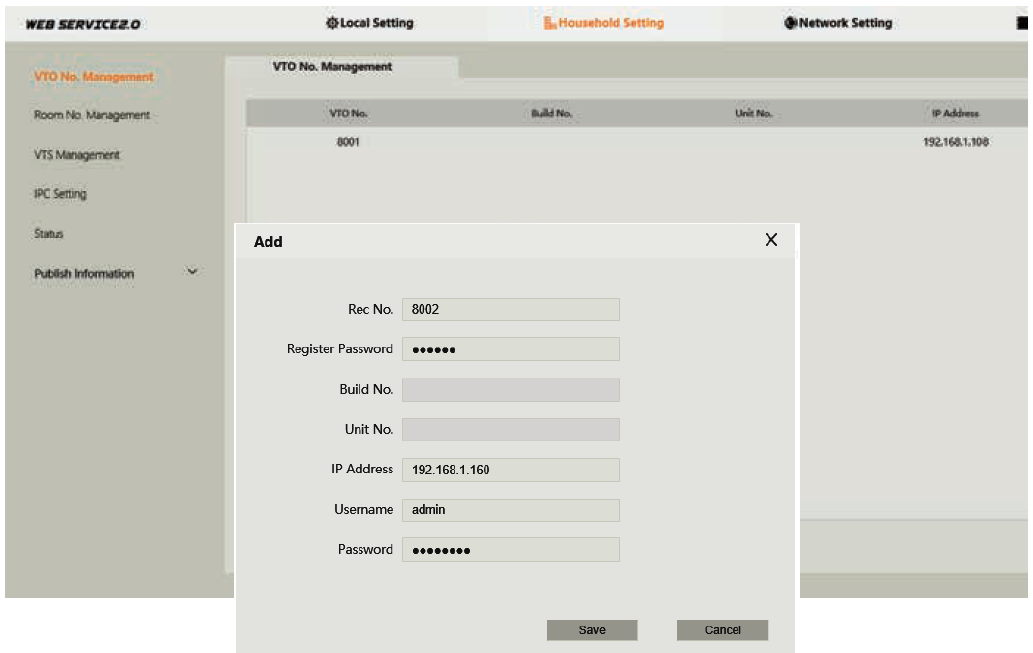
- Log into the Master Door Station and select Household Setting. On the VTO No. Management page, press the Add button.
- Set Rec No. to the VTO number set in Step 11. Set the IP Address, Username, and Password (Set in Steps 4 & 8). Do not modify the Register Password field (123456 by default). Select Save.
- On the Master Indoor Monitor, press and hold down the Settings button - after 6 seconds, a prompt will appear. Enter your password (888888), select OK. You will then be on the Main Menu.
- Select VTO Config. Set the Sub_VTO Name to an easily identified name for the door (e.g Gate or Doorbell). Set the VTO IP Address, UserName and Password. These will be the IP Address, Username and Password of the Door Station (Set in Step 4 & 7). Turn the Enable Status button OFF then ON to save the settings. Ensure it is left in the ON position.
- Allow up to 10 minutes for the Indoor Monitor to connect to the Door Station. Once the “
 ” icon disappears, you can press the call button on the Door Station to test the connection.
Additional Procedure
2-Button & 4-Button Door Stations
When setting up a 2-button or 4-button Door Station, additional setup is required. The button on the Door Station needs to be assigned to a Indoor Monitor.
2-Button & 4-Button Door Station additional configuration
When setting up a 2-button or 4-button Door Station, additional setup is required.
The buttons on the Door Station needs to be assigned to a Indoor Monitor.
- Log into the Door Station’s web interface.
- Select Local Settings.
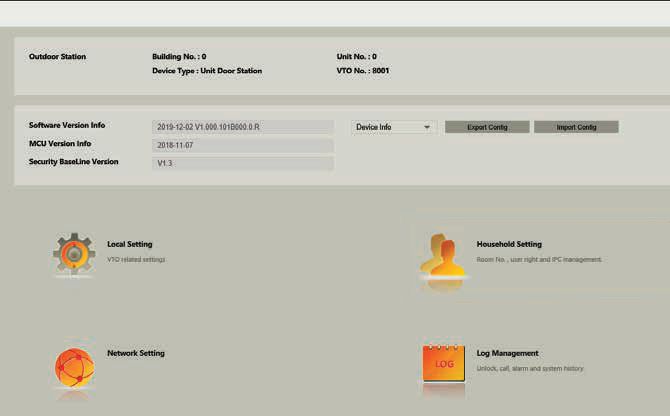
- Set the Count drop down list to the number of buttons your Door Station has.
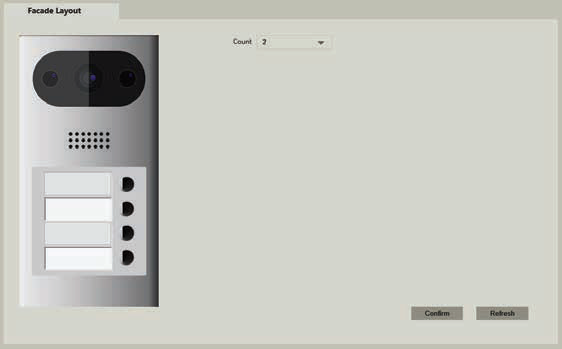
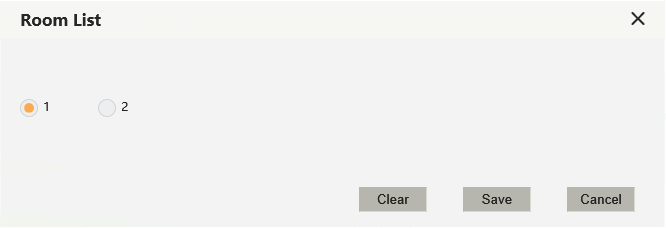
- For each button, click on the white box. In the Room List prompt, select the desired room number for that button from the list and click Save.
- Click Confirm to finish.
Group Calling Monitors
By default the Apartment Door Stations have group call disabled. If you want multiple monitors to ring at once (e.g Two monitors in same apartment) additional setup will be required.
Group Calling Configuration.
When setting up monitors for group call (calling more then one Indoor Monitor at once), additional setup is required.
- Log into the Door Station’s web interface.
- Select Local Settings, then Basic.
- Turn on Group Call.
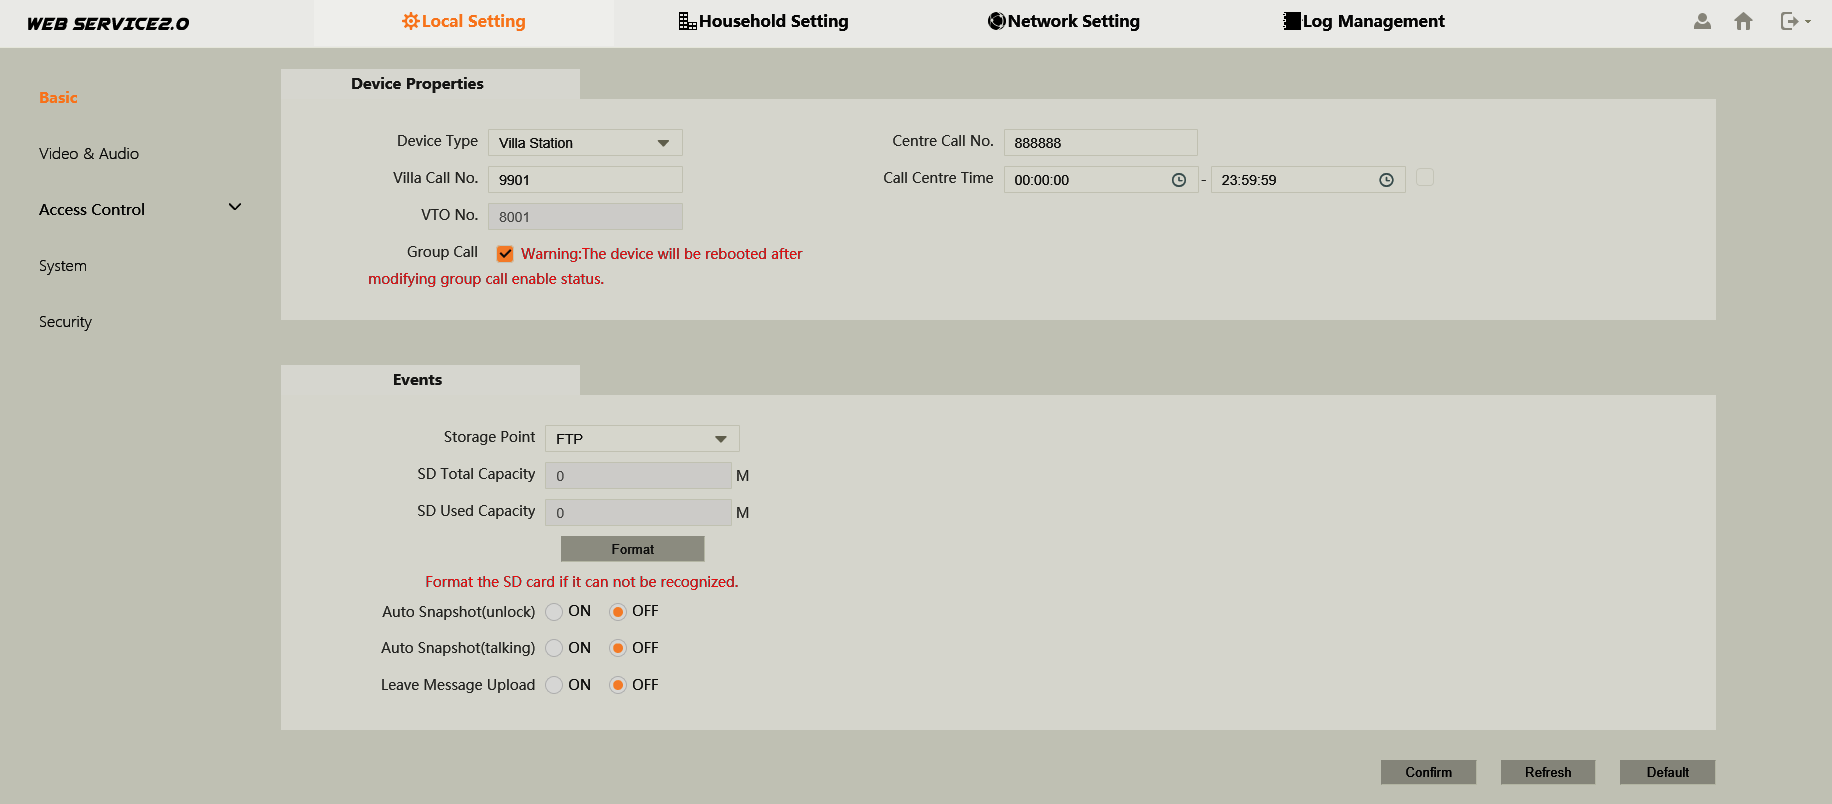
- Reboot the Door Station.
- Log back into the Door Station and select Household Setting, then Room Number Management.

- Add the Room Numbers you wish to call in groups, (e.g. 1#0 & 1#1 is a group of 2 Indoor Monitors, which would both be called when dialing number 1. 2#0, 2#1 & 2#2 is a group of 3 Indoor Monitors that would be called when dialing number 2.)

- Set the room numbers of the Indoor Monitors by following Section 4.2. Ensure that the room ending in #0 is setup as the master monitor.

